
To setup a DMR repeater with MMDVM, often the transceiver used are Motorola. This time, I sought to implement TAIT® branded transceivers also used by professionals. The TM8100 series (TM8105, TM8110, TM8115…) works with MMDVM in both ways, in reception and transmission.
Thanks to this tutorial, you are invited to realize the settings of your Tait® transceivers. In my case, I use TM8110 UHF 10 channels. Let’s see this in a few steps.
Connection
First of all the rear socket of the station is a female DB15 socket. We will exploit these 5 pins which will be connected on the filtering MMDVM shield (Arduino Due ou STM32):
- 6 RSSI (optionnal for RX way)
- 7 Audio Input (TX way)
- 12 PTT* (TX way)
- 13 Audio Output (RX way)
- 15 Ground
The PTT pin will be configured as alternate output with the Tait programming application.

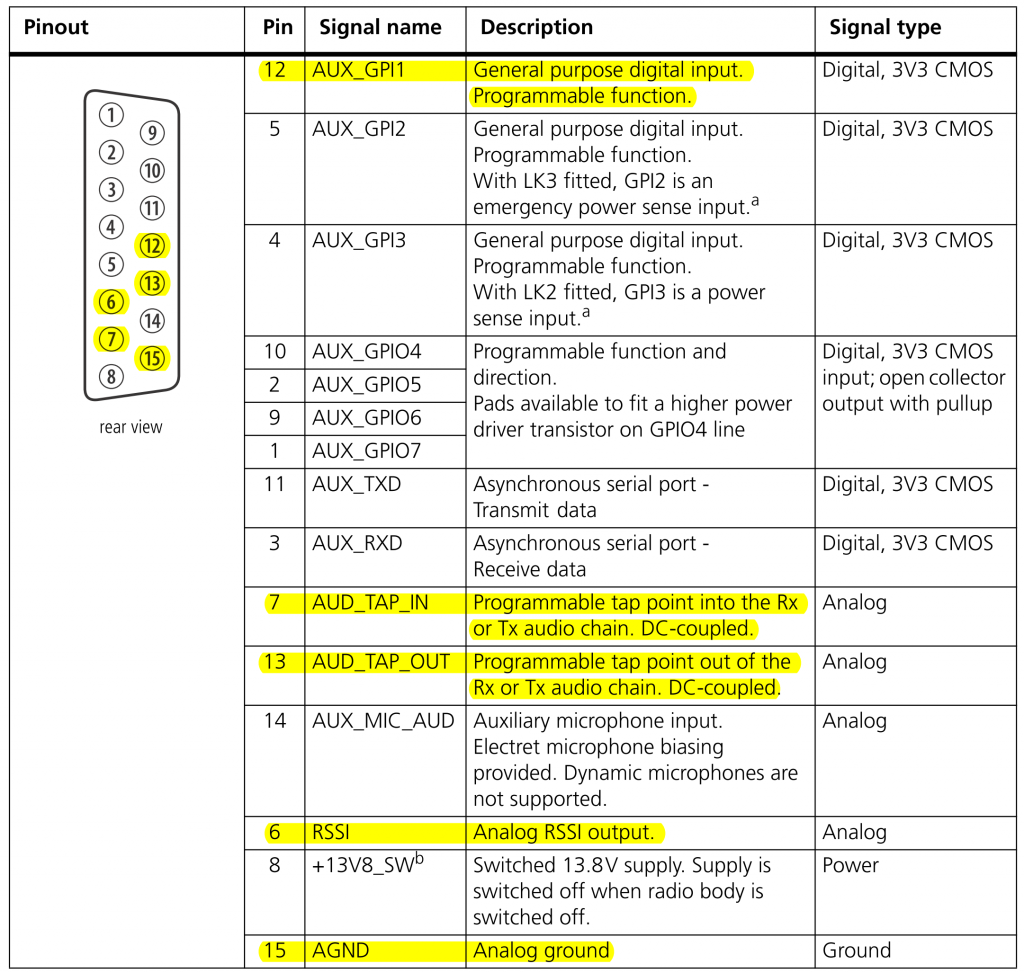
TAIT TM8100 rear connector
Tait® Transceiver Settings
The configuration of the two transceivers (transmitter and receiver of the MMDVM repeater) can be the same programming.
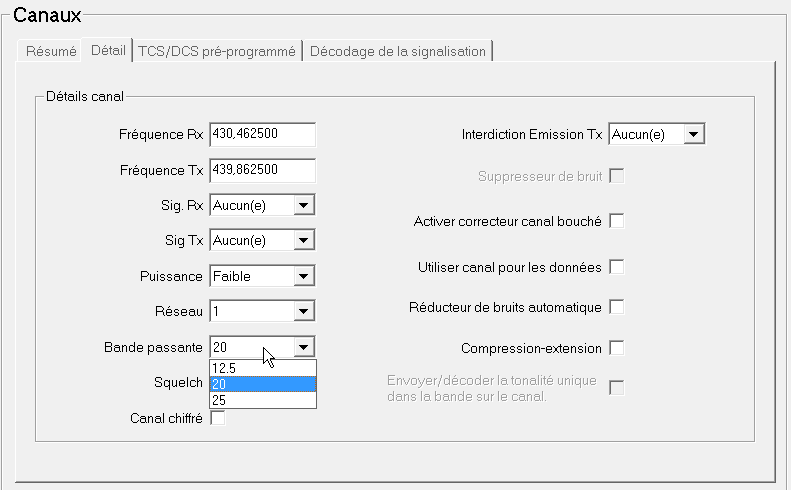
Receiving/transmining channel
Using the Tait® programming application, we define a channel corresponding to the frequencies of the repeater (Channel Configuration menu). The receive bandwidth must be set to 12.5 (advised by Adrian) or 20 kHz.

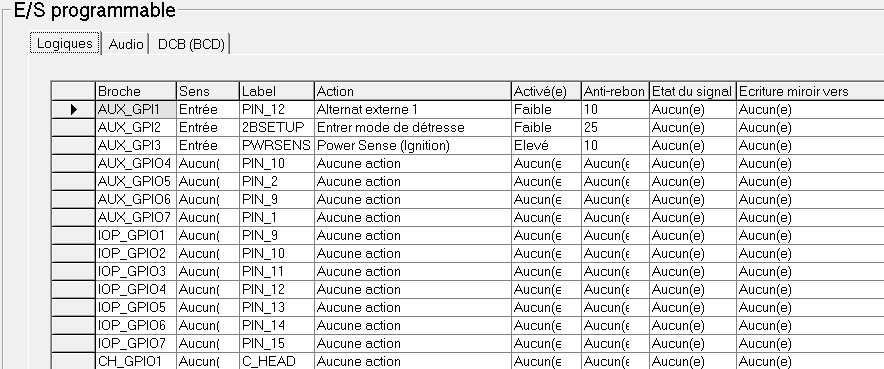
Inputs and outputs programming
In order for the pin 12 assigned to the PTT to be configured, we program in the Tait® software (programmable I/O part) that the AUX_GPI1 pin is an input channel with an external alternate 1.

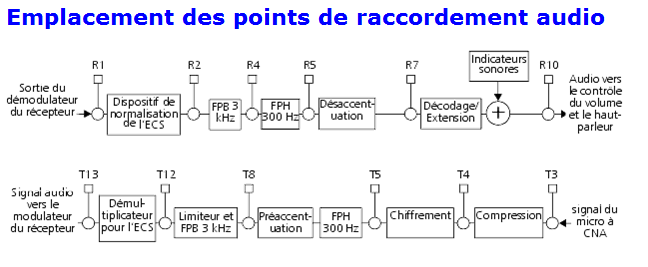
On the Audio tab, you must set Rx (which is the audio signal received by the transceiver) to an audio output point on R2.
For the EPPT1 row (corresponding to transmitted signal), the input point must be set to T13.


Réglage des voies Audio entrée et sortie du poste TAIT® TM8100
Here are the locations of the R2 and T13 points highlighted in the audio diagram.

![]()
ECS : peak excursion
FPB : low-pass filter
FPH : high-pass filter
CNA : automatic level control

Load both receiver and transmitter TAIT® TM8100 with the same configuration.
For those who might be interested, here is the Tait codeplug that I used for this tutorial : TM8110 Codeplug MMDVM DMR
MMDVM Tuning for DMR mode
The two transceivers are now configured and connected to the MMDVM board. We will realize the MMDVM setting using the MMDVMCal software. This part is developed more precisely in my article Install MMDVMHost on Raspberry Pi and tuning MMDVM for DMR digital mode
For the adjustment of the DMR emission, the potentiometer must be set to a high limit stop and thus passing so that the entire LF signal is transmitted to the transmitter without loss.
Run MMDVMCal
sudo /opt/MMDCal/MMDVMCal /dev/ttyACM0
Go to DMR deviation mode, by pressing D key (D uppercase).
Transmit (space bar) and control the transmisting spectrum. In my case, I use an SDR key to display the dynamic spectrum. Decrease the modulation amplitude until the central line disappears. I expect in my case 29%.
Exit the software with the Q key
Setting MMDVM.ini
It remains for us to configure the file MMDVM.ini
sudo nano /opt/MMDVMHost/MMDVM.ini
In the Modem section, we need to change these parameters for Tait® TM8100:
- TxInvert and RXInvert are set to 1
- DMRDelay is fixed to 90
- TXLevel is set to 27 (29% finded reduced by 5% – 29 x 0.95 ≅ 27 )
[Modem]
Port=/dev/ttyACM0
#Port=\\.\COM3
TXInvert=1
RXInvert=1
PTTInvert=0
TXDelay=100
DMRDelay=90
RXLevel=85
TXLevel=27
Conclusion
We start MMDVMHost …
sudo /opt/MMDVMHost/MMDVMHost /opt/MMDVMHost/MMDVM.ini
Here is your MMDVM repeater ready to operate with TAIT® transceivers of the TM8100 series. This configuration may well be suitable for other series of the TAIT® brand. Do not hesitate to share your experiences by submitting your comments at the bottom of the page. This can interest other Sysop …