In the following of my pedagogical articles on MMDVM, I offer you this time a tutorial explaining step by step how to add a Nextion (itead) screen on your MMDVM repeater.
Initial programming of the Nextion screen
Software prerequisites
We need to add the serial module to the python language
sudo apt-get install python-serial
Configuring the serial port /dev/ttyAMA0
Disable access to the console via the serial port. (You are logged in by another means).
sudo raspi-config
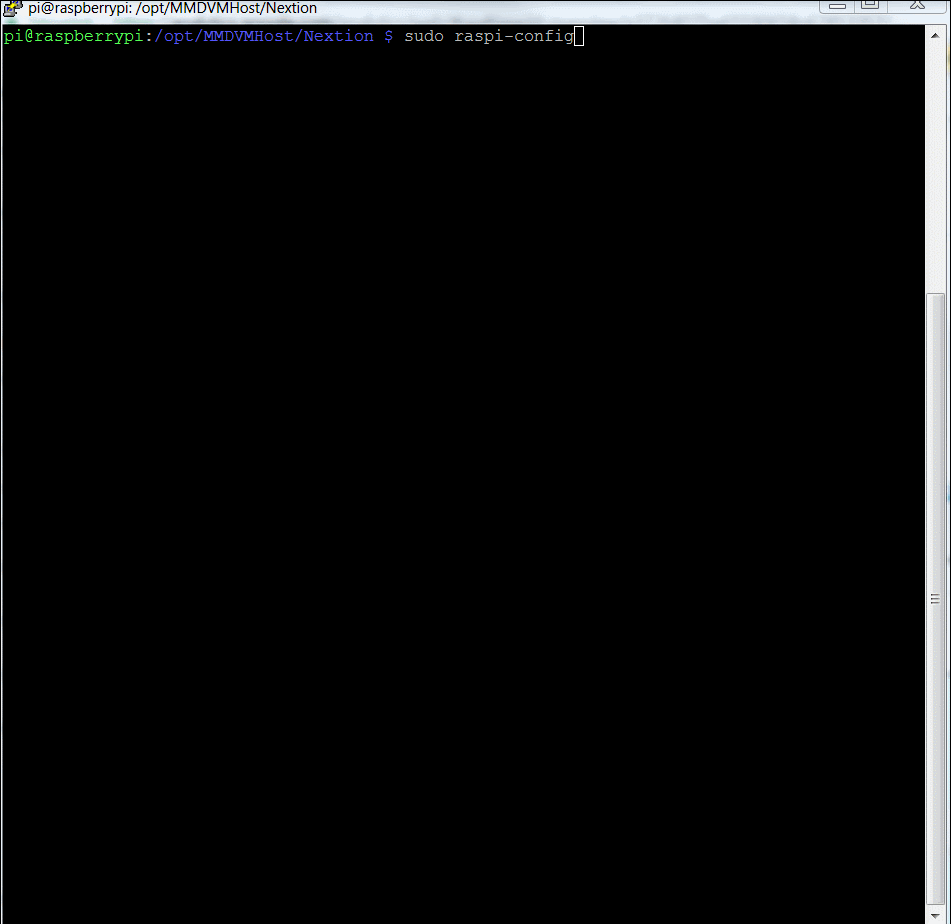
Configure the serial port and restart the Raspberry Pi
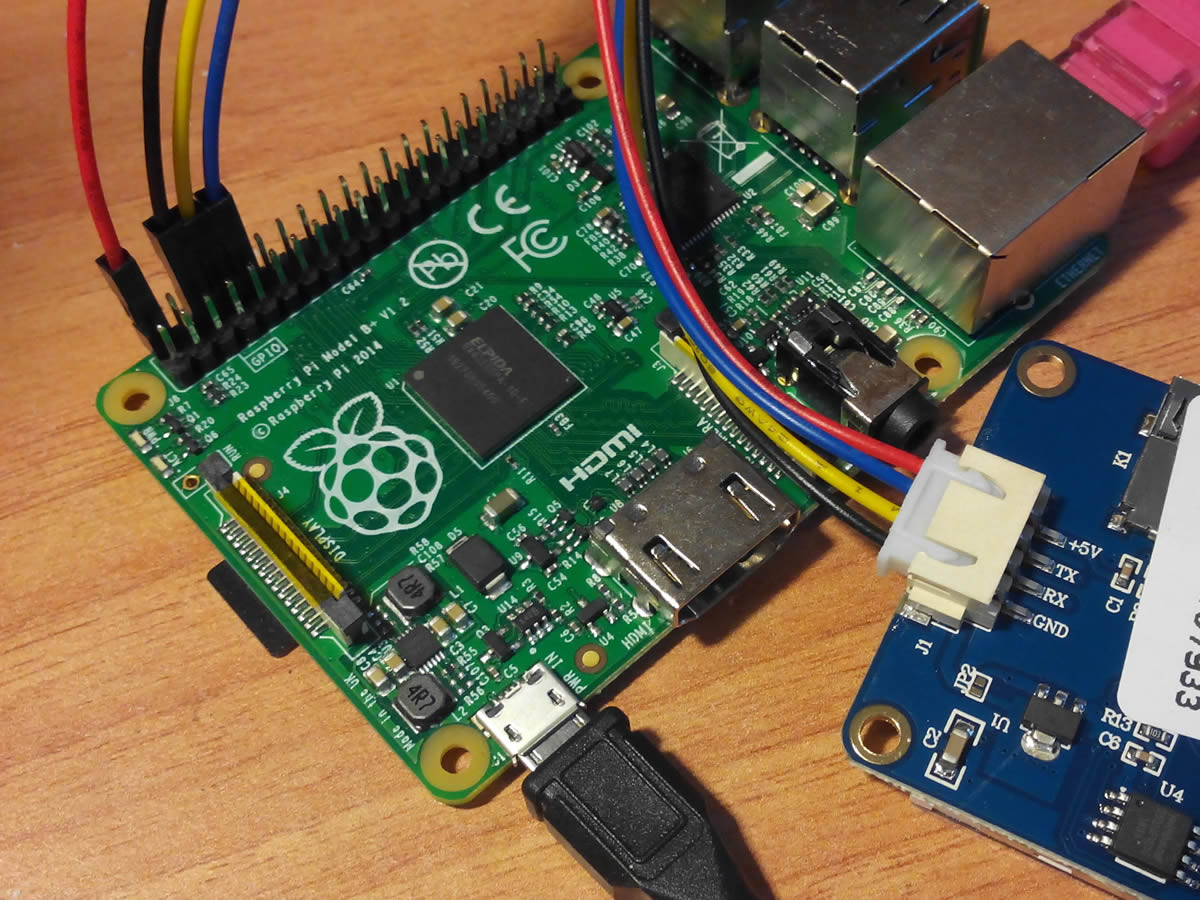
Connecting the Display
The screen must now be connected to the serial port (called UART) of the Raspberry Pi, in order to be able to program it in the next step.
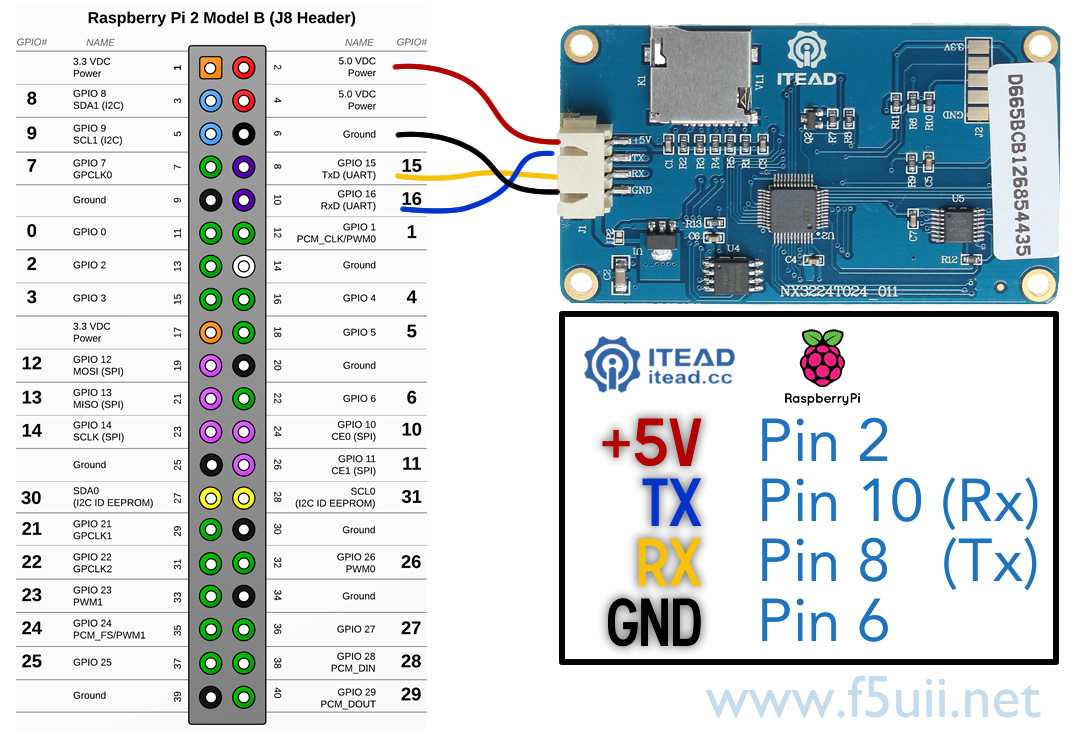
Raspberry Pi (GPIO) wiring to program of Nextion Screen
 Loading the MMDVM firmware on the Nextion screen
First select the file you will load according to your screen. Consult the reference written on the back of your screen. In the case of our example, the screen is labeled NX3224T024_011. We will identify the file name with the following commands
cd /opt/MMDVMHost/Nextion
ls
ls *24T024*
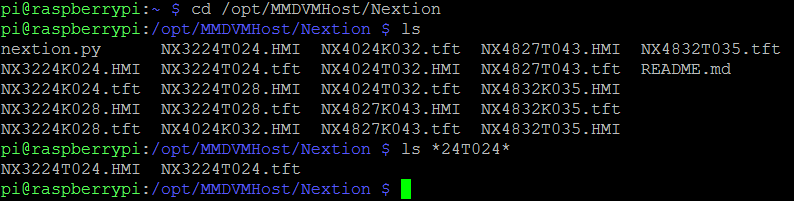
We find two files corresponding to this screen. The .HMI file is the native format. The .tft file is the compiled binary file that will be loaded on the screen in the next step.
We will now load the file with the supplied nextion.py python program. The first parameter is the name of the tft file to load, the second parameter is the target serial port.
sudo python nextion.py NX3224T024.tft /dev/ttyAMA0
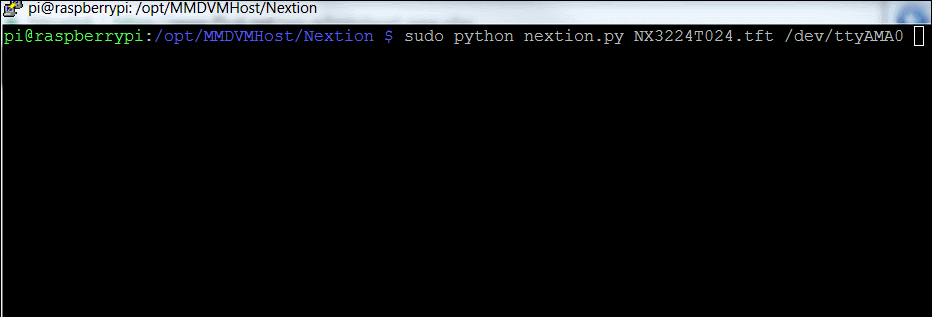
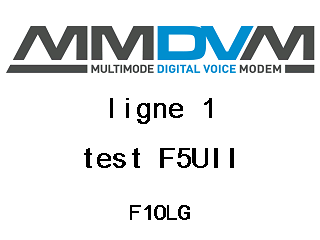
The display lights up. The MMDVM logo appears.
Connecting and configuring MMDVM
Choice of connection
There are two ways to connect your Nextion screen:
- To the Raspberry Pi, connected identically to what was indicated below for the programming part
- To the MMDVM filter card (Arduino or STM32, or other …)
We will explain both ways of proceeding. You have to choose the solution you want to implement
The Nextion screen on Raspberry Pi
We must validate the operation of the screen by modifying the configuration file MMDVM.ini
sudo nano /opt/MMDVMHost/MMDVM.ini
At the beginning of the file, in [General] section we will specify the screen.
[General]
Callsign=F5ZKS
Timeout=600
Duplex=1
# ModeHang=10
RFModeHang=10
NetModeHang=3
Display=Nextion
#Display=None
Daemon=0
And we verify that the [Nextion] section specifies the serial port used
[Nextion]
# Port=modem
Port=/dev/ttyAMA0
Brightness=50
DisplayClock=1
UTC=0
IdleBrightness=20
We save the modified file (Ctrl-X), and Yes
We restart the Raspberry Pi
sudo reboot
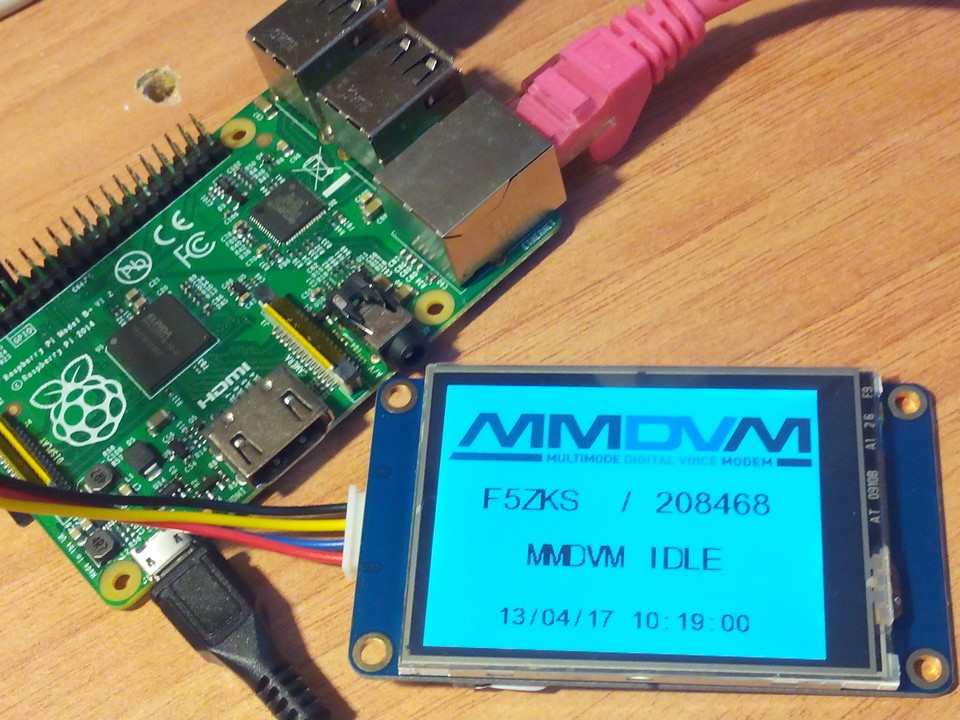
The display lights up and indicates that MMDVM is ready (Idle). The repeater callsign and ID are displayed.
Nextion screen on the MMDVM filtering board
We are now explaining the second way to connect the screen, directly to the MMDVM filtering modem
MMDVM Firmware Configuration
Note that for details on the firmware upgrade process, please refer to MMDVM installation on a STM32F4xx board .
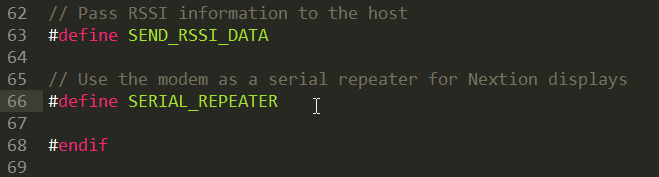
We modify the config.h firmware configuration file, validating the serial port for the Nextion display (SERIAL_REPEATER), at the end of the file.
Then you recompile MMDVM firmware (see “Start compilation” in MMDVM installation on a STM32F4xx board).
We reload the target (with STM32 utility for Nucleo for example, see MMDVM installation on a STM32F4xx board).
Configuring MMDVMHost
We now specify in MMDVM.ini file so that the Nextion screen is connected to the MMDVM modem.
sudo nano /opt/MMDVMHost/MMDVM.ini
[Nextion]
Port=modem
#Port=/dev/ttyAMA0
Brightness=50
DisplayClock=1
UTC=0
IdleBrightness=20
In the [General] section, the screen is specified as Nextion.
[General]
Callsign=F5ZKS
Timeout=600
Duplex=1
# ModeHang=10
RFModeHang=10
NetModeHang=3
Display=Nextion
#Display=None
Daemon=0
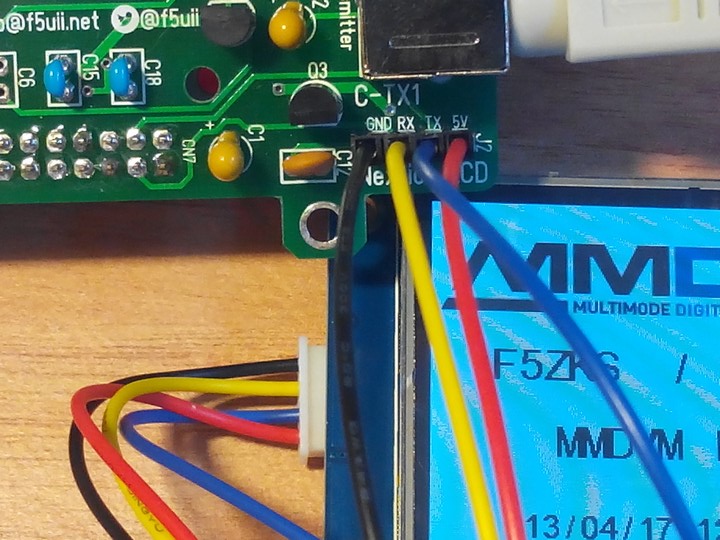
Connecting the display to the MMDVM modem
Plug into the MMDVM Nucleo STM32 shield as shown on the picture below.
We restart the Raspberry Pi
sudo reboot
Your display is operational.
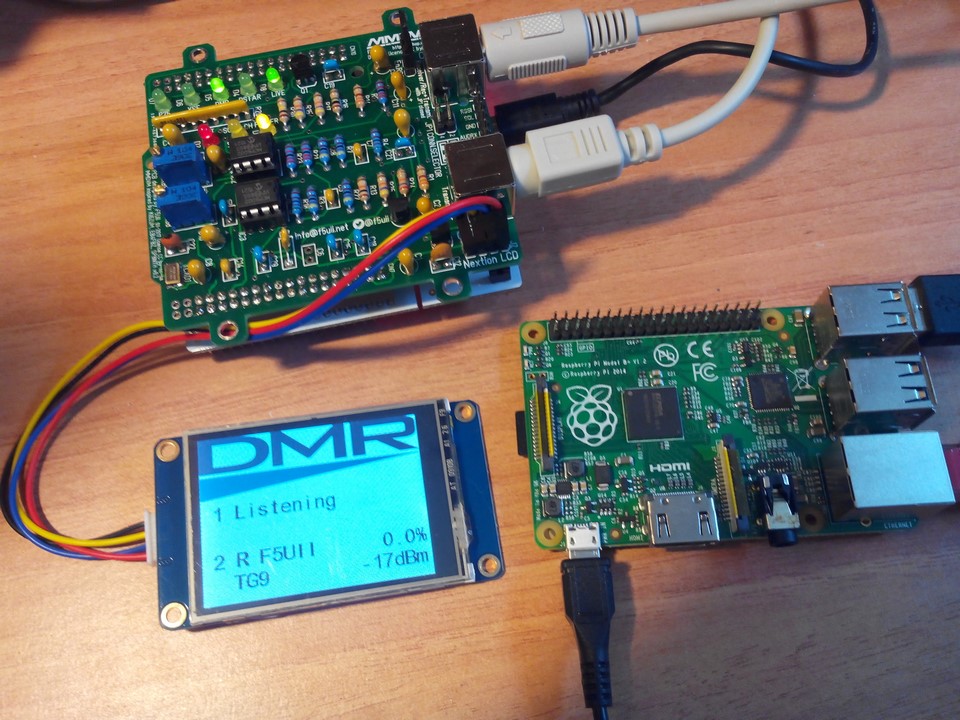
MMDVM modem, on Nucleo STM32F4, iTead Nextion screen and Raspberry Pi
Do not hesitate to use comments to ask some needed help.
Bonjour,
j’utilise le langage Basic Bascom pour Arduino, (un bon vx basic compiler ultra rapide) je voudrais utiliser les écrans Nextion mais je ne trouve nul part la config du port série pour envoyer les commandes.
Pouvez vous me donner les réglages , j’aurais besoin de qq chose comme ça:
Config Com1 = 19200 , Synchrone = 0 , Parity = None , Stopbits = 1 , Databits = 8 , Clockpol = 0
Merci de votre aide
(translation)
Hello,
I use the Basic Bascom language for Arduino, (a good vx basic compiler ultra fast) I would like to use Nextion screens but I can not find the serial port config to send the commands anywhere.
Can you give me the settings, I would need qq something like this:
Config Com1 = 19200, Synchrone = 0, Parity = None, Stopbits = 1, Databits = 8, Clockpol = 0
Thank you for your help
Bonjour Jean-Pierre,
Par défaut l’écran que j’ai utilisé répond à 9600, mais vous pouvez le pousser à 115200 bauds (instruction bauds , voir https://www.itead.cc/wiki/Nextion_Instruction_Set).
A priori, le protocole est 8bits et 1 stop bits, pas de parité (http://support.iteadstudio.com/support/discussions/topics/11000011760).
Bon bricolage
(translation)
Hello Jean-Pierre,
By default the screen I have used works at 9600, but you can push it to 115200 baud (bauds command, see https://www.itead.cc/wiki/Nextion_Instruction_Set).
The protocol must be 8 bits with 1 stop bit, no parity (http://support.iteadstudio.com/support/discussions/topics/11000011760).
Good DIY
Merci pour cette réponse rapide, le site Itead n’est pas très simple à naviguer, quant au forum heureusement que vous m’avez indiquez le lien , j’ai cherché plusieurs heures ce matin…
bref j’hésite encore …
Puis-je encore vous poser qq questions ?
Si je comprends bien, on dessine ses écrans avec l’éditeur, on les envoie vers la carte SD.
– comment se fait le transfert vers la carte SD ? par transfert via un PC ?
puis on discute avec cet écran à travers une connexion rx tx, ça me plait bien car on peut alors utiliser des micro-controleurs très simples genre ATTiny. ou ATMega 328
Visiblement le touch screen se pilote avec un stylet ? on ne peut pas le piloter avec les doigts ?
Merci encore
JP
(Translation)
Thanks for the quick reply, the Itead website is not very easy to navigate, as for the forum fortunately you indicated the link, I searched several hours this morning …
In short I still hesitate …
Can I still ask you questions?
If I understand correctly, we draw its screens with the editor, we send them to the SD card.
– how is the transfer to the SD card? By transfer via a PC?
Then we discuss with this screen through an rx tx connection, I like it very well because you can then use very simple micro-controllers ATTiny type. Or ATMega 328
Obviously the touch screen is pilot with a stylus? We can not control it with your fingers?
thanks again
JP
Oui, sur Carte SD ou bien en mémoire de l’écran directement. Exactement cela, comme cela est décris ici par exemple :https://www.itead.cc/wiki/Nextion_Editor_Quick_Start_Guide
Vous trouverez certainement d’autres exemples d’applications avec ATTiny ou d’autre système. http://fritzing.org/projects/nextion-display
L’écran s’utilise avec les doigts, classiquement.
Bons développements avec les écrans Nextions.
(Translation)
Yes, on SD card or in the screen memory directly. Exactly this way, as described here for example: https: //www.itead.cc/wiki/Nextion_Editor_Quick_Start_Guide
You will certainly find online other examples of applications with ATTiny or other system. http://fritzing.org/projects/nextion-display
The screen is used with the fingers, classically.
Good developments with Nextions screens.
Merci Beaucoup,
J’ai commandé un écran, pour faire les premiers tests, et j’ai enfin compris -enfin un peu mieux- le mécanisme du site
Itead, avec le “wiki”. je suis client chez eux pour mes propres CI de bonne qualité.
A plus tard avec des résultats…. j’espère.
Jean-Pierre
(translation)
Thank you very much,
I ordered a display, to do the first tests, and I finally understood – finally a little better – the mechanism of the site
Itead, with the “wiki”. I am a customer of Itead for my own PCB (good quality).
Soon, with results …. I hope.
Jean Pierre
Bonjour,
Si l’afficheur Nextion est connecté avec un adaptateur série cela devient /dev/ttyUSB0
Bonne journée Patrick ON5AV
(Translation)
Hello,
If the Nextion display is connected with a serial adapter this becomes / dev / ttyUSB0
Have a nice day Patrick ON5AV
Bonjour
je souhaiterais savoir si il était possible d’extraire la programmation faite sur un écran afin de pouvoir le remplacer
sur une de mes imprimante 3D il y a un écran nextion que j’ai cassé et souhaiterais le remplacer et le fabricant de l”imprimante me demande 320€ hors frais de transport
Merci d’avance
(Translation)
Hello
I would like to know if it was possible to extract the program made on a display in order to be able to replace it
On one of my 3D printer there is an nextion display that I have break and would like to replace it and the manufacturer of the printer asks me 320 € excluding transport costs
Thank you in advance
Davy,
Non, le logiciel Nextion ne dispose pas de possibilité de relire la configuration d’un écran Nextion. Vérifier quand même qu’il n’y a pas de carte micro SD installée à l’arrière de l’écran, et qui contiendrait le programme.
Pour reprogrammer, il vous faut charger avec le logiciel Nextion le programme que vous pourriez recevoir de votre fabricant. Le fichier que vous lui demanderiez est le fichier à extension HMI.
Je doute qu’il veuille vous le communiquer. Qui ne demande rien n’a rien !
(Translation)
Davy
No, the Nextion software does not have the ability to re-read the configuration of a Nextion screen. Check that there is no micro SD card installed at the back of the screen, and that would contain the program.
To reprogram, you need to load with the Nextion software the program you may receive from your manufacturer. The file you would require is the HMI file.
I doubt he will let you know. Who asks nothing has nothing!
Ok merci pour la réponse rapide
(Translation)
Thanks for the quick reply
Where do i find the file
nextion.py? And could you update your story to the latest raspberry version including python 3 ?Merci beaucoupErik, PA0ESH
(Traduction)
Où puis-je trouver le fichier
nextion.py? Et pourriez-vous mettre à jour votre histoire avec la dernière version raspberry incluant python 3 ?Merci beaucoup ?Erik, PA0ESH
Erik,
In MMDVM on Github, just here https://github.com/g4klx/MMDVMHost/blob/master/Nextion_G4KLX/nextion.py
73
(Traduction)
Dans MMDVM sur Github, juste ici https://github.com/g4klx/MMDVMHost/blob/master/Nextion_G4KLX/nextion.py
73
Thanks for your reply. In the meantime i also discovered that using the ON7LDS Nextion driver with pistar, there are still some issues. In short, i expect the Read Only situation to influence the proper working. It does not start by itsself and you have to give a additional command regularly to the screen, whichever command you like. I used the visibility command of a text element on screen 0 from a stand alone programme in python (called startup.py) , which runs once an hour from a cronjob to keep everything up and working.
import serialser = serial.Serial ('/dev/ttyUSB0')
ser.baudrate = 9600
ser.write('vis t0,1\xFF\xFF\xFF')
ser.close()
73’s
Erik
(Traduction)
Merci pour votre réponse. Entre-temps, j’ai également découvert que l’utilisation du pilote ON7LDS Nextion avec pistar, il y a encore quelques problèmes. En bref, je suppose que l’état lecture seule influence le bon fonctionnement. Il ne démarre pas par lui-même et vous devez donner une commande supplémentaire régulièrement à l’écran, quelle que soit la commande que vous demander. J’ai résolu le soucis avec une ommande de visibilité d’un élément texte sur la vue screen0 à partir d’un programme autonome en python (appelé startup.py), qui fonctionne une fois par heure à partir d’un cronjob pour que tout fonctionne.
import serialser = serial.Serial ('/dev/ttyUSB0')
ser.baudrate = 9600
ser.write('vis t0,1\xFF\xFF\xFF')
ser.close()
73’s
Erik
If you are using the RPi3 then the
/dev/ttyAMA0port does not work unless you disable Bluetooth by adding:dtoverlay=pi3-disable-btto the/boot/config.txtand then reboot the Pi.
(Traduction)
Si vous utilisez le RPi3, le port
/dev/ttyAMA0ne fonctionne pas, sauf si vous désactivez Bluetooth en ajoutant :dtoverlay=pi3-disable-btvers le/boot/config.txt.puis redémarrer le Pi.
Thank you Stewart for your contribution.
73 Christian
(Traduction)
Merci Stewart pour votre contribution.
73 Christian
Bonjour
J’utilise un écran Nextion NX3224T024_011 mais le texte dans les champs est déformé et donc illisible. j’ai téléchargé un fichier sur internet suivant une video : https://www.youtube.com/watch?v=TU3ylIPd0a0 . j’utilise la version 0.59 de nextion editor , avez vous une idée ? merci par avance de vos réponses .
(Translation)
Hello
I use a Nextion NX3224T024_011 screen but the text in the fields is distorted and therefore unreadable. I downloaded a file from the internet following a video : https://www.youtube.com/watch?v=TU3ylIPd0a0 . I use version 0.59 of nextion editor , do you have an idea ? thank you in advance for your answers .
Bonjour Thierry,
Le fichier à mettre à charger sur l’écran à utiliser est disponible ici https://github.com/g4klx/MMDVMHost/tree/master/Nextion_G4KLX
sous la référence NX3224T024.tft. VOus n’avez pas besoin de l’éditeur nextion pour charger le fichier sur l’écran
J’ai ouvert le fichier NX3224T024.HMI avec la version 0.59 de Nextion Editeur. Le mode Debug montre bien l’écran et lignes correctement.
Peut être n’avez vous pas sur votre windows les fontes windows.
73
Christian
(Translation)
Hello, Thierry,
The file to be loaded on the screen to be used is available here https://github.com/g4klx/MMDVMHost/tree/master/Nextion_G4KLX.

under the reference NX3224T024.tft. You don’t need the nextion editor to load the file on the screen.
I opened the NX3224T024.HMI file with version 0.59 of Nextion Editor. The Debug mode shows the screen and lines correctly.
Maybe you don’t have windows fonts on your windows.
73
Christian
I was looking at your instructions for the Nextion 2.4 Display and a MMDVM. My question is about your display. I looked at the Nextion page and they offer two versions of it with the same model number was yours the enhanced or basic?
(Traduction)
Je regardais vos instructions pour l'écran Nextion 2.4 et un MMDVM. Ma question porte sur votre écran. J'ai regardé la page de Nextion et ils en proposent deux versions avec le même numéro de modèle ; le vôtre était-il le modèle amélioré ou de base ?
Hello, Richard,
I certainly use the basic version which is quite sufficient for the expected performance of MMDVM. I invite you to watch this video to discover the differences between the 2 screens Nextion Basic and Enhanced. At your disposal
(Traduction)
Bonjour Richard,
J'utilise certainement la version basic qui est bien suffisante pour les performances attendus pour MMDVM. Je vous invite à visionner cette vidéo pour découvrir les différences entre les 2 écrans Nextion Basic et Enhanced.
A votre service
Interesting post is good article, you have written. There are some posts that touch the mind. Looks very breathtaking