
Intro
After the online resources to mount its full duplex MMDVM digital repeater based on Arduino and Nucleo STM32F4, here is the time to explain how to set up a “homemade” access point (Hotspot) MMDVM based on a few simple elements:
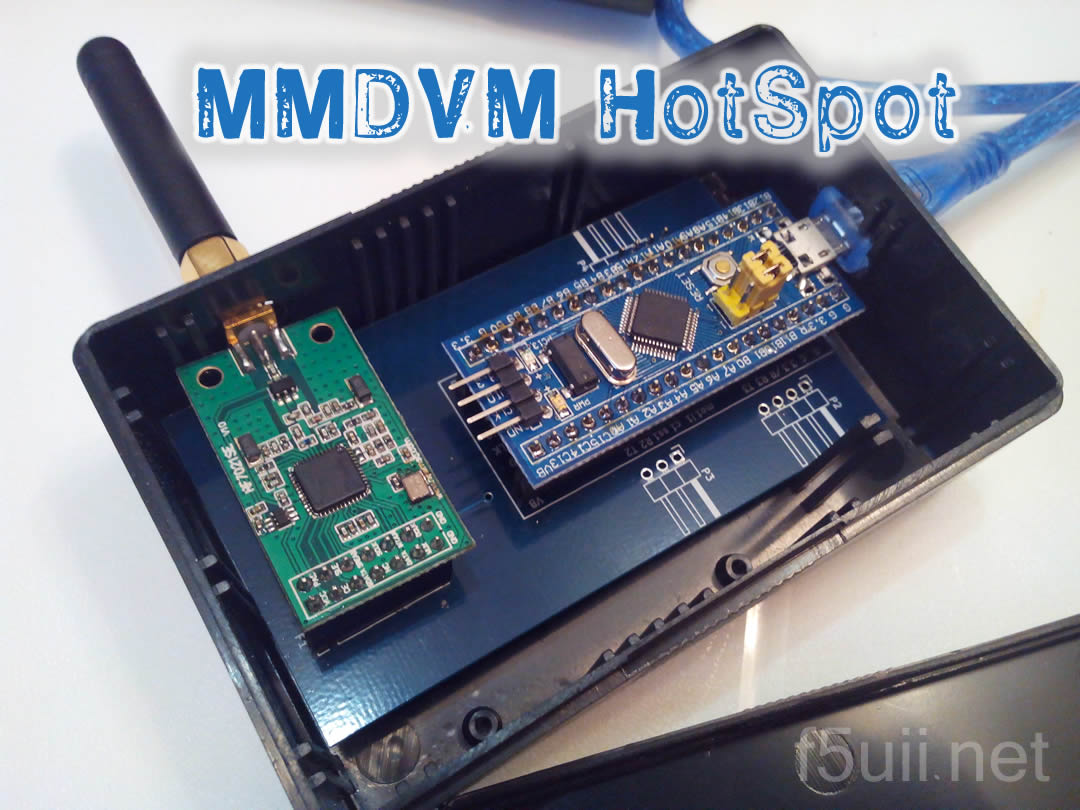
- A “STM32Duino” board based on STM32F103 CPU, which we will program with MMDVM (firmware)
- A RF transmitter/receiver UHF RF7021SE (ADF7021) circuit board providing a few RF milliwatts
- a simple PCB circuit that allows the interconnection of the STM32F103 and RF part
- and always the Raspberry Pi (to host MMDVMHost).
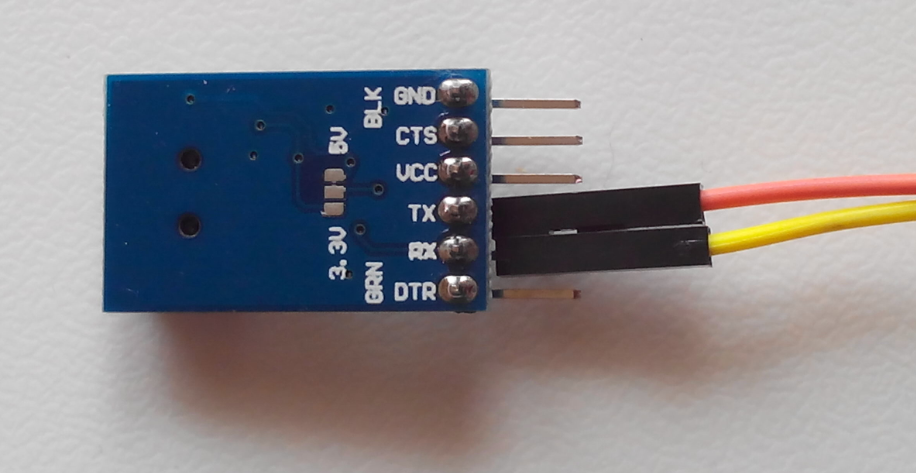
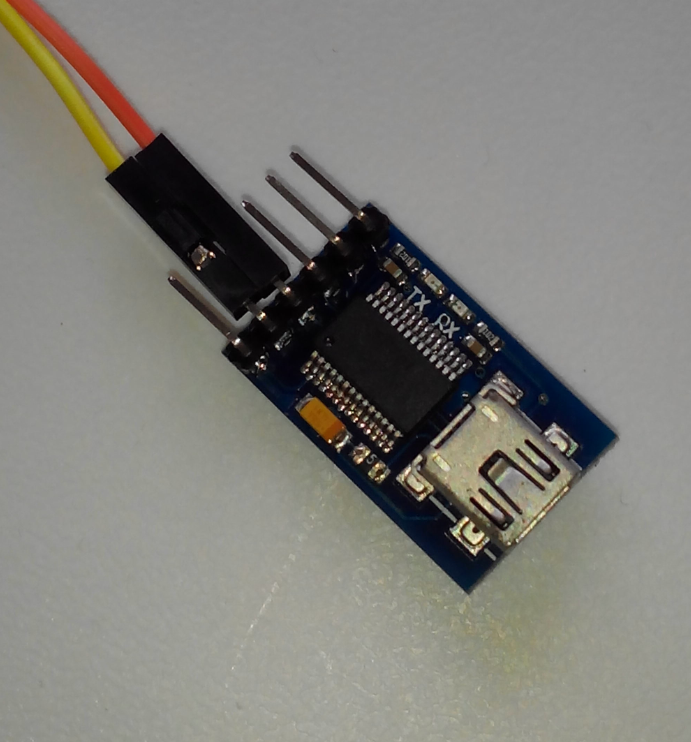
- For firmware loading purposes, a TTL serial USB adapter
The purpose of this article is to guide you step by step through the process of assembling the physical parts and then to explain you the software configuration. We will complete the installation with a user-friendly Wifi connection management software (RaspAp).

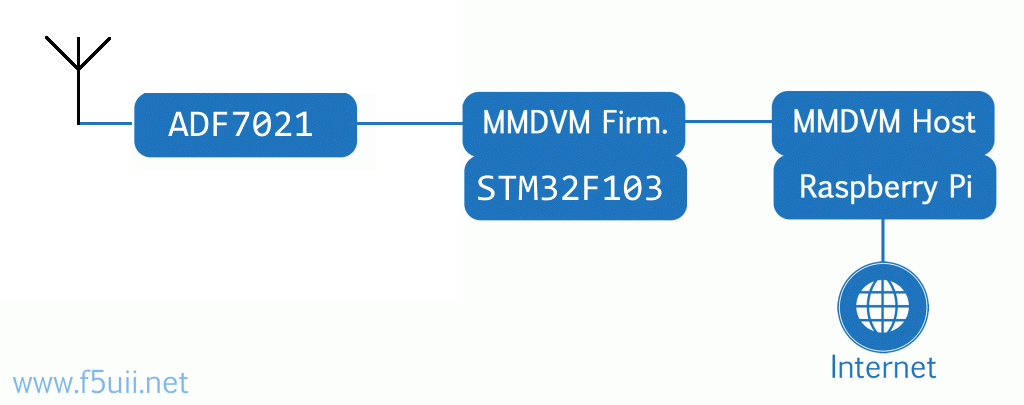
Synoptic view of MMDVM HotSpot
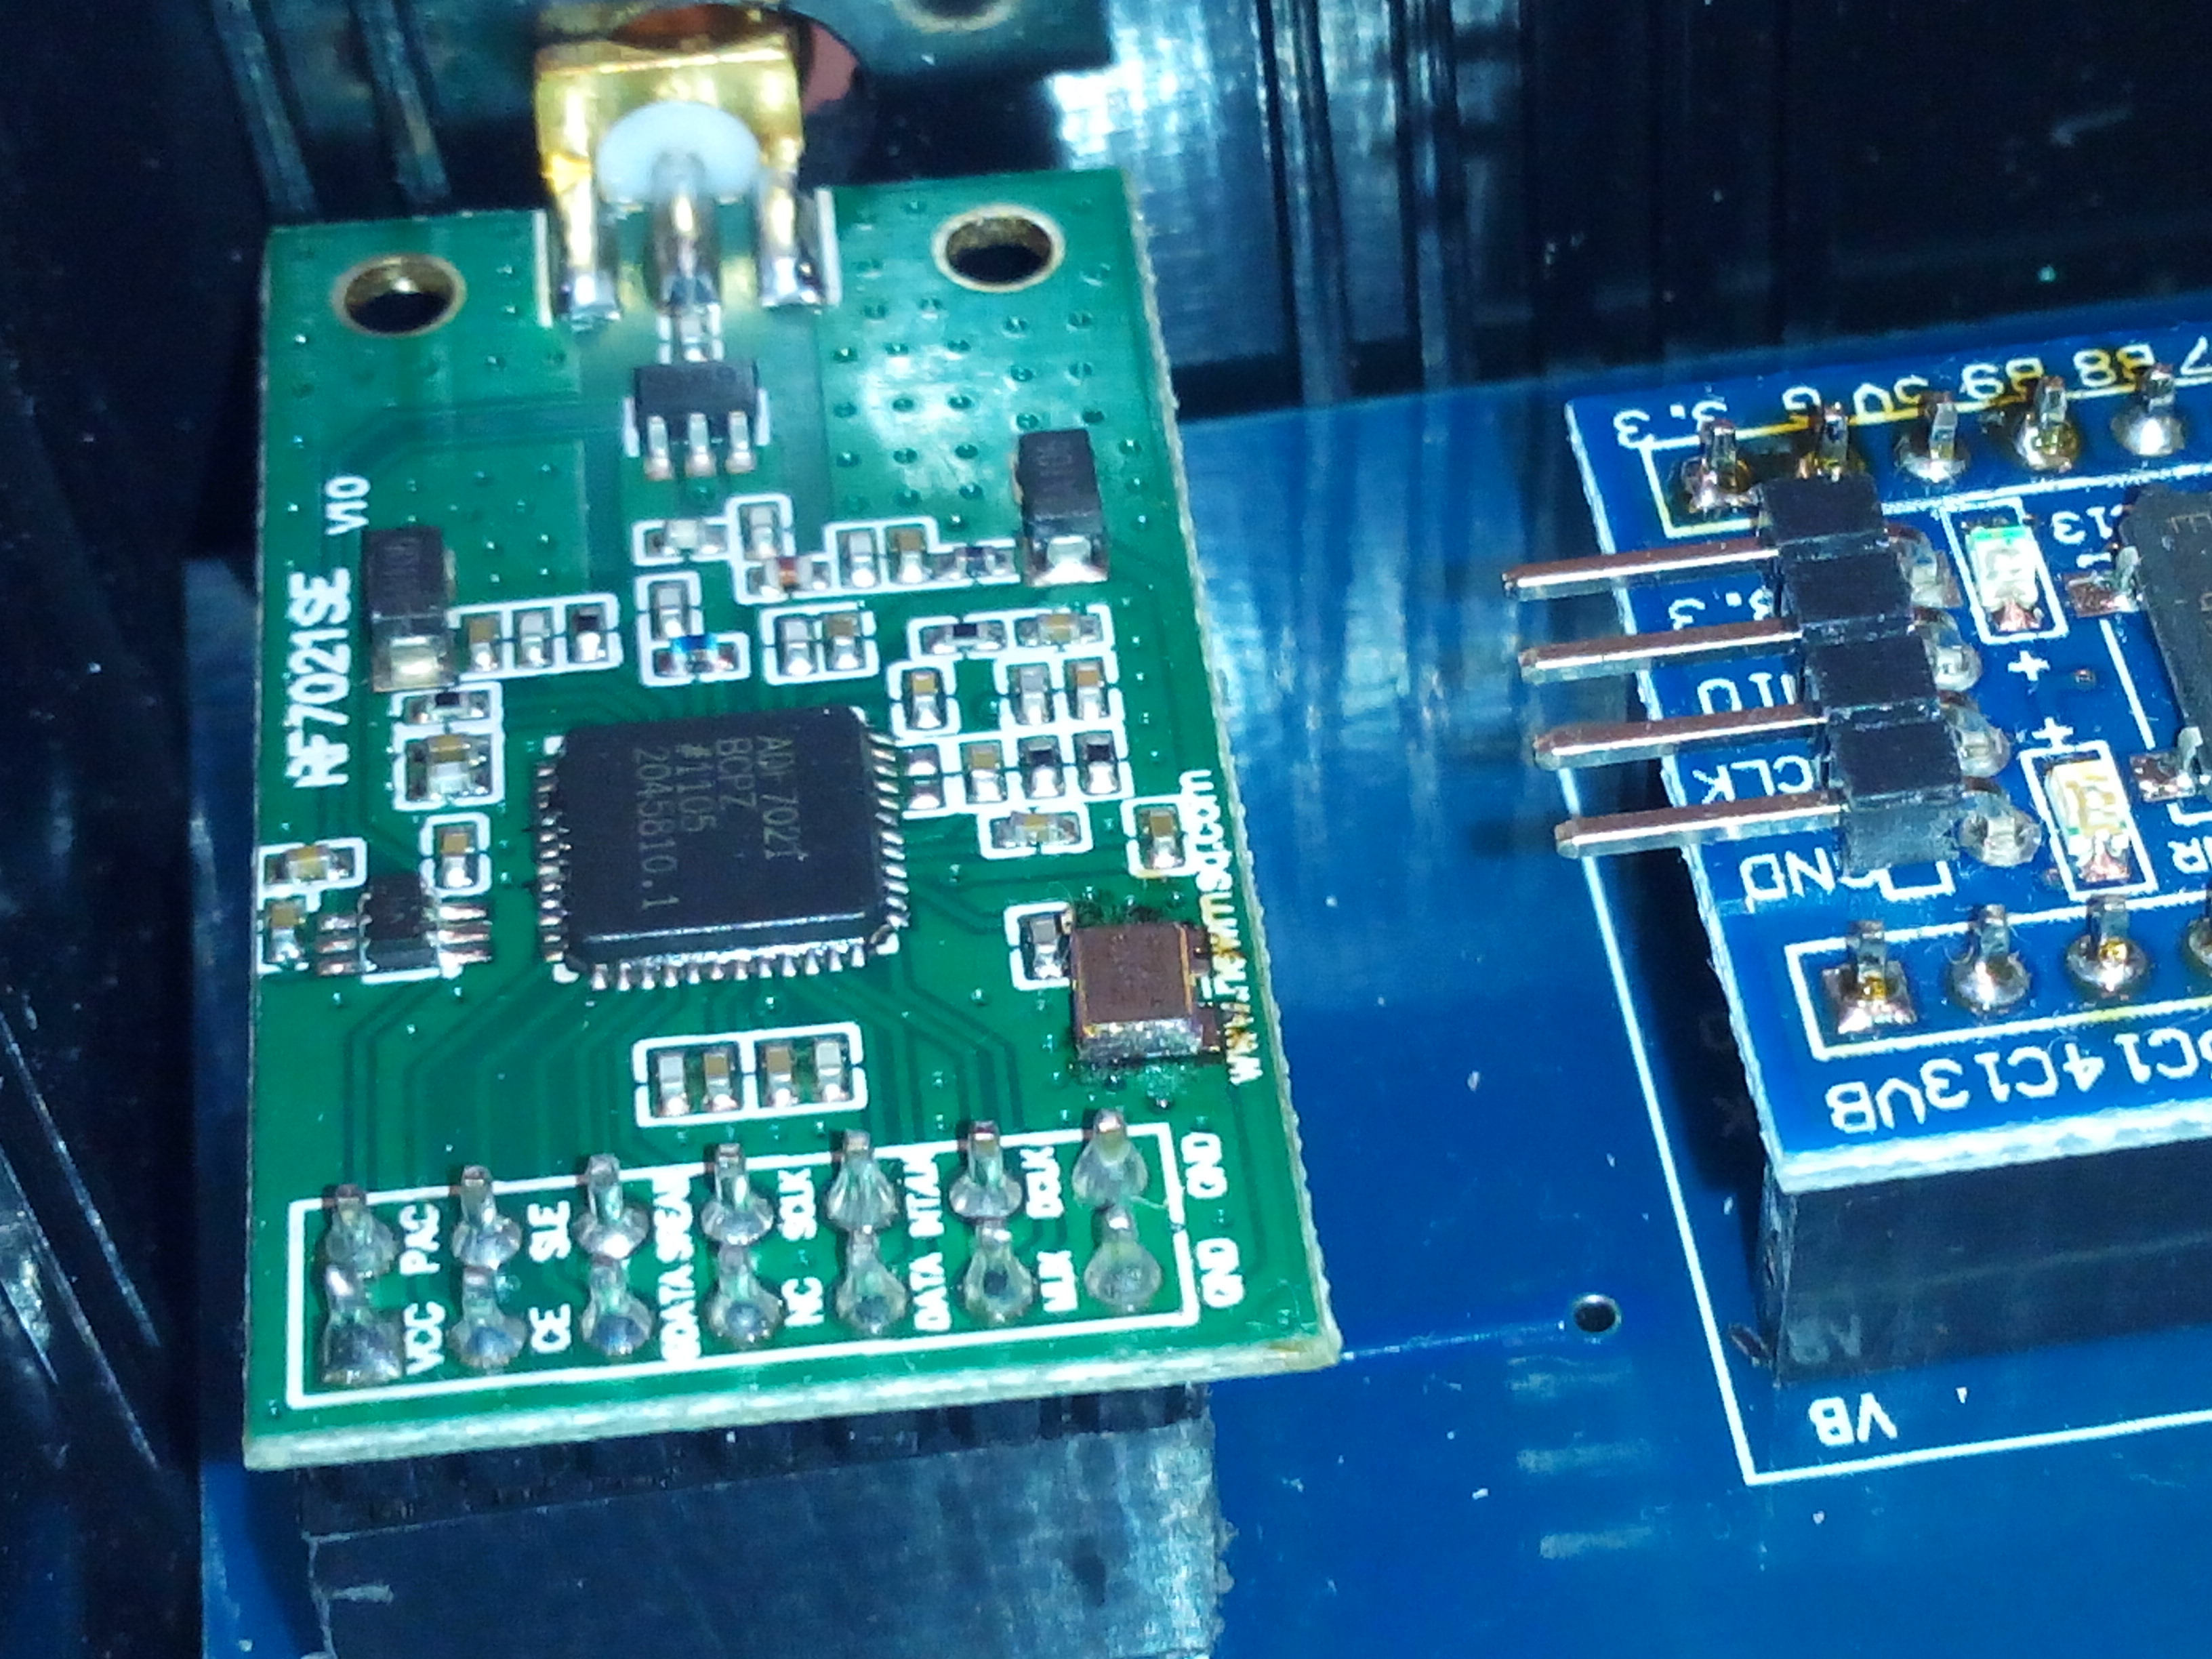
The interface board
This board is a PCB that has the objective of simply connecting the STM32F103 microcontroller to the ADF7021 UHF transmitter. As an accessory, LEDs have been installed to display the functioning (active mode, transmission…) and other connectors to possibly add a screen. This is not essential for operation. So I didn’t solder anything on the board, except for the P4 connector that will be used for load the firmware (HOST_RX and HOST_TX signals). I only installed the two modules (STM32 and ADF7021).
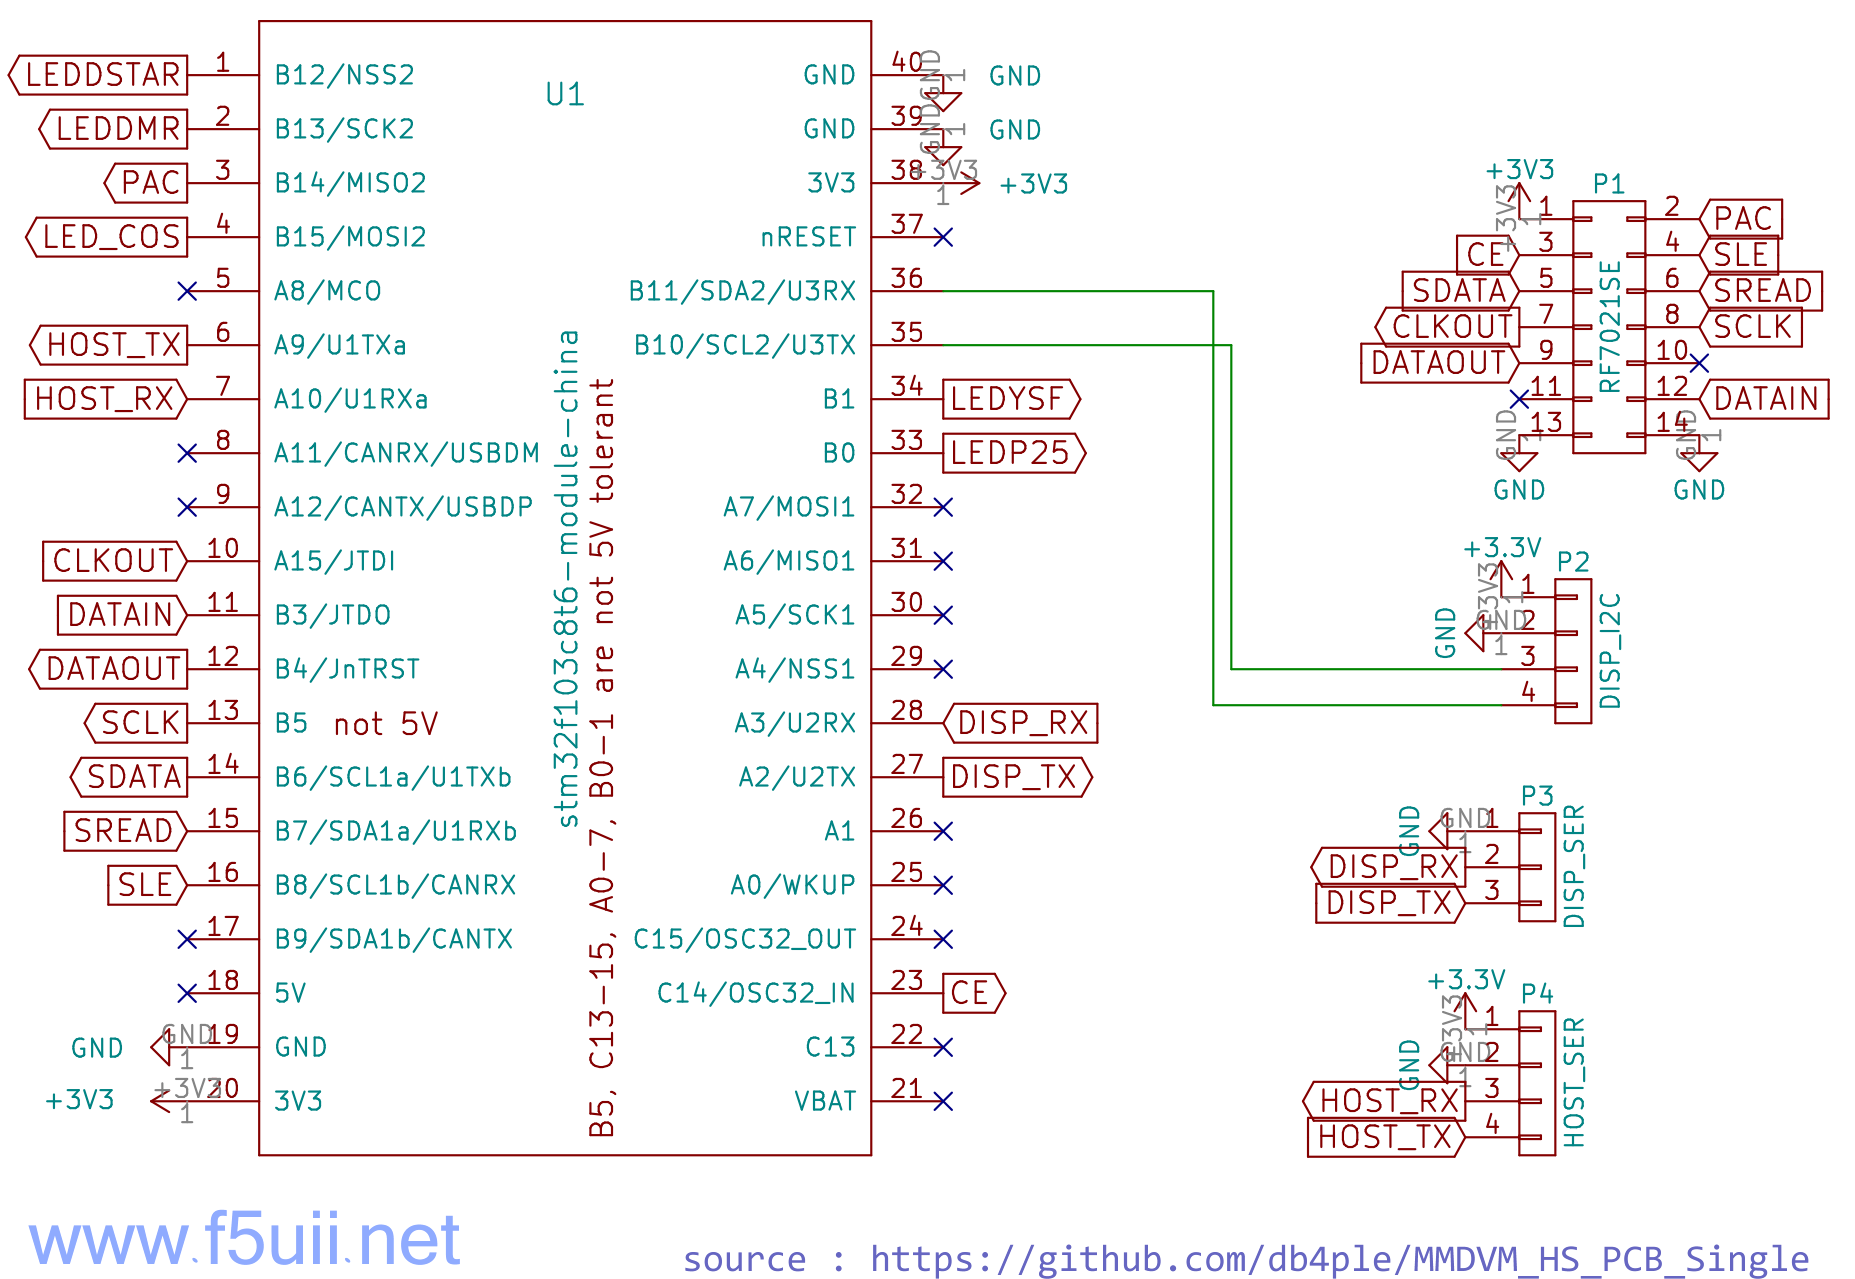

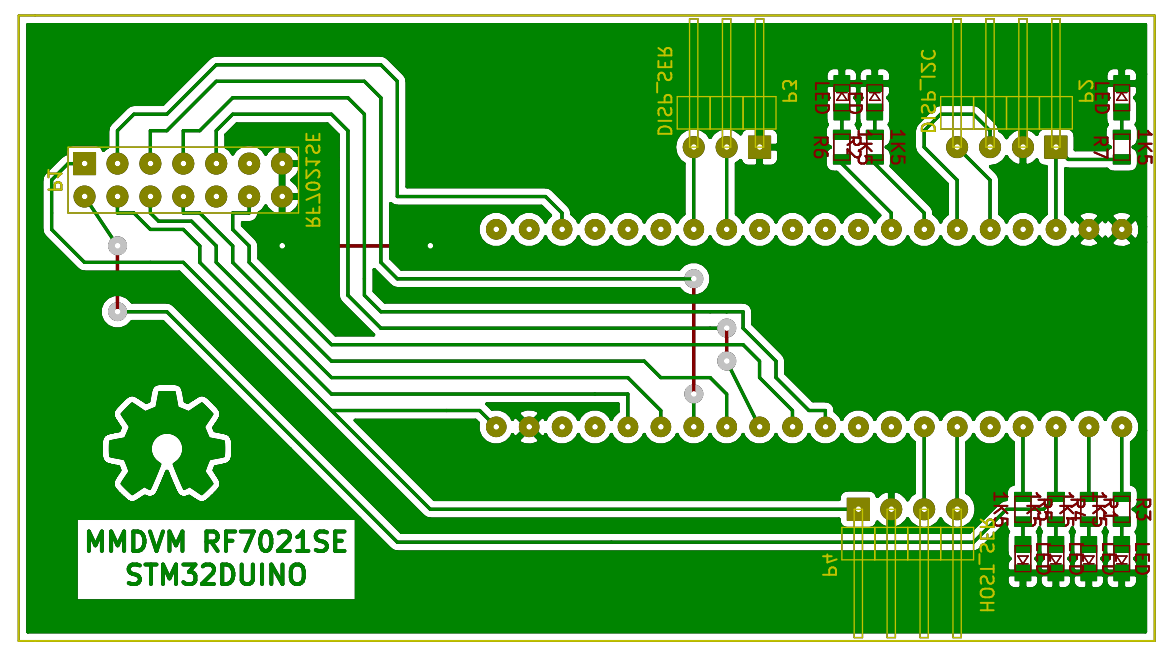

All the resources to make this PCB are available on DB4PLE GitHub (for Kicad software). You can also download it directly here.
Oscillator Replacement on ADF7021
You can obtain the board 433 Mhz ADF7021 for example on aliexpress.
On the ADF7021 board, we need to replace the TCXO in place with another model with a frequency of 14.7456 MHz. You will find this TCXO in the same dimensions as the original (3.2 mm x 2.5 mm) under the part number ECS-TXO-3225-147.4-TR (Available from Mouser for example).
This operation is delicate but can be carried out with a soldering iron equipped with a fine tip and a tweezer. Patience and precision will help you also…
Compiling and MMDVM firmware loading
The STM32F103 board will receive the firmware. The installation must be able to be done with Windows, but some sudden complications for the installation of the drivers, I propose you to compile and load the firmware from your Raspberry Pi. Switch on the Raspberry Pi, connect it to the power supply and to the network (initially RJ45)
The firmware to load is MMDVM HS which is dedicated to HotSpot
We load from the console opened remotely on the Raspberry Pi (I use Putty. exe as explained in Raspberry Pi documentation).
Log in to your Raspberry Pi.
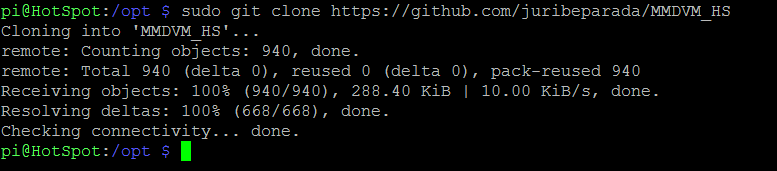
Download MMDVM HS
First of all, let’s install some prerequisites.
- An update of installation resources
sudo apt-get update
Get:1 http://mirrordirector.raspbian.org jessie InRelease [14.9 kB]
Get:2 http://archive.raspberrypi.org jessie InRelease [22.9 kB]
Get:3 http://mirrordirector.raspbian.org jessie/main armhf Packages [9,535 kB]
...
...
Ign http://mirrordirector.raspbian.org jessie/rpi Translation-en
Fetched 9,702 kB in 1min 24s (115 kB/s)
Reading package lists... Done
- And module installations
sudo apt-get install gcc-arm-none-eabi gdb-arm-none-eabi libstdc++-arm-none-eabi-newlib libnewlib-arm-none-eabi
Confirm by Yes
Reading package lists... Done
Building dependency tree
Reading state information... Done
gcc-arm-none-eabi is already the newest version.
libnewlib-arm-none-eabi is already the newest version.
libnewlib-arm-none-eabi set to manually installed.
libstdc++-arm-none-eabi-newlib is already the newest version.
libstdc++-arm-none-eabi-newlib set to manually installed.
The following NEW packages will be installed:
  gdb-arm-none-eabi
0 upgraded, 1 newly installed, 0 to remove and 84 not upgraded.
Need to get 1,621 kB of archives.
After this operation, 5,075 kB of additional disk space will be used.
Do you want to continue? [Y/n]
Get:1 http://mirrordirector.raspbian.org/raspbian/ jessie/main gdb-arm-none-eabi armhf 7.7.1+dfsg-3+6 [1,621 kB]
Fetched 1,621 kB in 20s (80.7 kB/s)
Selecting previously unselected package gdb-arm-none-eabi.
(Reading database ... 34460 files and directories currently installed.)
Preparing to unpack .../gdb-arm-none-eabi_7.7.1+dfsg-3+6_armhf.deb ...
Unpacking gdb-arm-none-eabi (7.7.1+dfsg-3+6) ...
Processing triggers for man-db (2.7.0.2-5) ...
Setting up gdb-arm-none-eabi (7.7.1+dfsg-3+6) ...
- And installation of git to download directly the GitHub ressources
sudo apt install git
- In /opt directory
cd /opt
- Downloading HS MMDVM
sudo git clone https://github.com/juribeparada/MMDVM_HS

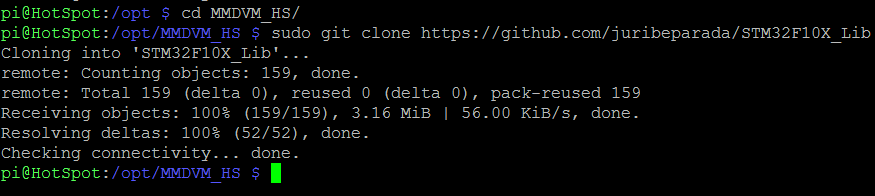
- Download the STM32F103 library
cd MMDVM_HS/
sudo git clone https://github.com/juribeparada/STM32F10X_Lib

Firmware compilation and loading
First of all, let’s make sure that the configuration file validates all the functions necessary for the HotSpot.
sudo nano /opt/MMDVM_HS/Config.h
The default configuration normally corresponds to our needs. Here is the expected file.
#if !defined(CONFIG_H)
#define  CONFIG_H

// Select one board (STM32F103 based boards)
// 1) ZUMspot USB and ZUMspot RPi:
// #define PI_HAT_7021_REV_03
// 2) ZUMspot Libre Kit or board with modified RF7021SE and Blue Pill STM32F103:
#define ADF7021_CARRIER_BOARD

// Enable ADF7021 support:
#define ENABLE_ADF7021

// Enable full duplex support with dual ADF7021:
// #define DUPLEX

// TCXO of the ADF7021
// For 14.7456 MHz:
#define ADF7021_14_7456
// For 12.2880 MHz:
// #define ADF7021_12_2880

// Host communication selection:
// #define STM32_USART1_HOST
#define STM32_USB_HOST

// Enable mode detection:
#define ENABLE_SCAN_MODE

// Send RSSI value:
// #define SEND_RSSI_DATA

// Enable Nextion LCD serial port repeater on USART2 (ZUMspot Libre Kit and ZUMspot RPi):
#define SERIAL_REPEATER

// Enable Nextion LCD serial port repeater on USART1 (Do not use with STM32_USART1_HOST enabled):
// #define SERIAL_REPEATER_USART1

// Enable P25 Wide modulation:
// #define ENABLE_P25_WIDE

// Disable mode LEDs blink during scan mode:
// #define QUIET_MODE_LEDS

#endif
Let’s now start compiling MMDVM HS with bootloader ( bl option)
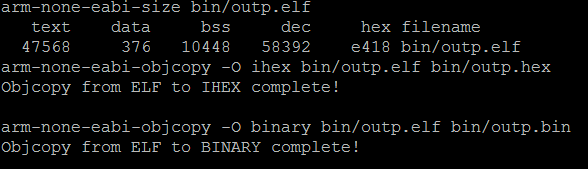
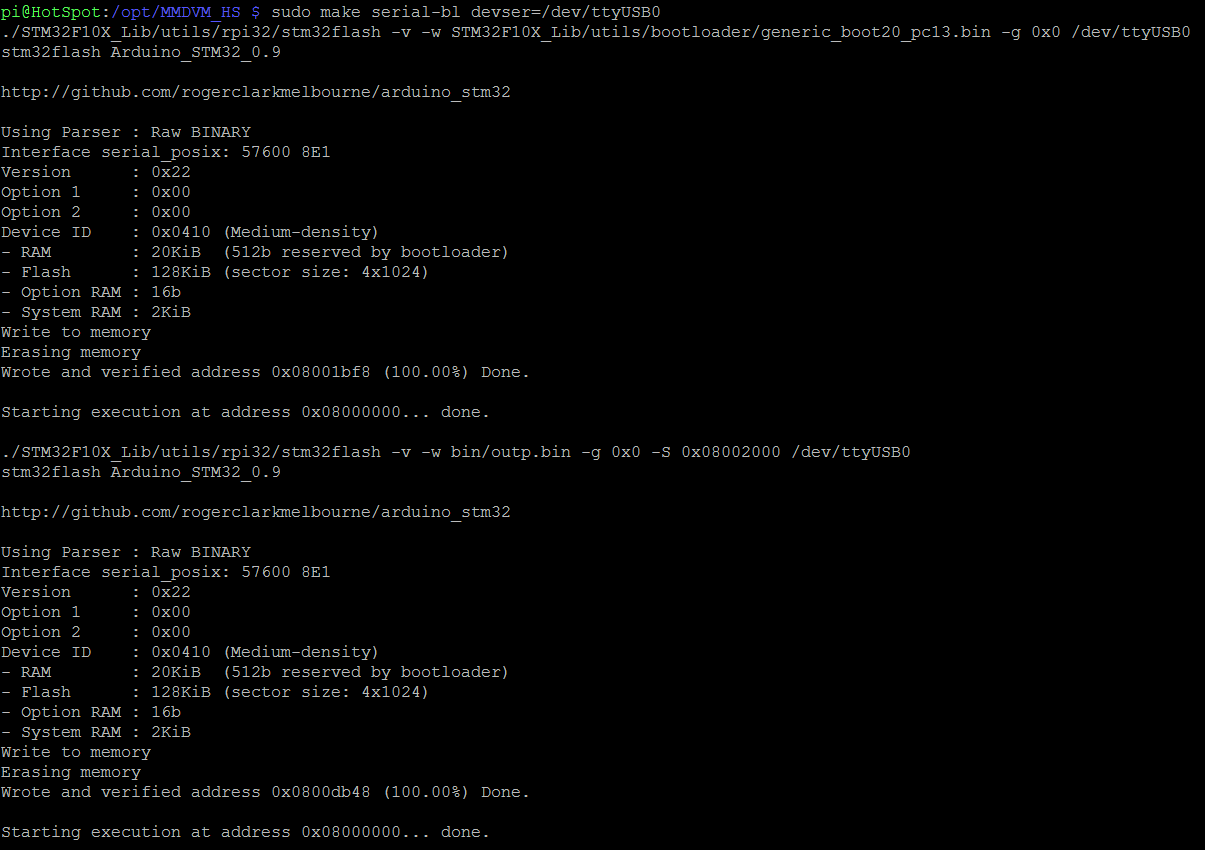
cd /opt/MMDVM_HS

sudo make clean
sudo make bl
The compilation must end by indicating that the files outp.hex et outp.bin have been generated.

To load the firmware, we use an RS232 TTL USB TTL adapter. When plugged into a USB port on the Raspberry Pi, a /dev/ttyUSB0 port must appear (ls /dev/tty* ).


To load the firmware and bootloader on the STM32F103, we need to move one of the two jumpers (the BOOT0, positioned at the top, on side of pins B11, B10, B1) to position 1 (to the right).

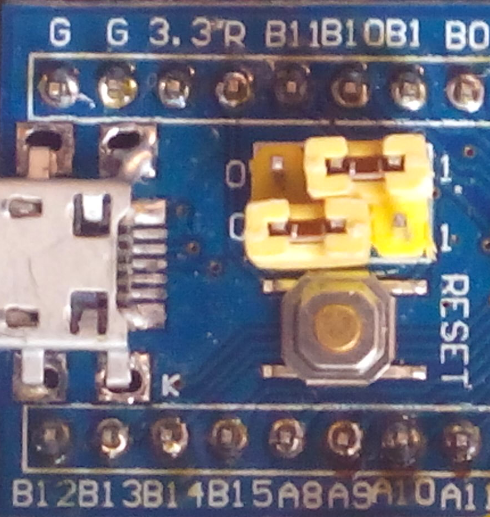
The BOOT0 jumper is positioned on 1
Start the loading command.
sudo make serial-bl devser=/dev/ttyUSB0

Let’s return the jumper BOOT0 to position 0 (the two jumpers are in position 0, on the left). Restart the STM32F103 with a short press of the RESET button (close to the jumpers). The red LED of the STM32 starts flashing (rapidly then slowly).

Firmware update
If you want to update the firmware at another time, you will no longer need the USB interface or to set jumper BOOT0 to 1. Indeed, since the bootloader is already in place, the update is done directly via the USB link from the STM32F103 to the Raspberry Pi, the one that we will be in use for HotSpot normal operation. This is the serial port /dev/ACM0
In this case, to make the update, here are the commands, BOOT0 to 0 and via USB connection.
cd /opt/MMDVM_HS
sudo make clean
sudo make bl
sudo make dfu devser=/dev/ttyACM0
Now the firmware is loaded. Let’s take care of the configuration of the Raspberry Pi on which we install the MMDVMHost software. Let’s look at the MMDVMHost stage now, we will soon be on the air and the network.
Installation and configuration MMDVMHost
Installation
We download MMDVMHost.
cd /opt/
sudo git clone https://github.com/G4KLX/MMDVMHost
cd MMDVMHost
sudo make
Configuring the MMDVM. ini file
Changes to the configuration file concern:
- your callsign of course
- the hotspot is simplex (Duplex=0)
- simplex frequencies (TX and RX)
- the MMDVM modem is connected to the Raspberry Pi via /dev/ACM0
- in DMR, your identifier (ID)
- the DMR (Master) server to connect
sudo nano /opt/MMDVMHost/MMDVM.ini
[General]
Callsign = Y0URCALL
Duplex=0

[Info]
RXFrequency=435000000
TXFrequency=435000000
Power=1
Latitude=47.7
Longitude=7.7
Height=0
Location=Mulhouse
Description=MMDVM Homebrew HotSpot
URL=https://www.f5uii.net
[Log]
# Logging levels, 0=No logging
DisplayLevel=1
FileLevel=1
FilePath=/
FileRoot=MMDVM

[Modem]
Port=/dev/ttyACM0
#Port=\\.\COM3
TXInvert=1
RXInvert=0
[D-Star]
Enable=0
[DMR]
Enable=1
Beacons=1
Id=2080000
ColorCode=1

[System Fusion]
Enable=0

[P25]
Enable=0

[D-Star Network]
Enable=0
For DMR, the Brandmeister server configuration is based on the FR Master . You can find this information online at https://wiki.brandmeister.network/index.php/France
[DMR Network]
Enable=1
Address=217.182.129.131
Port=62031
Jitter=300
# Local=62032
Password=passw0rd
# Options=
Slot1=1
Slot2=1
Debug=0
[System Fusion Network]
Enable=0
[P25 Network]
Enable=0
You can of course set other modes (D-Star, Fusion, P25) your HotSpot will be multi-mode.
Save your changes by quitting the editor with CTRL-X then Yes
Calibration
If you know the MMDVM repeater, you know what this phase of setting the transmission is. In the case of our HotSpot, no calibratio required. The ADF7021 module will be emitted correctly from the outset.
First check of good functioning
We are now ready to launch the startup order for MMDVMHost, which will put our HotSpot into operation.
sudo /opt/MMDVMHost/MMDVMHost /opt/MMDVMHost/MMDVM.ini
On the start page you will see a reminder of the Modem settings.
 Modem Parameters
I: 2017-09-17 10:58:11.541     Port: /dev/ttyACM0
I: 2017-09-17 10:58:11.541     RX Invert: no
I: 2017-09-17 10:58:11.541     TX Invert: yes
I: 2017-09-17 10:58:11.541     PTT Invert: no
I: 2017-09-17 10:58:11.541     TX Delay: 100ms
I: 2017-09-17 10:58:11.541     RX Offset: 0Hz
I: 2017-09-17 10:58:11.541     TX Offset: 0Hz
I: 2017-09-17 10:58:11.541     DMR Delay: 0 (0.0ms)
I: 2017-09-17 10:58:11.541     RX Level: 50.0%
I: 2017-09-17 10:58:11.541     CW Id TX Level: 50.0%
I: 2017-09-17 10:58:11.541     D-Star TX Level: 50.0%
I: 2017-09-17 10:58:11.541     DMR TX Level: 50.0%
I: 2017-09-17 10:58:11.541     YSF TX Level: 50.0%
I: 2017-09-17 10:58:11.541     P25 TX Level: 50.0%
I: 2017-09-17 10:58:11.541     RX Frequency: 435000000Hz (435000000Hz)
I: 2017-09-17 10:58:11.541     TX Frequency: 435000000Hz (435000000Hz)
M: 2017-09-17 10:58:11.542 Opening the MMDVM
After the line Opening the MMDVM , the firmware of the STM32F103 is read and tells you what its version is.
I: 2017-09-17 10:58:13.553 MMDVM protocol version: 1, description: ZUMspot ADF7021 v1.0.1 20170826 (DStar/DMR/YSF/P25) GitID #2beb3d7
Your HotSpot is ready to transmit you…
For myself, my HotSpot only serves me in DMR, I added channels dedicated to the frequency of my Hotspot on my DMR radio (a Retevis RT3 equivalent to TYT MD380).

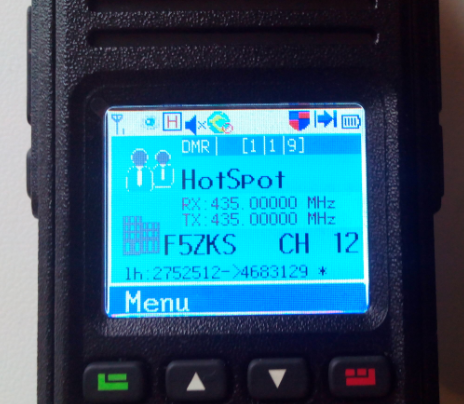
The radio on the simplex 435 MHz frequency
To finish the installation, I invite you to follow the article specifically dedicated to the automatic startup of MMDVMHost.
In the same way as I do, you could add DG9VH’s Dashboard monitoring software to help you check that the HotSpot is working properly. For my part I installed it in a subdirectory /var/www/html/MMDVM/ in order to access it simply from http://HotSpot.lan/MMDVM/ .
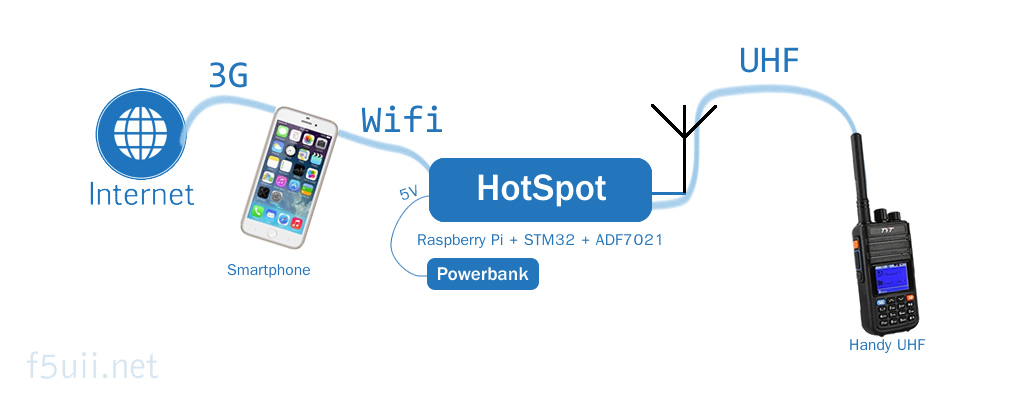
Hotspot connected wireless


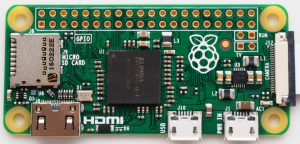
Raspberry Pi Zero with Wifi
By sharing your 3G or 4G mobile internet connection in wifi, you will connect your HotSpot powered on a USB power pack. You will be completely mobile…
Installation of RaspAp
I will explain you how to install and use this tool which will make it easier for you to use Wifi on your Raspberry Pi.
Installation
We will first specify a hostname so that we can easily identify our hotspot on the network and access it without knowing the IP address of the Raspberry Pi.
sudo raspi-config
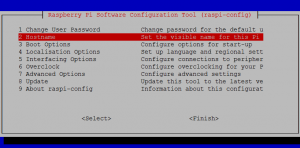

Select menu 8 Advanced options then A2 Hostname
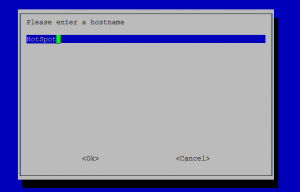

Enter for example “HotSpot”.
Exit the menu and then restart the Raspberry Pi with the sudo reboot command.
Start the installation of Rasp-WebGui via this command line.
wget -q https://git.io/voEUQ -O /tmp/raspap && bash /tmp/raspap
The IP address of the wlan0 wifi network is static (10.3.141.1). We will modify this to make the address dynamic.
sudo nano /etc/dhcpcd.conf
Change the lower part of the configuration file, as follows.
# RaspAP-WebGui wireless configuration
interface wlan0 inet dhcp
#static ip_address=10.3.141.1/24
#static routers=10.3.141.1
#static domain_name_server=8.8.8.8 8.8.4.4
Use of RaspAp
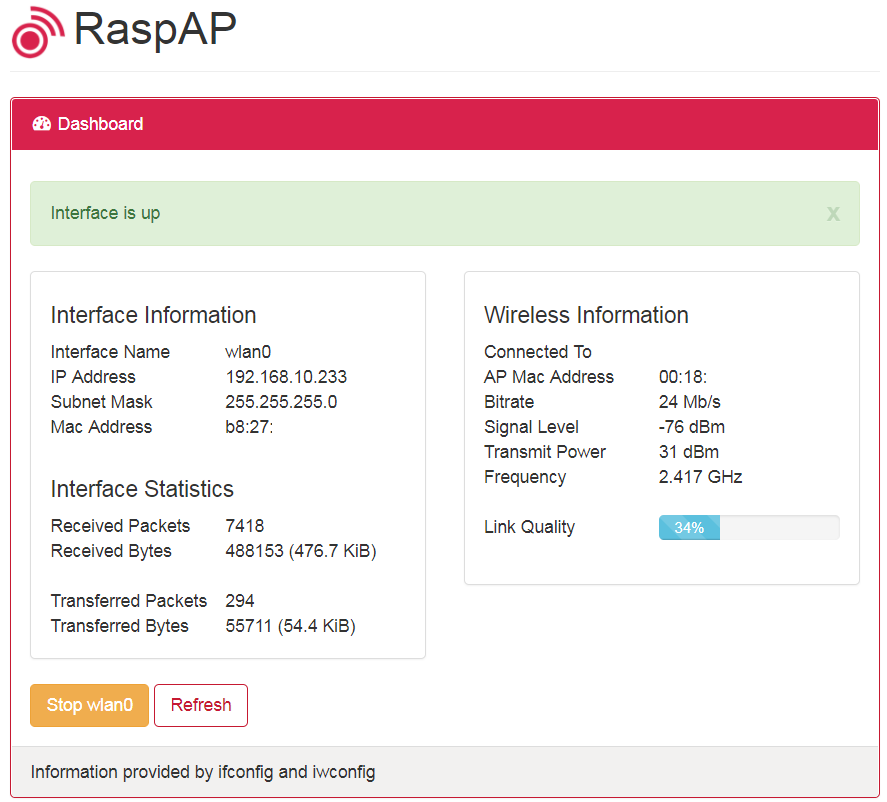
From your smartphone or PC connected on the same network as the HotSpot, in your browser launch http://HotSpot.lan/
You must then enter the default password: admin / secret


You reach the software homepage.

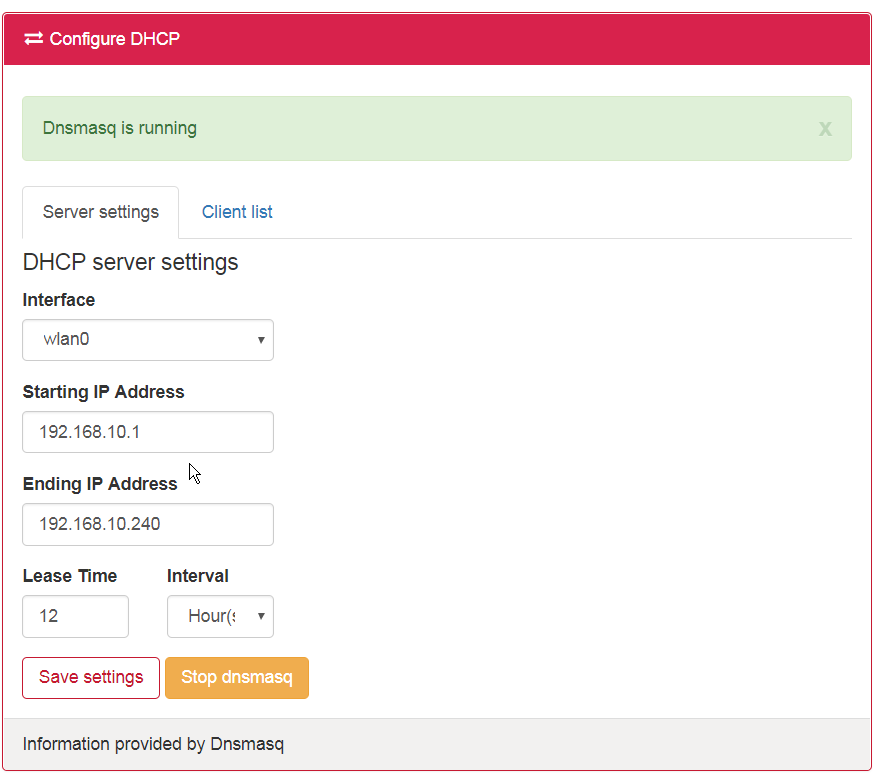
The DHCP Configure menu allows you to configure the dynamic IP address ranges corresponding to your networks (lan, wlan0).
On the Client Setup page, this is where you can enter the passwords of your Wifi access points. When you are on the move, this is where you will save the WiFi access point passwords.
If you have a mobile smartphone with an Internet service, this is also where you will see the name of your shared connection. You will enter the Wifi password so that your access point can connect via your smartphone to the Internet.
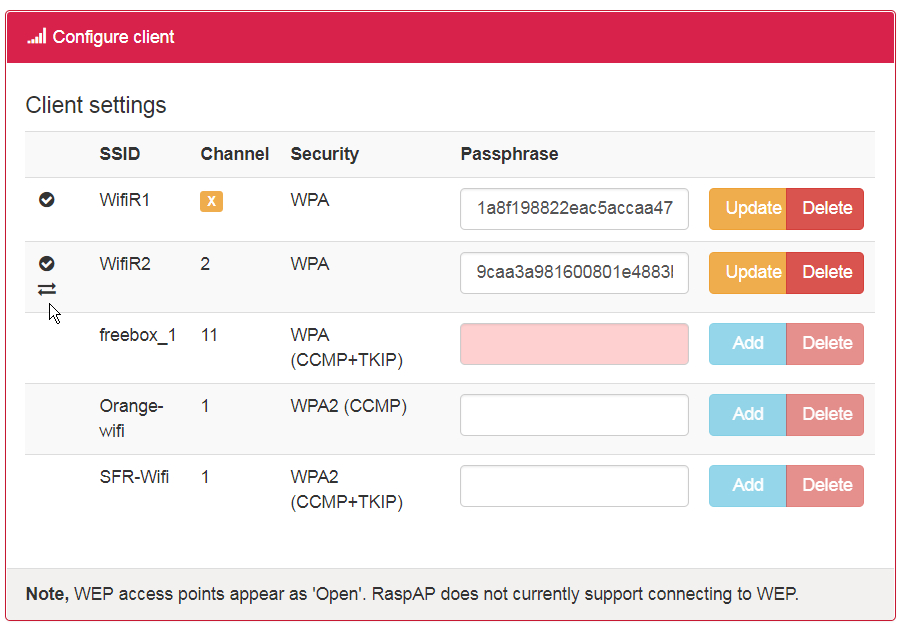


The double arrow indicates the access point used (here WifiR2). ![]()

You are ready to be QRV on your favorite digital amateur radio network. The equipment that I’ll take with me is:
- a Raspberry Pi 3 case
- a case with the STM32F103 and UHF module
- a 5V power supply unit (or 5V USB power pack)
- a smartphone to share my internet connection
- a digital transceiver (for me, a Retevis RT3, DMR mode)

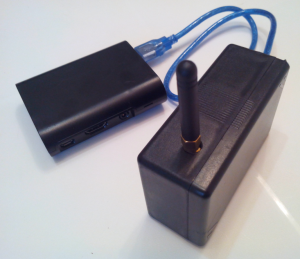
The Hotspot with its Raspberry Pi 3

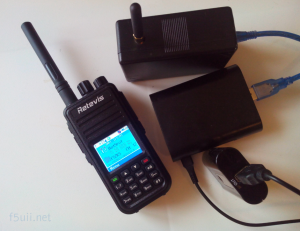
The MMDVM hotspot, the Raspberry Pi, the power pack and DMR handy
Overall, the price of such a Hotspot is rather low as it is around 75 EUR, including Raspberry Pi and SD card.
And what’s the future?
Some have sought to reduce the place of all this. See this board designed by Mathis DB9MAT, which is a board that brings together the UHF module, the STM32F103 CPU, and wich is plugged directly onto the smallest Raspberry Pi, the Pi Zero W. This is called the MMDVM HS HAT (Hardware Attached on Top).

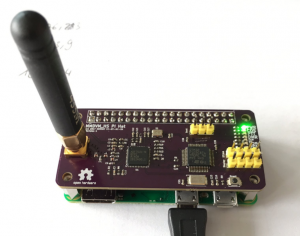
MMDVM_HS Pi HAT (DB9MAT)
Mathis resources are online on GitHub. But there it could perhaps be the subject of another article on my blog….
Feel free to post your questions and comments below. I will of course be happy to answer them.