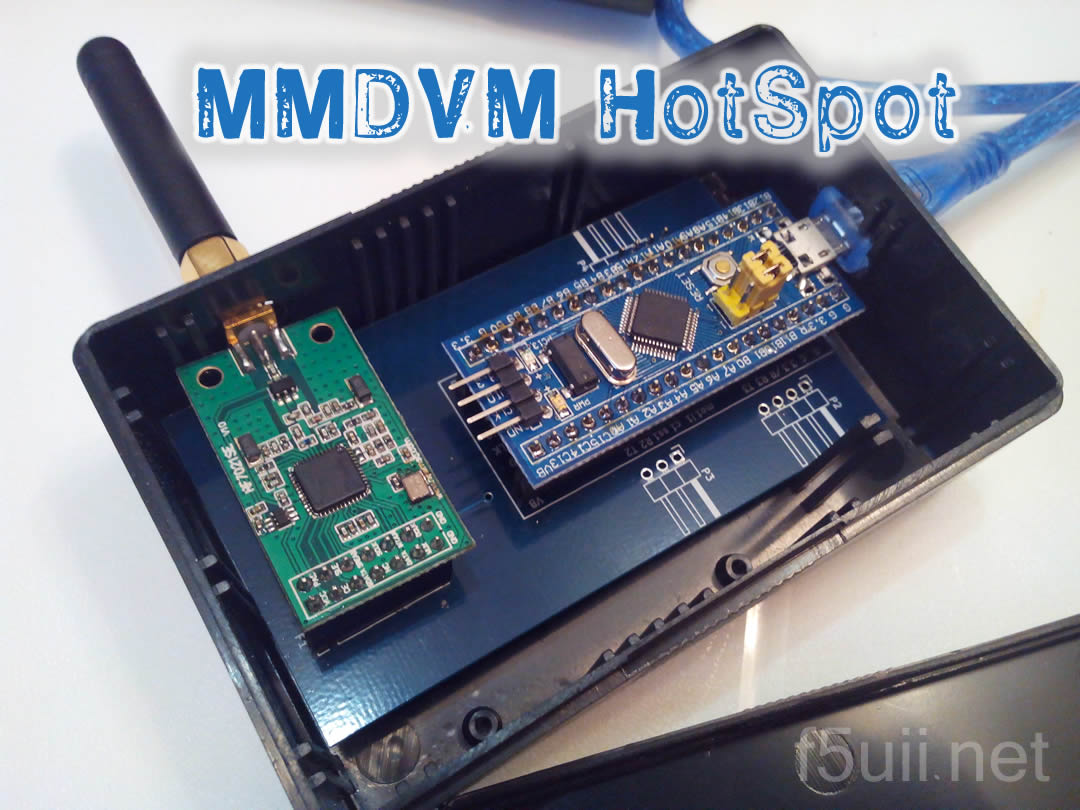
Installation de RaspAP, gestion du wifi
Installation of RaspAp
I will explain you how to install and use this tool which will make it easier for you to use Wifi on your Raspberry Pi.
Installation
We will first specify a hostname so that we can easily identify our hotspot on the network and access it without knowing the IP address of the Raspberry Pi.
sudo raspi-config
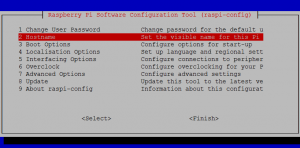
Select menu 8 Advanced options then A2 Hostname
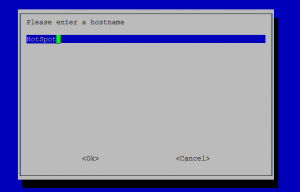
Enter for example “HotSpot”.
Exit the menu and then restart the Raspberry Pi with the sudo reboot command.
Start the installation of Rasp-WebGui via this command line.
wget -q https://git.io/voEUQ -O /tmp/raspap && bash /tmp/raspap
The IP address of the wlan0 wifi network is static (10.3.141.1). We will modify this to make the address dynamic.
sudo nano /etc/dhcpcd.conf
Change the lower part of the configuration file, as follows.
# RaspAP-WebGui wireless configuration
interface wlan0 inet dhcp
#static ip_address=10.3.141.1/24
#static routers=10.3.141.1
#static domain_name_server=8.8.8.8 8.8.4.4
Use of RaspAp
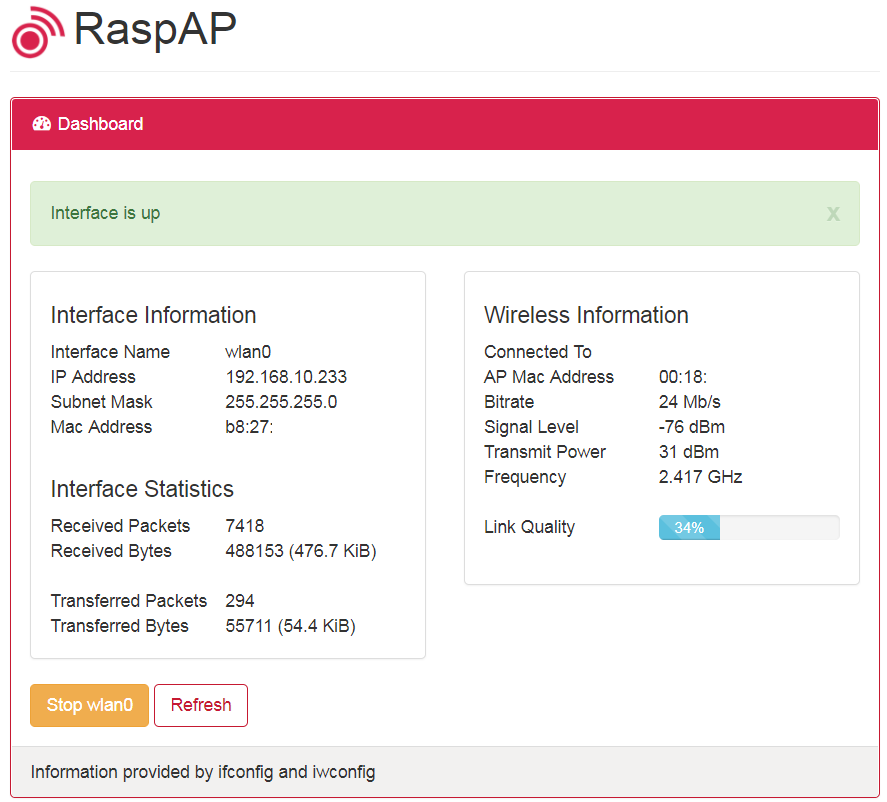
From your smartphone or PC connected on the same network as the HotSpot, in your browser launch http://HotSpot.lan/
You must then enter the default password: admin / secret

You reach the software homepage.
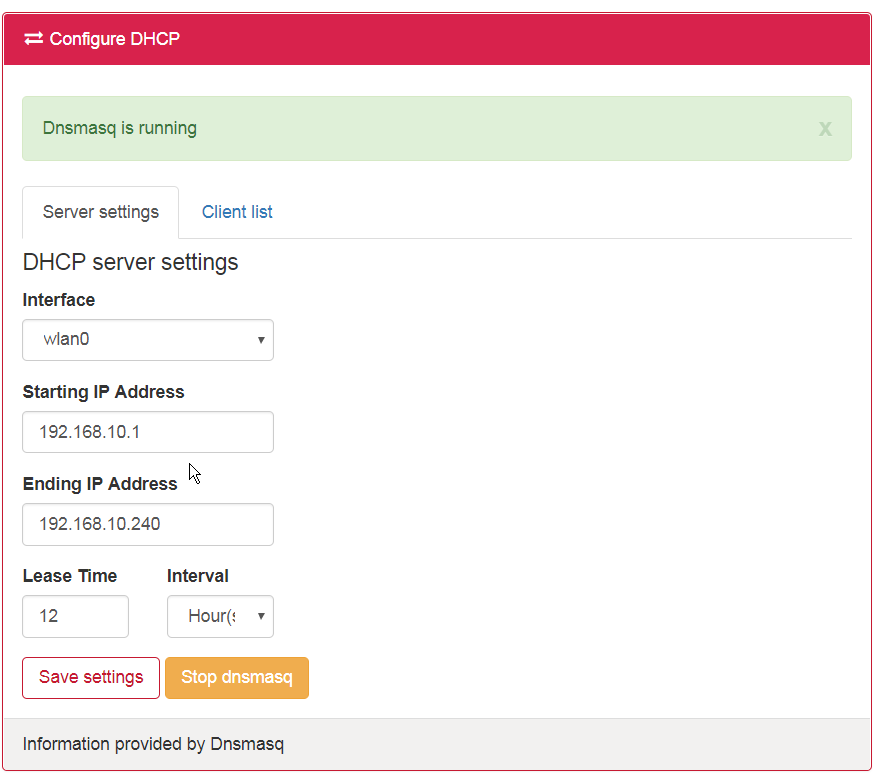
The DHCP Configure menu allows you to configure the dynamic IP address ranges corresponding to your networks (lan, wlan0).
On the Client Setup page, this is where you can enter the passwords of your Wifi access points. When you are on the move, this is where you will save the WiFi access point passwords.
If you have a mobile smartphone with an Internet service, this is also where you will see the name of your shared connection. You will enter the Wifi password so that your access point can connect via your smartphone to the Internet.
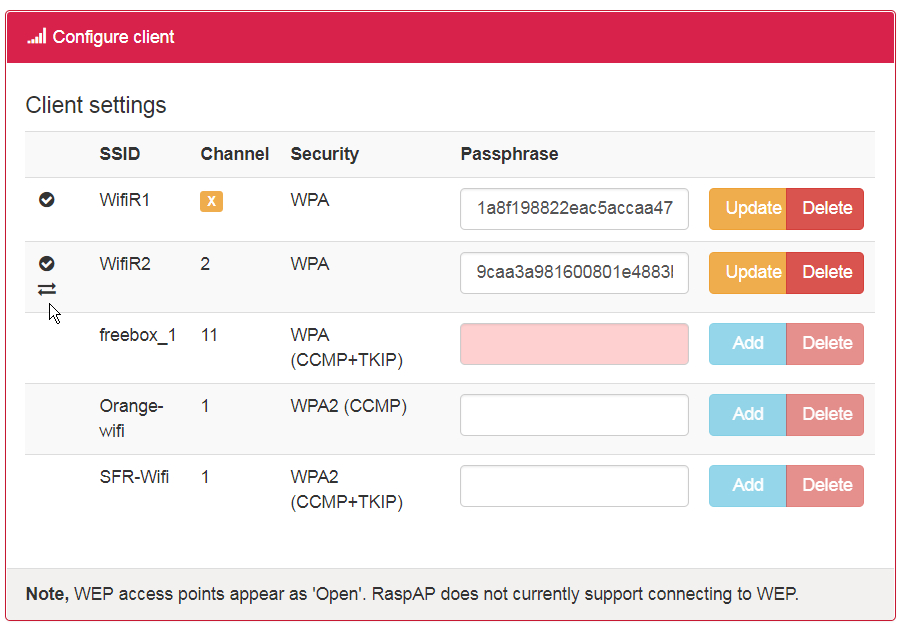
The double arrow indicates the access point used (here WifiR2). 
Bonjour, bravo pour ce tuto 73
(Translation)
Hello, congrats for this tutorial 73
Bonjour,
très beau tuto Christian, merci !
Bruno
(Translation)
Hello,
Very nice tutorial Christian, thanks !
Bruno
nice tutorial ! well done.
best 73
(Traduction)
joli tutoriel! bien joué.
meilleur 73
Hello, I have been reading your very informative website, as I am in the process of setting up my Hotspot.
The question I have is what UHF frequency do you set your MMDVM to?
Is it a special simplex frequency which is also programmed into your P25 ,DMR, Fusion, D-Star radios?
Or is it a UHF frequency of a local reflector to your QTH.
73
Colin
Sydney Australia
(Traduction)
Bonjour, J’ai lu votre site très instructif, car je suis en train de mettre en place mon Hotspot.
La question que j’ai est : quelle fréquence UHF définissez-vous votre MMDVM?
Est-ce une fréquence simplex spéciale qui est également programmée dans vos radios P25, DMR, Fusion, D-Star?
Ou est-ce une fréquence UHF d’un réflecteur local à votre QTH.
73
Colin
Sydney, Australie
Hello Colin,
The frequency of the hotspot is to be programmed in your stations in simplex (RX = TX).
For example 435000
Regards
(Traduction)
Bonjour Colin,
La fréquence du hotspot est à programmer dans vos postes en simplex (RX=TX)
Par exemple 435000
where is the PCB info file for gerbers and or also where can the PCB be made
(Traduction)
où est le fichier d’information PCB pour les gerbers et ou aussi où le PCB peut-il être fait?
Have a look in the material section, you will find the link to PCB ressource to be open with Kicad.
(Traduction)Regardez dans le paragraphe Matériel, vous trouverez le lien vers les fichiers ressources du PCB à ouvrir avec Kicad.
What is the current usage of the adf and stm and it be connected to the pi by a usb connection
(Translation)
Quelle est la consommation actuelle de l’adf et du stm et lorsqu’il est connecté au pi par une connexion usb?
Trent,
I just measure, the electrical power consumption of this hotspot using a Raspberry Pi 3 is 0,36A under 5,25V. When disconnecting the hotspot (remains alone the pi), then the current is down to 0,34A.
73
(Traduction)
Trent,
Je viens de mesurer, la consommation électrique de ce hotspot fonctionnant avec un Raspberry Pi 3 est de 0,36A sous 5,25V. Lors de la déconnexion du hotspot (seul le pi reste) le courant est réduit à 0,34A.
73
Il suffit de bien suivre Le tuto et ça fonctionne.
L’ensemble “zumspot libre” ainsi programmé fonctionne très bien logiciel pi-star.
73 à tous F5jwx.
(translation)
Just follow the tutorial and it works.
The “free zumspot” set thus programmed works very well pi-star software.
73 to all F5jwx
Bonjour
Merci pour tous vos tutos.
J ai une question sur le module RF7021SE.
Serait il possible de utiliser ce module en RX dans un relai mmdvm afin de remplacer un TRX Motorola ou autre. Est il suffisamment sensible ?
Merci de votre retour
73
Manu f4flq
(Translation)
Hello
Thank you for all your tutorials.
I have a question about the RF7021SE module.
Would it be possible to use this module in RX in a mmdvm repeater to replace a Motorola TRX or other. Is he sensitive enough?
Thank you for your feedback
73
Manu f4flq
Bonjour Manu,
La datasheet du composant ADF7021 indique une bonne sensibilité théorique de -122 dBm, soit 0,18 µV (pour modulation 2FSK). J’ai donc l’impression que cela doit pouvoir être un bon récepteur.
Pour en faire un relais, il vous faudra fonctionner MMDVM_HS en mode duplex, avec 2 ADF7021. Voici un exemple.
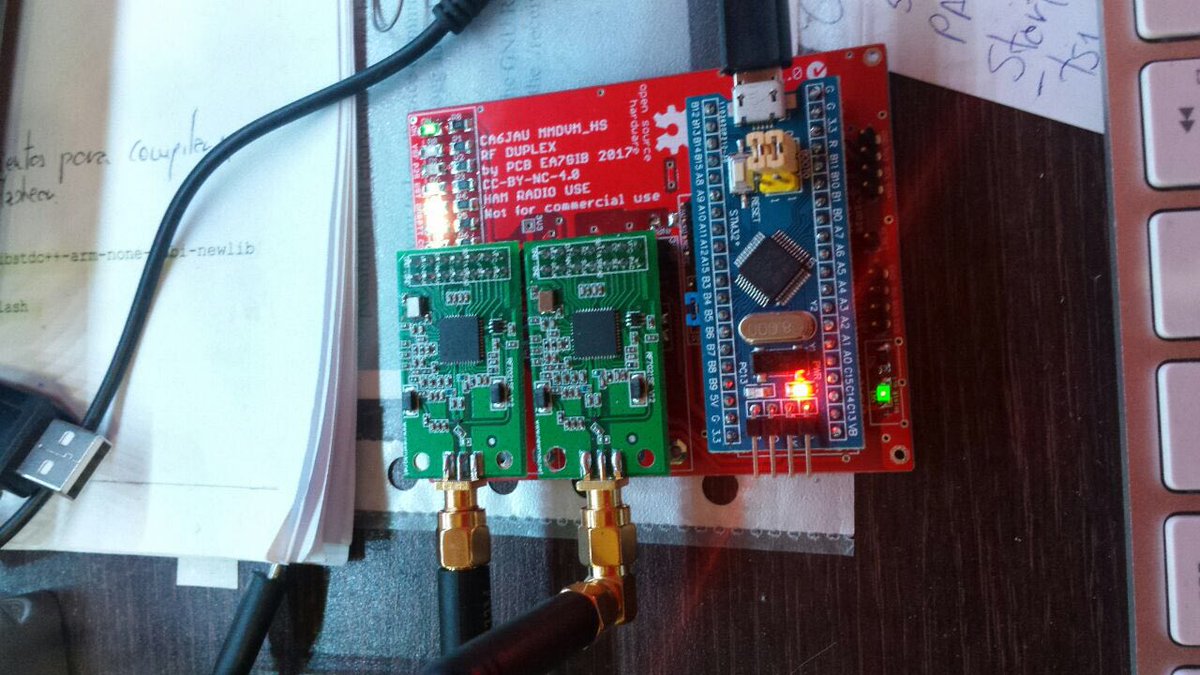
Vu sur https://twitter.com/quini7620/status/944580784031232000
(Translation)
Hello Manu,
The datasheet of component ADF7021 indicates a good theoretical sensitivity of -122 dBm, i. e. 0.18 µV (for 2FSK modulation). So I have the impression that it must be a good receiver.
To make it a repeater, you will need to run MMDVM_HS in duplex mode, with 2 ADF7021. Here is an example.

Viewed on https://twitter.com/quini7620/status/944580784031232000
Excellent tutorial. I have made mine on a piece of strip board. The trouble is is that the ADF7021 does not seem to work. Your board looks slightly different to mine. Can you provide a closeup of the TXCO please? Maybe I have soldered the oscillator on upside down!
Keep up the good work,
John
(Traduction)
Excellent tutoriel. J’ai monté le mien sur un bout de plaque d’essai. Le problème est que l’ADF7021 ne semble pas fonctionner. Votre platine est légèrement différente de la mienne. Pouvez-vous fournir un gros plan du TXCO s’il vous plaît? J’ai peut-être soudé l’oscillateur à l’envers!
Continuez le bon travail,
John
Hello John,
Thanks for greatings.

Here is a closeup; Pin 1 on the TCXO is left down (printed dot). This corner have no connected pin (according to the TCXO datasheet)
Chris
(Traduction)
Je vous remercie.
Voici le gros plan. Pin 1 est en bas à gauche sur le TCXO. A ce coin, il n’y a pas de pin connecté (voir la fiche constructeur du TCXO)
Christian
Thank you, I think I just need to recheck my soldering
(Traduction)
Merci, je crois que j’ai juste besoin de revérifier ma soudure.
Bonjour,
Existe-t-il à votre avis un logiciel qui tourne sous Android pour utiliser avec ma tablette.?
Merci de votre réponse
73
f6grh
(Translation)
Do you think there is a software that runs under Android to use with my tablet.?
Thank you for your answer
73
f6grh
Bonjour Marc,
Vous pouvez accédez au tableau de bord RaspAP par un navigateur internet depuis votre tablette.
73
(Translation)
Hello, Marc,
You can access the RaspAP dashboard via a web browser from your tablet.
73
Merci pour votre réponse
Je tourne déjà sous Ubuntu et je pensais pouvoir faire la même chose sous Android en me servant d’un fichier MMDVM.ini ou similaire sur ma tablette Pipo X9
73 & amitiés renouvelées
(Translation)
Thank you for your answer
I’m already running Ubuntu and I thought I could do the same under Android using an MMDVM.ini or similar file on my Pipo X9 tablet
73 &
hello Christian,
Greetings from Belgrade. I built a cheap hotspot with ADF7021 and blue pil. I put in the firmware and it’s all ok, everything works. Log in to BM and see traffic from the Internet. But the ADF7021 does not work. No RS or TS. Oscillator at 14 mhz is placed. Do you have any idea what could be the cause?
I can send you photos of hotspot settings. I used PCB from DB4PLE.
According to your instructions, I made a hotspot with a nucleo and Tait TM8105, everything works properly, thanks!
Regards,
Zoran YU3ZZ
(Traduction)
Bonjour Christian,
Salutations depuis Belgrade. J’ai construit un hotspot bon marché avec ADF7021 et blue pil. J’ai mis le firmware et tout va bien, tout fonctionne. Connecté à BM et je vois le trafic de l’Internet. Mais l’ADF7021 ne fonctionne pas. Pas de signaux RS ou de TS. L’oscillateur de 14 Mhz est en place. Avez-vous une idée de ce qui pourrait en être la cause ?
Je peux vous envoyer des photos des réglages du hotspot. J’ai utilisé le PCB de DB4PLE.
Selon vos instructions, j’ai fait un hotspot avec un nucléo et Tait TM8105, tout fonctionne correctement, merci !
Salutations,
Zoran YU3ZZZ
Hi, Have just completed building the STM32 stick MMDVM. Compiled and loaded MMDVM to the stm32. Code appears to be running ok.
Configured MMDVMHost.h and complied with no errors. Configured MMDVMHost.ini and attempted to run but failed. Tried several configurations of MMDVMHost.ini but still fails with Unable to read the firmware version after six attempt.
Help Please
Best regards
Dave
(Traduction)
Salut, Je viens de terminer la construction de la platine MMDVM pour STM32. Compilé et chargé MMDVM sur le stm32. Le code semble fonctionner correctement.
MMDVMHost.h est configué et n’a commis aucune erreur. MMDVMHost.ini est configuré. J’ai tenté de m’exécuter mais cela échoue. Plusieurs essais avec différentes configurations de MMDVMHost.ini mais ne parvient toujours pas à lire la version du firmware après six tentatives.
De l’aide, s’il vous plaît
Meilleures salutations
Dave
Found the problem. The resistor r10 on the stm32 board is the wrong value it should be 1k5.
See this article http://wiki.stm32duino.com/index.php?title=Blue_Pill
(Traduction)
J’ai trouvé le problème. La résistance r10 sur la carte de la STM32 est la mauvaise valeur il devrait être de 1k5.
Voir cet article http://wiki.stm32duino.com/index.php?title=Blue_Pill
Bravo, you had to find that! Congratulations and good digital radio experience
(Traduction)
Bravo, il fallait le trouver ! Félicitations et bon trafic en numérique
Good day. Does this VHF scheme work?
Bonne journée. Ce système fonctionne-t-il en VHF?
Yes, I have several working. I have them working with a Raspberry pi and attached to a Linux laptop.
They work very well.
(Traduction)
Oui, j'en ai plusieurs qui fonctionnent. Je les ai fait tourner avec un pi Raspberry relié à un ordinateur portable Linux.
Ils fonctionnent très bien.
The supplier indicates 80 Mhz-650 Mhz
https://fr.aliexpress.com/item/Rf7021se-adf7021-wireless-module-wireless-module/1331907442.html
(Traduction)
Le fournisseur indique 80 Mhz-650 Mhz
You have to change the TCXO, see build instructions.
https://www.f5uii.net/en/hotspot-homebrew-zumspot-mmdvm-pistar-tune/2/
(Traduction)
Vous devez changer le TCXO, voir instructions.
https://www.f5uii.net/en/hotspot-homebrew-zumspot-mmdvm-pistar-tune/2/
Hello, I am curious is it possible to connect screen to the DISP_I2C connector ?
If yes, what will it shows ?
(Traduction)
Bonjour, je suis curieux de savoir s’il est possible de connecter l’écran au connecteur DISP_I2C ?
Si oui, qu’est-ce qu’il indiquera ?
I suppose you could connect (on these pins or elsewhere, to check with the assignment of MMDVM_HS) a NEXTION screen, which you would have programmed before. Here is an example of a realization
Here I personally did not feel the need for an additional screen…
(Traduction)
Je suppose que vous pourriez y brancher (sur ces broches ou ailleurs, à vérifier par rapport au affectation de MMDVM_HS) un écran NEXTION, que vous auriez programmer avant. Voici un exemple de réalisation.
Ici je n’ai personnellement pas ressenti le besoin d’un écran supplémentaire…
Bonjour, merci pour toutes ces infos.
J’ai réalisé un relai avec le MMDVM et je voudrais savoir si pour le mode D-star il y a des réglages à faire, car je ne trouve que des réglages pour le Dmr.
Merci
(Translation)
Hello, thank you for all this information.
I have done a repeater with the MMDVM and I would like to know if there are any settings to do for the D-star mode, as I can only find settings for the Dmr.
Thanks
David,
Merci pour vos mots d’encouragements.
Je n’ai personnellement jamais mis en oeuvre le mode Dstar avec MMDVM, mais de ce que je sais, le même réglage que celui réalisé pour le DMR devrait permettre le bon fonctionnement du DSTAR, car le plus “contraignant” par rapport aux autres modes.
Bons réglages, Christian F5UII
(Translation)
David,
Thank you for your words of encouragement.
I personally have never implemented Dstar mode with MMDVM, but from what I know, the same setting as the one made for the DMR should allow the DSTAR to work properly, as it is the most “constraining” compared to the other modes.
Good settings, Christian F5UII