Intro
Following my previous article dedicated to the transmission to the Qatar Oscar 100 satellite with SDR technology (LimeSDR, Adalm pluto), here is an article that will interest this time those who are equipped with up-converter or transverter and who use a “modern” station equipped with a serial CAT communication interface. Moreover, this function is simply useful for those who operate an SDR receiver associated with a transmitter, which can be used independently of satellite radio traffic. This function called “External radio” (as described here) is available since version 3.0.17 of SDR Console, software developed by Simon G4ELI.
Here is what the “External radio” function provides in detail:
- Controls the transmitter frequency, depending on the SDR reception (SDR to Radio direction).
- Function can be activated/disactivated
- (inversely) Controls the reception selection when the transmitter frequency changes (Radio to SDR direction).
- Function can be activated/disactivatedChanging the modes of the controlled transmitter
- Indicating the transmitter’s status
- Muting from reception to transmission
- Reducing the SDR IQ reception gain when switching to transmission
- Setting the offset between the SDR reception frequency and the frequency of the controlled radio transmitter
- Possible control of 2 transmitters (switchable to either one or the other)
- Setting the appearance (4 recordable configurations)
- Possible setting of a RIT Offset
Compatible radios are those supported by OmniRig (List of controllable radio

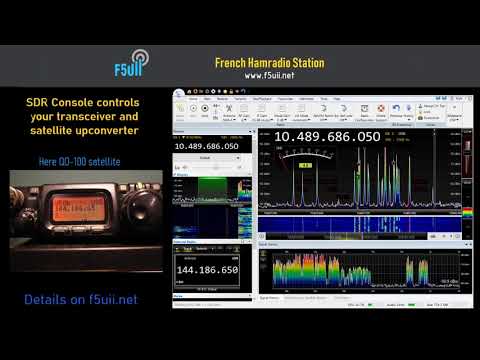
I suggest you discover how it works, with this short video. On the left, you see a Yaesu FT-817 connected via serial port to SDR Console. On the right you can see the frequency, mode and transmission status control on the “External Radio” panel of SDR Console.
Below, here is the synoptic of the installation that is being performed. It consists of two parallel segments:
- the SDR reception circuit: LNB satellite head connected to an SDR receiver (SDR RX) – refer to my article Receiving Qatar Oscar 100 satellite with SDR Console) and,
- the controlled transmission chain: A transmitter generating the intermediate frequency for the 2400 MHz converter (Up-converter) – refers for the signal amplification part to my previous article The transmission to the Qatar Oscar 100 satellite with SDR Console
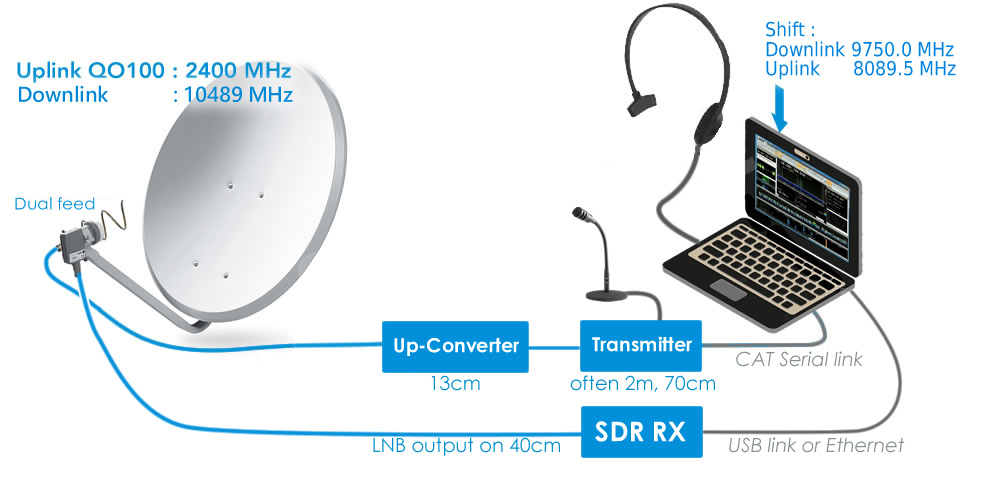
Complete diagram: QO100 transmission with up-converter, and SDR Console reception
By reading on, you will find step by step the operations to be implemented to achieve this result.
This article is “multi-page”, to be browsed from one page to another or directly from the contents to the desired page.
Serial communication
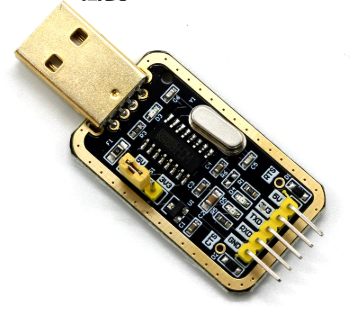

Clé USB port série
Your transmitter must have a serial port or USB port for communication with your PC and SDR Console. The modern workstation equipped with USB port, once connected to a PC, must provide a virtual serial link.
For those who use a transmitter that is not “modern”, in other words, that does not have a USB port, you are probably confronted with the absence of a serial port on your PC. I advise you to get one of these small USB/serial and economical adapters, like the ones found here and there:
- Serial port FT232 (Link Aliexpress – Link Ebay)
- Serial port with cover PL2303 (Lin Aliexpress – Lien Ebay)
- Serial port CH340 with choice of signal levels 3.3V/5V (Lien Aliexpress – Lien Ebay)
The connection cable is to be made between the RX / TX and Ground pins of the two sockets. Here is an example of a serial link made for a Yaesu FT-817.
Yaesu FT-817 serial link
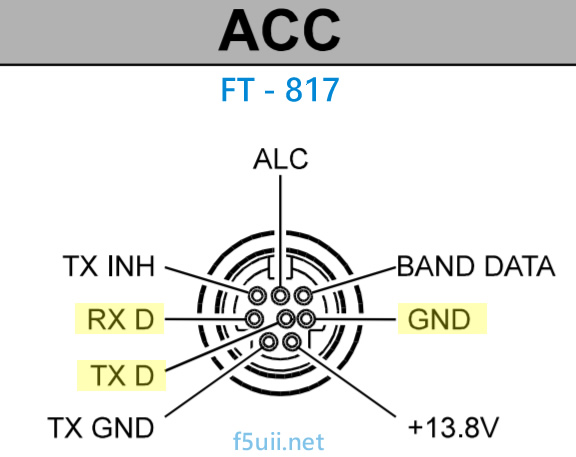
You can easily build the serial link cable between your FT817 and your USB adapter or serial connector (DB9 plug).
- Mini-Din plug 8 male pins (Link Aliexpress)
- Dupont connector (Link Aliexpress)
Connect the substation according to the simple diagram
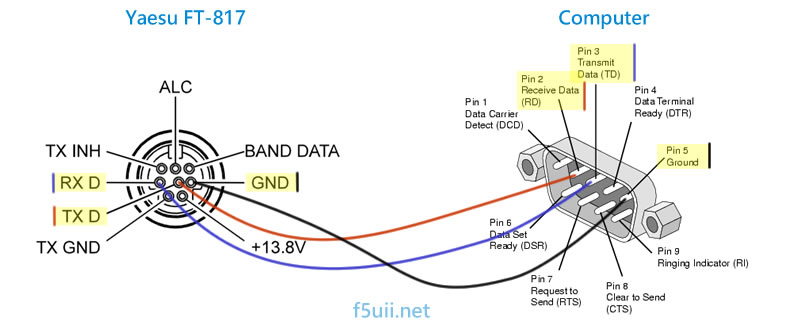
Detailed diagram of the Yaesu -FT-817 (RS232) serial link
You can also find USB cables designed with connectors adapted to radio models. This is the one from FT817:
- USB CT-62 CAT Cable for Yaesu FT-100 FT-817 FT-857 (Link Ebay)
- Cable CAT CT-62 forYaesu FT-857 FT-857D FT-897 FT-897D mini DIN male / USB (Link Aliexpress)
The hardware part being realized, let’s proceed to the software part.
Installation of additional OmniRig software
SDR Console uses OmniRig to communicate with your device. It allows to control 2 serial channels, so two different sets. It’s time to download and install it.
- Download the software development of Alex VE3NEA on its website DxAtlas. (or directly here update du 07/04/2019)
- After unpacking the file, launch the OmniRig installation (OmniRigSetup.exe). Confirm the standard steps proposed by the setup.
The big advantage of this OmniRig software is that it can be accessed by multiple software in parallel, and therefore without implementation complexity. I invite you to follow the explanations on the use of Omnirig in video. For information, there is a 4-channel version of OmniRig (SDR Console will only manage the first 2 channels). The OmniRig screenshots that illustrate this article are made with this version. You will find it for download on the website of the author Wolfgang HB9RYZ.
In SDR Console, start the controler
- Start SDR Console, (unless you have already done so), configure it to have the satellite transmission frequency display (for QO-100 10489 MHz). You can follow the guide of a previous article Receiving Qatar Oscar 100 satellite with SDR Console, in the View tab, click on Select (right part of the More Options tab…)
- In the View tab, click on Select (right part of the More Options tab…)
-
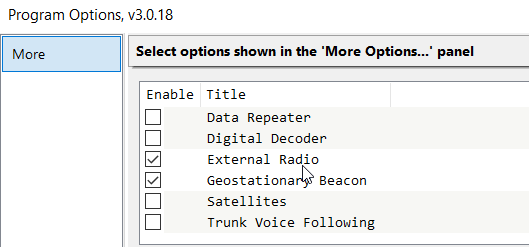
On the open window, confirm the option by checking “External Radio”. You must restart SDR Console as proposed by the software

Configure the “External Radio” options
- Your serial link is in place between the computer and the transmitter
- You know the parameters of the serial link expected by your radio, and in particular the speed of the CAT link and that you will report to OmniRig
- Refer to your radio’s user manual to determine its elements
- For a Yaesu FT-817, the serial port speed is indicated in menu 14 of the FT-817 (enter the menu with the F key held down). I use the speed of 38400 bauds.
- To the right of the View tab, click on the External Radio button. SDR Console requests a restart. Confirm.
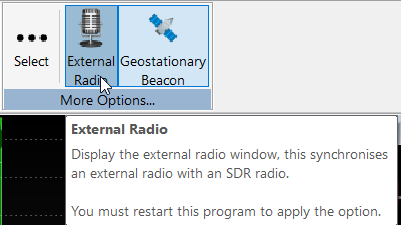
- After restarting, you will find in the vertical Receive panel, an “External Radio” section. Expand the area by clicking on the line-up.


- Click on the question mark to open the External Radio control panel.
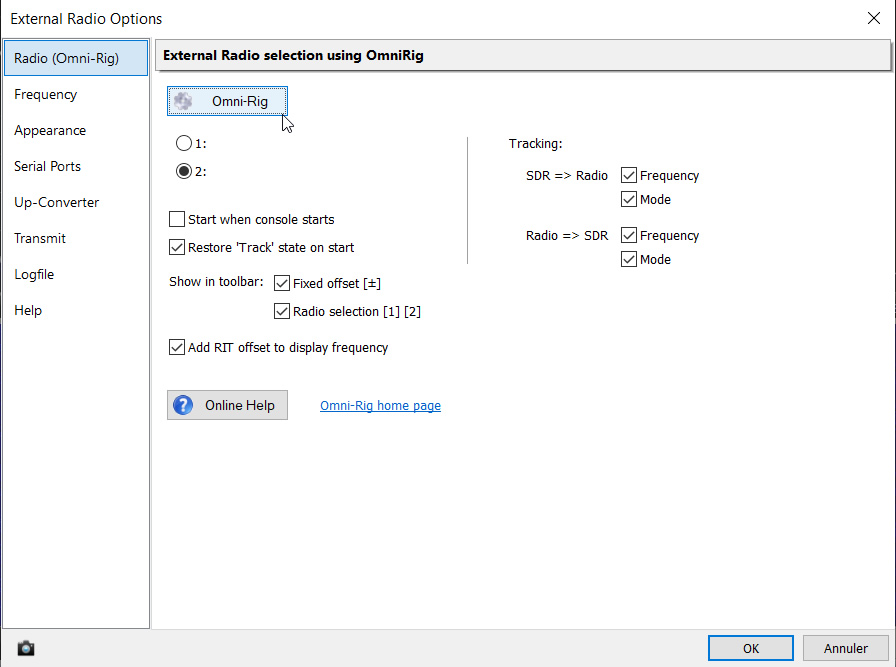
- From this control panel, launch Omni-Rig by clicking on the button.
-
OmniRig (version 4 équipements)
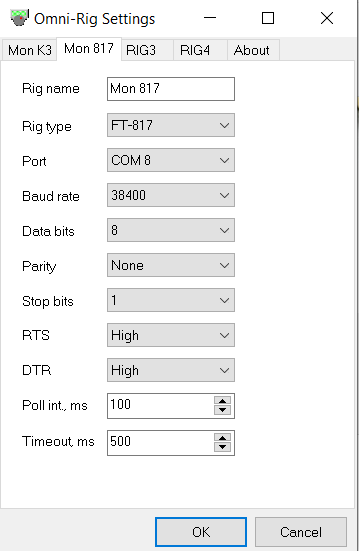
Configure the panel with known serial link information, in particular:
- Reference of your radio
- Speed
- and port number: to determine the port number, open the “Device Manager” of the operating system, and identify the COM port in the Ports section (COM and LPT). You can also find this information directly on the Serial Ports tab of this panel.
- Check on the Frequency tab that you are active on Antenna : Same frequency as external antenna
- Switch to the Up-Converter tab to configure the frequency to be controlled. Determine the frequency by simply calculating the difference between the reception frequency and the corresponding transmission frequency of your up-converter transmitter. Example: To hear me on the descent of QO 100 on 10489790.0 kHz, in front of my 2400 MHz transverter, my 2m transmitter must transmit on 144289.5 kHz. The arithmetic difference is therefore 10345500.5 kHz
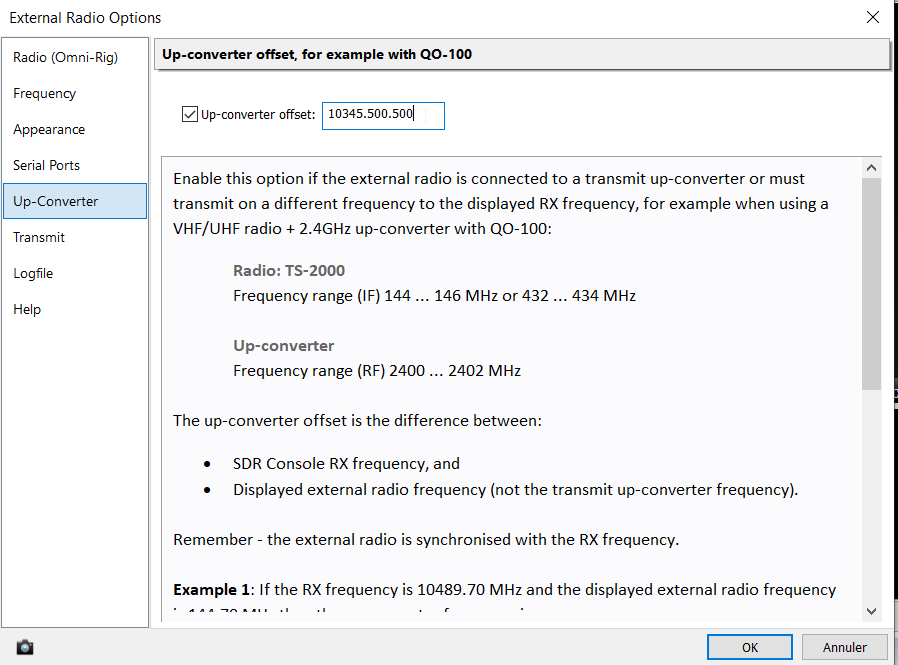

- Close the window with OK.
- The frequency is now displayed, and corresponds to that of your transmitter.
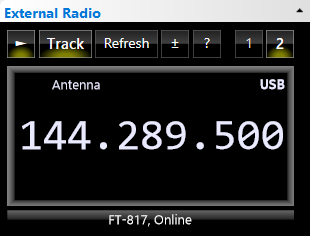

Serial communication is established.

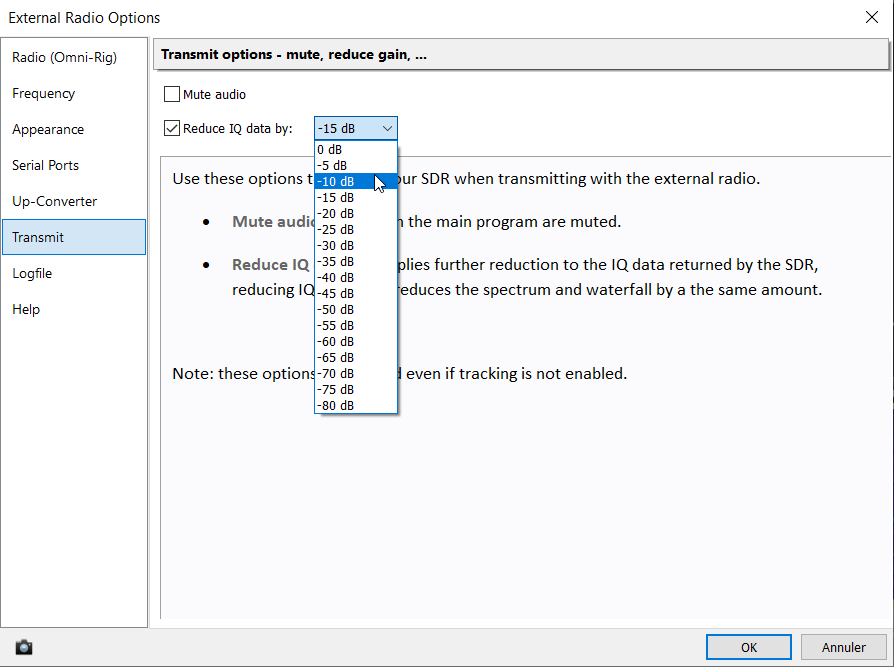
When you are transmitting, you can appreciate that your satellite feedback is attenuated (What could be more terrible than trying to talk while hearing yourself!). You have two options:
- Check Audio Mute, in the Transmit tab (in the External Radio options panel): Reception is simply muted. In this case, you don’t hear any more. For QO-100 satellite traffic, this does not comply with the recommendations that require that you listen to your feedback from the satellite.
- Check Reduce IQ data and select a level: When transmitting, the reception signals will be reduced.

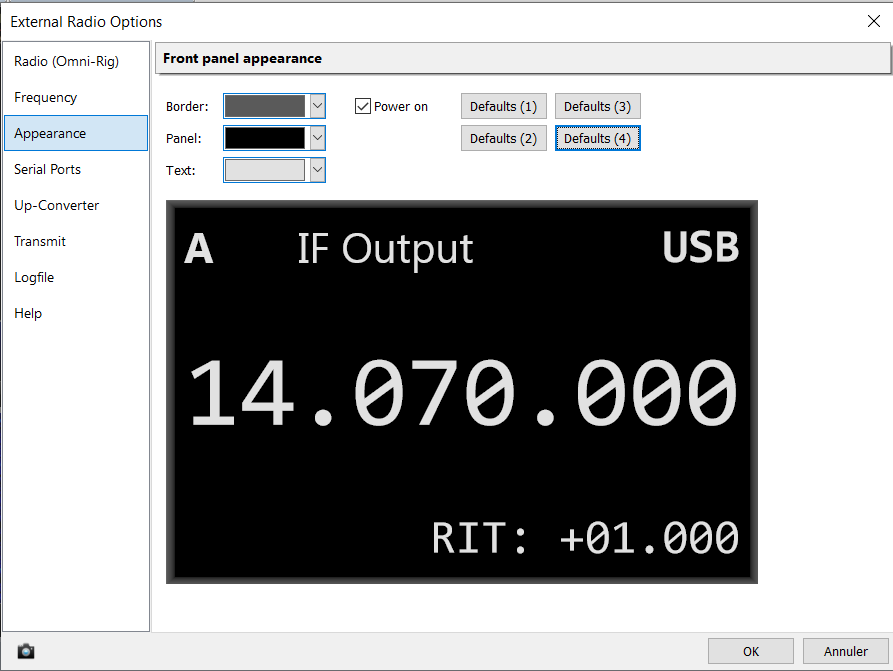
With the Appearance tab, you can configure the text, border and panel colors of the “External Radio” module as you wish.

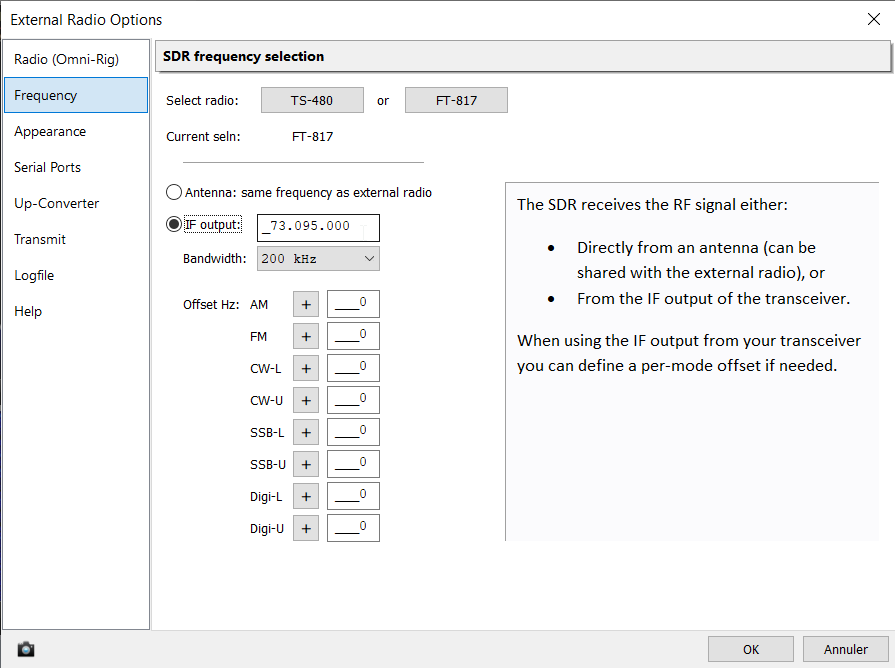
IF Frequency
In other cases, you can use the External Radio function of SDR Console with a decametric transmitter/receiver, on which you want to display the reception band (in other words, you can install a panadapter). With SDR Console, you will use the transceiver option with an IF output (for example, a modified TS 480 uses an IF 73.095 MHz). On the Frequency panel, you will then indicate this frequency in IF-Output.