Installer MMDVMHost
Configuration du fonctionnement de MMDVMHost
Toute la configuration du fonctionnement de MMDVM se réalise à partir du fichier de configuration unique MMDVM.ini. C’est dans ce fichier que nous indiquerons notamment quels modes seront activés (DStar, C4FM, DMR, …). Dans notre cas, nous avons mis uniquement le mode numérique DMR en route (Enable=1 dans la rubrique [DMR])
Egalement, vous y renseigner votre indicatif de relais, ainsi que l’identifiant ID (CCS7) que vous aurez certainement reçu en retour de votre enregistrement en ligne.
sudo nano /opt/MMDVMHost/MMDVM.ini
[General]
Callsign=F1ZZZ
Timeout=180       # Transmitter timeout in seconds. Default is: 120s
Duplex=1          # Is this station Simplex or Duplex. DVMega is simplex. Default is: 1
# ModeHang=10     # Time to stay in mode after receiption. If set overrides RFModemHang and NetModemHang
RFModeHang=10     # Time to stay in mode after RF-receiption Default is: 10s
NetModeHang=3     # Time to stay in mode after Network-receiption Default is: 3s
Display=None      # If a screen of LCD is on the device (None or name)
Daemon=0          # Run in background

[Info]
RXFrequency=431950000    # Receiver frequency in Hz Used by DVMega, reported to DMR-Master. Default is: 0Hz
TXFrequency=439550000    # Transmitter frequency in Hz. Used by DVMega, reported to DMR-Master. Default is: 0Hz
Power=5                  # Power in Watts, for informational use only. Keep below 99 for BrandMeister
Latitude=47.7            # if set, reported to DMR-Master, causes recognition as repeater in BrandMeister
Longitude=7.4            # if set, reported to DMR-Master, causes recognition as repeater in BrandMeister
Height=12                # if set, reported to DMR-Master, causes recognition as repeater in BrandMeister
Location=Colmar
Description=Multi-Mode Repeater
URL=www.yourwebsite.net

[Log]
# Logging levels, 0=No logging
DisplayLevel=2          # log Debug to console. Default is: 1
FileLevel=2             # log Debug to file. Default is: 1
FilePath=.
FileRoot=MMDVM

[CW Id]
Enable=1                # Enable the CW Id
Time=10                 # How often to ID in minutes

[Modem]
Port=/dev/ttyACM0
# Port=\\.\COM3
TXInvert=0              # Invert TX data. Needed for some transmitters. Default is: 0
RXInvert=0              # Invert RX data. Needed for some receivers. Default is: 0
PTTInvert=0             # PTT goes low to transmit. Invert for some transmitters. Default is: 0
TXDelay=100             # Give the transmitter time to settle in ms. Default is: 100ms
DMRDelay=0              # Compensate for delay in transmitter audio chain in ms . Usually DSP based. Default is: 0.0ms
RXLevel=50              # Soft control for receive level. Not used by DVMega. Default is: 100%
TXLevel=50              # Soft Control for transmit level. Not used by DVMega. Default is: 100%
# D-StarTXLevel=50
# DMRTXLevel=50
# YSFTXLevel=50
OscOffset=0             # Tweak the Due oscillator if not using the TCXO. Default is: 0ppm
RSSIMultiplier=1
RSSIOffset=10
Debug=0

[D-Star]
Enable=0                # Enable D-Star repeater mode. Default is: 1
Module=C
SelfOnly=0              # If set, only own ID can operate. Default is: 0

[DMR]
Enable=1                # Enable DMR repeater mode. Default is: 1
Beacons=1               # Enable transmission of DMR-Beacons, used for DMR-Roaming
Id=2084333              # DMR ID of this station (repeater)
ColorCode=1             # Color Code to use for DMR repeater access. Default is: 2
SelfOnly=0              # If set, only own ID can operate. Default is: 0
# Prefixes=234,235      # These prefixes are whitelisted for operation. Default is: 0
LookupFile=DMRIds.dat
CallHang=3              # Time to answer in same Talk Group. Default is: 3
TXHang=4                # Time that TX stays on transmission after DMR-over. Default is: 3
#Blacklist=
#DstIdBlackListSlot1RF=       # comma separated list TGs to block on RF Slot1
#DstIdBlackListSlot2RF=       # comma separated list TGs to block on RF Slot2
#DstIdWhiteListSlot1RF=       # comma separated list TGs to allow on RF Slot1
#DstIdWhiteListSlot2RF=       # comma separated list TGs to allow on RF Slot2
#DstIdBlackListSlot1NET=      # comma separated list TGs to block on NET Slot1
#DstIdBlackListSlot2NET=      # comma separated list TGs to block on NET Slot2
#DstIdWhiteListSlot1NET=      # comma separated list TGs to allow on NET Slot1
#DstIdWhiteListSlot2NET=      # comma separated list TGs to allow on NET Slot2

[System Fusion]
Enable=0                      # Enable Fusion repeater mode. Default is: 1

[D-Star Network]
Enable=0                      # Enable D-Star network connection. Requires ircDDBGateway. Default is: 1
GatewayAddress=127.0.0.1
GatewayPort=20010             # UDP port ircDDBGateway is listening on.
LocalPort=20011               # UDP port MMDVMHost is listening on.
Debug=0

[DMR Network]
Enable=1                      # Enable DMR network connection. Default is: 1
Address=51.254.100.133
Port=62031                    # Port DMRMaster is listening on
# Local=3350                  # Local UDP port if needed else random
Password=passwOrd             # Access password of DMR Master
RSSI=0                        # Enable RSSI measure. Defaukt is: 0
Slot1=1                       # Enable Slot 1 Do not enable for DVMega. Default is: 1
Slot2=1                       # Enable Slot 2. Default is: 1
Debug=1                       # Default is: 0

[System Fusion Network]
Enable=0                      # Enable Fusion network connection
LocalAddress=127.0.0.1
LocalPort=3200
GwyAddress=127.0.0.1
GwyPort=4200
Debug=0

[TFT Serial]
Port=/dev/ttyAMA0
Brightness=50

[HD44780]
Rows=2
Columns=16

# For basic HD44780 displays (4-bit connection)
# rs, strb, d0, d1, d2, d3
Pins=11,10,0,1,2,3

# Device address for I2C
I2CAddress=0x20

# PWM backlight
PWM=0
PWMPin=21
PWMBright=100
PWMDim=16

DisplayClock=1
UTC=0

[Nextion]
Port=/dev/ttyAMA0
Brightness=50
DisplayClock=1
UTC=0
IdleBrightness=20

[OLED]
Type=3
Brightness=0
Invert=0
Premier essai de validation, avant calibration
Pour vérifier que
- le logiciel MMDVMHost installé sur le Rapsberry Pi communique correctement avec le firmware MMDVM installé sur l’Arduino Due,
- le logiciel MMDVMHost connecte bien le serveur DMR BrandMeister
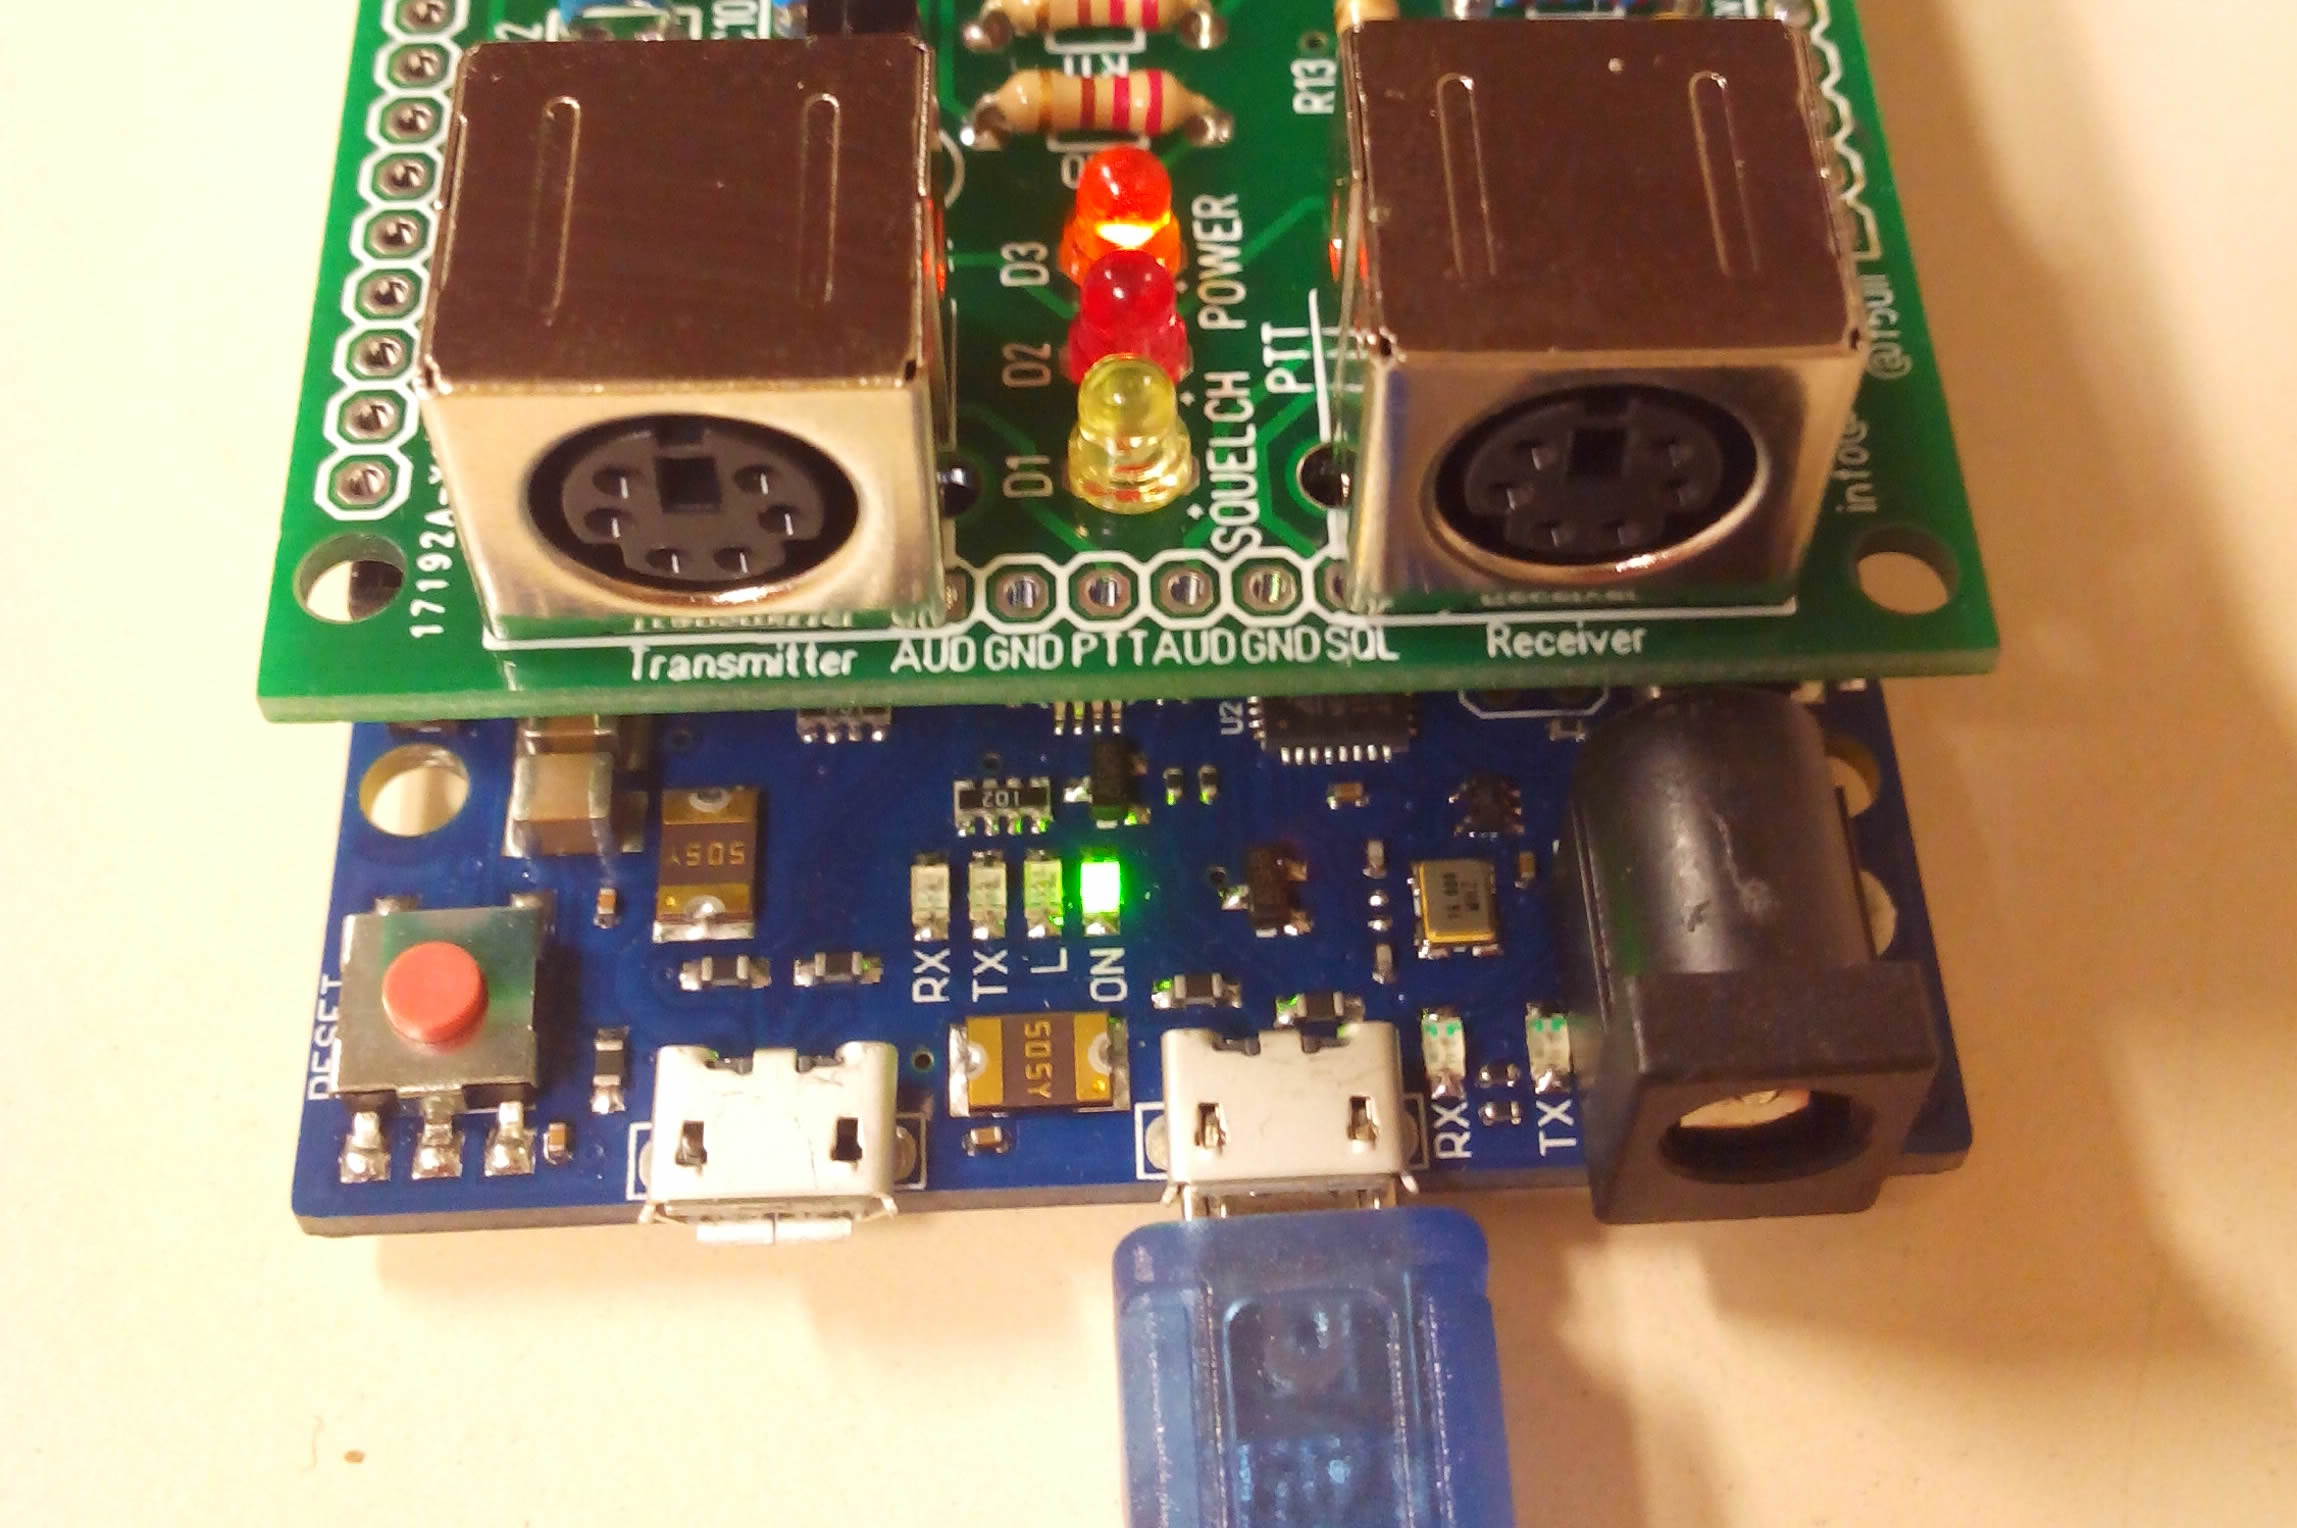 nous raccordons par câble USB entre le Raspberry Pi et l’Arduino Due. La prise de droite de l’Arduino Due (prêt du connecteur d’alimentation) doit être utilisé.
Lancez le logiciel directement en indiquant le chemin du fichier de configuration.
sudo /opt/MMDVMHost/MMDVMHost /opt/MMDVMHost/MMDVM.ini
L’arduino se met à clignoter (lentement puis rapidement lorsqu’il y le relais est en émission).
Cela vous donne les traces suivantes, avec du trafic entrant en provenance du réseau (internet).
I: 2016-08-18 19:29:50.005 This software is for use on amateur radio networks only,
I: 2016-08-18 19:29:50.005 it is to be used for educational purposes only. Its use on
I: 2016-08-18 19:29:50.005 commercial networks is strictly prohibited.
I: 2016-08-18 19:29:50.005 Copyright(C) 2015, 2016 by Jonathan Naylor, G4KLX and others
M: 2016-08-18 19:29:50.005 MMDVMHost-20160816 is starting
I: 2016-08-18 19:29:50.006 General Parameters
I: 2016-08-18 19:29:50.006     Callsign: F1ZZZ
I: 2016-08-18 19:29:50.006     Duplex: yes
I: 2016-08-18 19:29:50.006     Timeout: 180s
I: 2016-08-18 19:29:50.006     RF Mode Hang: 10s
I: 2016-08-18 19:29:50.006     Net Mode Hang: 3s
I: 2016-08-18 19:29:50.006     D-Star: disabled
I: 2016-08-18 19:29:50.006     DMR: enabled
I: 2016-08-18 19:29:50.006     YSF: disabled
I: 2016-08-18 19:29:50.006 Modem Parameters
I: 2016-08-18 19:29:50.006     Port: /dev/ttyACM0
I: 2016-08-18 19:29:50.006     RX Invert: no
I: 2016-08-18 19:29:50.006     TX Invert: yes
I: 2016-08-18 19:29:50.007     PTT Invert: no
I: 2016-08-18 19:29:50.007     TX Delay: 100ms
I: 2016-08-18 19:29:50.007     DMR Delay: 0 (0.0ms)
I: 2016-08-18 19:29:50.007     RX Level: 50%
I: 2016-08-18 19:29:50.007     D-Star TX Level: 50%
I: 2016-08-18 19:29:50.007     DMR TX Level: 50%
I: 2016-08-18 19:29:50.007     YSF TX Level: 50%
I: 2016-08-18 19:29:50.007     RX Frequency: 431950000Hz
I: 2016-08-18 19:29:50.007     TX Frequency: 439550000Hz
I: 2016-08-18 19:29:50.007     Osc. Offset: 0ppm
M: 2016-08-18 19:29:50.007 Opening the MMDVM
I: 2016-08-18 19:29:52.019 MMDVM protocol version: 1, description: MMDVM 20160624 24                          kHz (D-Star/DMR/System Fusion/CW Id)
I: 2016-08-18 19:29:52.039 Display Parameters
I: 2016-08-18 19:29:52.040     Type: None
I: 2016-08-18 19:29:52.040 DMR Network Parameters
I: 2016-08-18 19:29:52.040     Address: 51.254.100.133
I: 2016-08-18 19:29:52.040     Port: 62031
I: 2016-08-18 19:29:52.040     Local: random
I: 2016-08-18 19:29:52.040     Slot 1: enabled
I: 2016-08-18 19:29:52.040     Slot 2: enabled
I: 2016-08-18 19:29:52.040     RSSI: disabled
I: 2016-08-18 19:29:52.040 Info Parameters
I: 2016-08-18 19:29:52.040     Callsign: F5UII-R
I: 2016-08-18 19:29:52.040     RX Frequency: 431950000Hz
I: 2016-08-18 19:29:52.040     TX Frequency: 439550000Hz
I: 2016-08-18 19:29:52.041     Power: 5W
I: 2016-08-18 19:29:52.041     Latitude: 47.700001deg N
I: 2016-08-18 19:29:52.041     Longitude: 7.400000deg E
I: 2016-08-18 19:29:52.041     Height: 12m
I: 2016-08-18 19:29:52.041     Location: "Colmar"
I: 2016-08-18 19:29:52.041     Description: "Multi-Mode Repeater"
I: 2016-08-18 19:29:52.041     URL: "www.yourwebsite.net"
M: 2016-08-18 19:29:52.041 Opening DMR IPSC
I: 2016-08-18 19:29:52.041 CW Id Parameters
I: 2016-08-18 19:29:52.041     Time: 10 mins
I: 2016-08-18 19:29:52.041 DMR Parameters
I: 2016-08-18 19:29:52.041     Id: 2084333
I: 2016-08-18 19:29:52.041     Color Code: 1
I: 2016-08-18 19:29:52.041     Self Only: no
I: 2016-08-18 19:29:52.042     Prefixes: 0
I: 2016-08-18 19:29:52.042     Lookup File: DMRIds.dat
I: 2016-08-18 19:29:52.042     Call Hang: 3s
I: 2016-08-18 19:29:52.042     TX Hang: 3s
I: 2016-08-18 19:29:52.042     RSSI Multiplier: 1
I: 2016-08-18 19:29:52.042     RSSI Offset: 10
I: 2016-08-18 19:29:52.297 Loaded 40545 DMR Ids to the callsign lookup table
M: 2016-08-18 19:29:52.297 MMDVMHost-20160816 is running
M: 2016-08-18 19:30:02.240 Logged into the master successfully
M: 2016-08-18 19:52:37.767 DMR Slot 1, received network voice header from F1RRJ to TG 208
M: 2016-08-18 19:52:48.764 DMR Slot 1, received network end of voice transmission, 10.7 seconds, 0% packet loss, BER: 0.0%
M: 2016-08-18 19:55:40.749 DMR Slot 1, received network voice header from F1RRJ to TG 208
M: 2016-08-18 19:55:57.644 DMR Slot 1, received network end of voice transmission, 16.8 seconds, 1% packet loss, BER: 0.0%
M: 2016-08-18 19:56:15.277 DMR Slot 1, received network voice header from F4FHM to TG 208
M: 2016-08-18 19:56:15.826 DMR Slot 1, received network end of voice transmission, 0.5 seconds, 0% packet loss, BER: 3.0%
M: 2016-08-18 19:58:49.881 DMR Slot 1, received network voice header from ON7FI to TG 208
M: 2016-08-18 19:58:50.858 DMR Slot 1, received network end of voice transmission, 0.8 seconds, 0% packet loss, BER: 0.0%
M: 2016-08-18 19:59:08.617 DMR Slot 1, received network voice header from ON7FI to TG 208
M: 2016-08-18 19:59:15.952 DMR Slot 1, received network end of voice transmission, 6.8 seconds, 0% packet loss, BER: 0.0%
M: 2016-08-18 19:59:38.423 DMR Slot 1, received network voice header from ON7FI to TG 208
M: 2016-08-18 19:59:47.558 DMR Slot 1, received network end of voice transmission, 9.1 seconds, 0% packet loss, BER: 0.0%
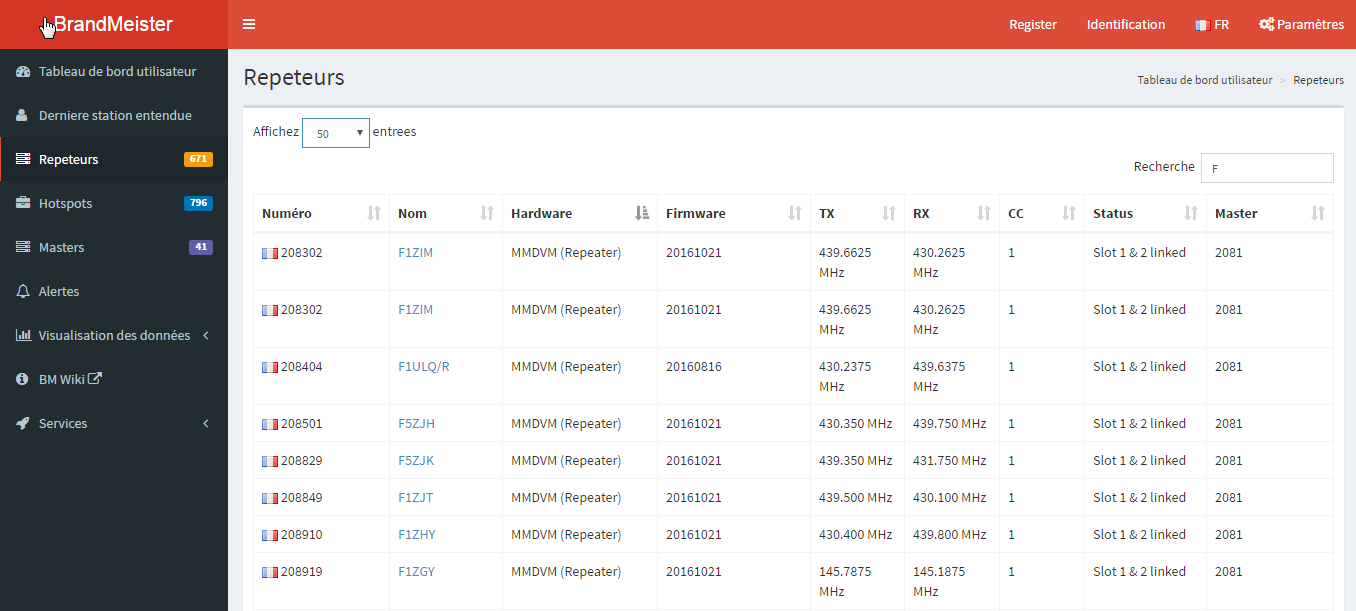
En visitant la page des relais “fait maison” (Homebrew Repeteurs) sur le site Brandmeister, vous allez voir l’indicatif de votre relais apparaître.
Spécifications des commandes du firmware MMDVM
Pour les curieux, voici les spécifications et commandes du firmware à envoyer à l’arduino MMDVM via le port série : MMDVM Specification 20150922 . Notez bien que cette documentation date de septembre 2015. Les informations ont pu évoluer depuis.
Bonjour,
j’aurai mis un décalage du démarrage du MMDVM idem YSFGateway
et je mettrai le fichier MMDVM.ini (YSFGateway.ini) dans ex: /home/pi pour le conserver pendant les updates.
donc lancement /opt/MMDVMHost/MMDVMHOST /home/pi/MMDVM.ini
Beau travail
Merci
(Translate by F5UII below)
Hello,
I would have set a start delay of the MMDVM idem YSFGateway
And I will put the file MMDVM.ini (YSFGateway.ini) into ex: /home/pi to keep it during the updates.
So launch is made by /opt/MMDVMHost/MMDVMHOST /home/pi/MMDVM.ini
Good job
Thank you
Merci Jean-Yves pour ces commentaires. En effet, il vaut mieux placer les fichiers de configuration hors du répertoire mis à jour. Bonne remarques
Thank you Jean-Yves for these comments. Indeed, it is better to place the configuration files out of the updated directory. Good remarks
Félicitations pour cet article, et Merci !
(Translation by F5UII)
Congratulations for this article, and thank you!
Bonjour,
Excellent article, félicitations.
Ceux qui voudront ajouter un display LCD devront recompiler en utilisant le makefile ad-hoc et adapter les scripts s’ils utilisent une image Raspbian pré-configurée ( DMR Utah par exemple)
Pour un LCD n’oubliez pas de démarrer MMDVMHost avec les droits de root (a cause de la librairie WiringPi ). Ce “détail” m’a fait perdre pas mal de temps, heureusement que le support de la liste Yahoo a été efficace.
73,
Jeff, F5BCB
(Translation by F5UII)
Hello,
Excellent article, congratulations.
Those who want to add a LCD display will need to recompile using the ad-hoc makefile and adapt the scripts if they are using a pre-configured Raspbian image (eg Utah DMR)
For an LCD do not forget to start MMDVMHost with the root rights (because of the WiringPi library). This “detail” made me waste a lot of time, fortunately that the support of the Yahoo Group was effective.
73,
Jeff, F5BCB
Merci Jean-François pour ce commentaire et le partage d’information avec cette précision technique concernant les écrans LCD.
Thank you Jeff for this comment and the sharing information with this technical precision regarding the LCD screens.
73
Christian
There is an error: the first Bessel null is 2.4048, so 1200*2.4048 = 2885,76Hz. The correct deviation for
DMR is 2749Hz, 5% lower.
My recommendation is to find the null using the potentiometer and then just reduce the TXlevel by 5. Try to avoid low TXlevels (50-75 is fine) to use the maximum DAC dynamic range ensuring a good SNR.
Traduction :
Il y a une erreur: le premier Bessel est nulle à 2.4048, donc 1200 * 2.4048 = 2885,76Hz. La déviation correcte pour DMR est 2749Hz, 5% inférieure.
Ma recommandation est de trouver le point J0 nulle à l’aide du potentiomètre, puis de réduire le TXlevel de 5. Essayez d’éviter les TXlevels faibles (50-75 est très bien) pour utiliser la plage dynamique maximale DAC assurant un bon SNR.
Félicitations pour la qualité de cet article, et Merci !
Ceci permettra aux OM’s d’aboutir dans leurs travaux.
Bravo.
F4GIX
(Translation)
Congratulations for the quality of this article, and Thank you!
This will allow the OMs to succeed in their work.
Bravo.
F4GIX
Merci Didier
Thanks Did
As of the November 2016 release, Raspbian has the SSH server disabled by default. You will have to enable it manually. This is done using raspi-config:
Enter sudo raspi-config in the terminal, first select Interfacing options, then navigate to ssh, press Enter and select Enable or disable ssh server.
For headless setup, SSH can be enabled by placing a file named ‘ssh’, without any extension, onto the boot partition of the SD card.
(Translation F5UII)
À partir de la version Novembre 2016, Raspbian a le serveur SSH désactivé par défaut. Vous devrez l’activer manuellement. Cela se fait à l’aide de raspi-config:
Entrez sudo raspi-config dans le terminal, sélectionnez d’abord les options Interfacing, puis naviguez jusqu’à ssh, appuyez sur Entrée et sélectionnez Activer ou désactiver le serveur ssh.
Pour une configuration sans tête, SSH peut être activé en plaçant un fichier nommé ‘ssh’, sans extension, sur la partition de démarrage de la carte SD.
Thank you for this important information … it means that if we follow the first manipulation, we are obliged to connect a screen and a keyboard, which I never realized with a Raspberry Pi, having always used SSH by networkg.
(Translation)
Merci pour cette information importante… cela veux dire que si l’on suit la première manipulation, on est obligé d’y brancher un écran et un clavier, chose que je n’est jamais réalisé avec un Raspberry Pi, ayant toujours utilisé SSH en réseau.
I have not tried this but it should turn on SSH at boot
(from my above note)
“For headless setup (read as no keyboard or monitor) , SSH can be enabled by placing a file named ‘ssh’, without any extension, onto the boot partition of the SD card.”
Doug
(Translation F5UII)
Je n’ai pas essayé ceci mais cela devrait activer SSH au démarrage
(de mon commentaire précédent)
“Pour la configuration sans interface (pas de clavier ou de moniteur), SSH peut être activé en plaçant un fichier nommé ‘ssh’, sans extension, sur la partition de démarrage de la carte SD.
Doug
Congratulations and thank you for producing such an excellent guide to setting up the MMDVM / Arduino Due / Pi combination.
73
Mike – G6GOS
(Traduction de F5UII)
Félicitations et merci d’avoir produit un excellent guide sur la mise en place de la combinaison MMDVM / Arduino Due / Pi.
73
Mike – G6GOS
Thank you Mike, happy to help you with the tunning of the fabulous MMDVM 😉
Merci Mike, heureux de pouvoir vous aidez à la mise au point du fabuleux MMDVM 😉
F5UII,
Thank you for the excellent guide for tuning up the MMDVM board. My unit now works on all modes except DMR. Since I am not familiar with DMR, it might be a MD380 radio setup problem or maybe an MMDVM.ini setting.
Here is what I am getting on the MMDVMHost terminal screen when I key the MD-380:
M: 2017-06-01 01:22:25.471 CSBK BS_Dwn_Act for ANY received from 3122007M: 2017-06-01 01:22:31.442 Debug: DMRIdleRX: data sync found centre/threshold 0 473
M: 2017-06-01 01:22:31.446 Debug: DMRIdleRX: data sync found centre/threshold -20 498
M: 2017-06-01 01:22:31.457 CSBK BS_Dwn_Act for ANY received from 3122007
M: 2017-06-01 01:22:32.678 DMR, Logged into the master successfully
M: 2017-06-01 01:22:33.098 Debug: DMRSlotRX: csbk found slot/pos/centre/threshold 2 457 -30 452
M: 2017-06-01 01:22:37.939 Debug: DMRIdleRX: data sync found centre/threshold 10 441
M: 2017-06-01 01:22:37.951 CSBK BS_Dwn_Act for ANY received from 3122007
M: 2017-06-01 01:22:39.594 Debug: DMRSlotRX: csbk found slot/pos/centre/threshold 2 466 11 480
M: 2017-06-01 01:22:41.424 Debug: DMRIdleRX: data sync found centre/threshold 7 442
M: 2017-06-01 01:22:41.438 CSBK BS_Dwn_Act for ANY received from 3122007
M: 2017-06-01 01:22:45.346 Debug: DMRIdleRX: data sync found centre/threshold -24 491
M: 2017-06-01 01:22:45.349 Debug: DMRIdleRX: data sync found centre/threshold -34 476
M: 2017-06-01 01:22:45.360 CSBK BS_Dwn_Act for ANY received from 3122007
M: 2017-06-01 01:22:49.511 Debug: DMRIdleRX: data sync found centre/threshold -11 462
M: 2017-06-01 01:22:49.521 CSBK BS_Dwn_Act for ANY received from 3122007
M: 2017-06-01 01:22:53.074 Debug: DMRIdleRX: data sync found centre/threshold -20 456
M: 2017-06-01 01:22:53.085 CSBK BS_Dwn_Act for ANY received from 3122007
Any suggestions would be appreciated.
Thanks,
Dave
K5OZ
(Traduction)
F5UII,
Nous vous remercions de l’excellent guide pour régler le modem MMDVM. Mon appareil fonctionne maintenant sur tous les modes sauf DMR. Comme je ne connais pas DMR, il pourrait s’agir d’un problème de configuration radio MD380 ou peut-être d’un paramètre MMDVM.ini.
Toute suggestion serait appréciée.
Merci,
Dave
K5OZ
Hello Dave,
Have a look on the TCXO operation. With this command (adapted on current logfile of course), we check stability
tail -f /MMDVM-2017-06-03.log | grep --line-buffered pos | cut -c91-94During transmission with your MD380 to the repeater, you must have same stable value
in my case with 12.000MHz TCXO
450

450

450

450

...
If its derives, check to TCXO output with a scope. The sinus level must be 0-3.3V. If the 0 is not reach (highest value), you may shorcut C22.
Hope this will help you
73
(Traduction)
Bonjour Dave
Vérifions le fonctionnement du TCXO. Avec cette commande (personnalisé avec le dernier fichier log bien-sûr), nous vérifions la stabilité
tail -f /MMDVM-2017-06-03.log | grep --line-buffered pos | cut -c91-94Dans mon cas, avec un TCXO 12.000MHz j’ai
450

450

450

450

...
Si cela dérive, vérifier avec un oscillo la sortie du TCXO. Les niveau du signal sinusoïdal doivent être 0-3.3V. Si le 0 n’est pas atteint (valeur plus haute), vous pouvez court-circuiter C22.
J’espère que cela vous aidera.
73
Bonjour Christian,
Tu nous parles d’atténuateurs, tu me conseilles de prendre quelle(s) valeur(s) pour ne pas abimer un DSA815TG ? Sachant que j’utilise un FT7900 en 5W ( pour les réglages )
Merci d’avance
73’s
(Translation)
Hello Christian,
You talk about attenuators, what value (s) can you advise me not to damage a DSA815TG? I use a FT7900 in 5W (for adjustments)
Thank you in advance
Sébastien,
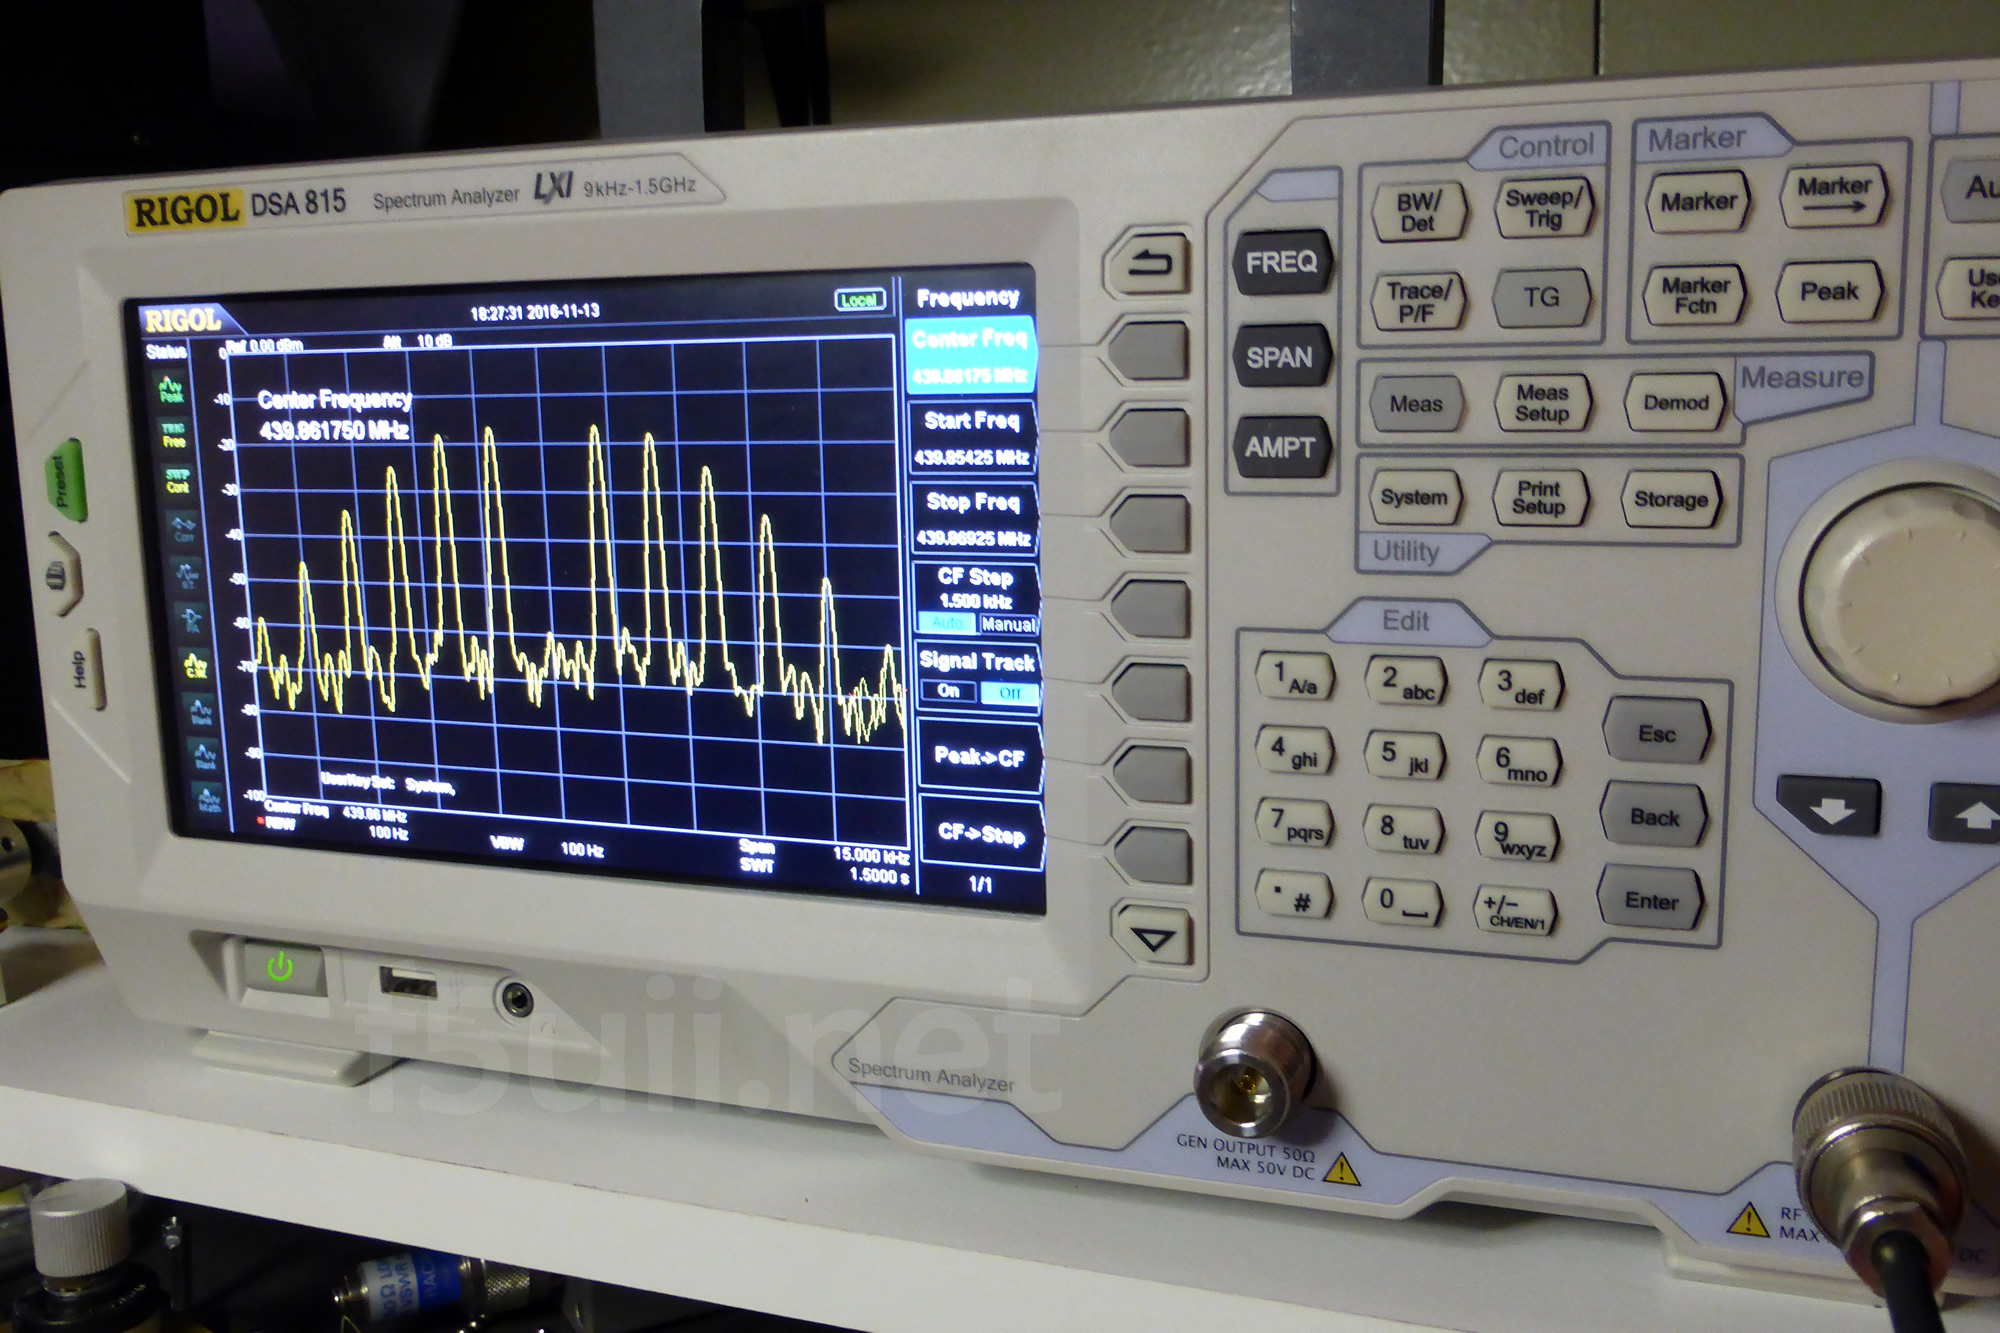
D’après ce que j’ai trouvé dans la documentation, ton analyseur mesure jusqu’à +20dBm (100mW) et sera endommagé à partir de +25dBm (316mW).
5W étant 37 dBm, l’atténuateur doit donc être d’au moins 17dBm. Un atténuateur standard de 50dBm amène à ce que tu vois sur les captures d’écran.
J’ajoute qu’il n’est pas nécessaire de mettre l’émetteur en ligne pour réaliser le réglage MMDVMCal, puisque nous ne cherchons pas à connaitre les niveaux, mais uniquement d’afficher le spectre. Il suffit d’une petit antenne sur le spectre.
(Translation) From what I found in the documentation, your analyzer measures up to + 20dBm (100mW) and will be damaged from + 25dBm (316mW).
5W being 37 dBm, the attenuator must therefore be at least 17 dBm. A standard attenuator of 50dBm leads to what you see on the screenshots.
I add that it is not necessary to put the transmitter in line to realize the MMDVMCal setting, since we do not try to know the levels, but only to display the spectrum. Just a small antenna on the spectrum.
73
Hi
What attenuator did you use and where did you buy it ?
I have seen a few on Ebay but not sure what is best.
https://www.ebay.co.uk/itm/1pce-Attenuator-N-male-to-female-50W-50-Watts-DC-3-0GHZ-50ohm-COAXIAL-6dBi-50dBi/223068717582
and
https://www.ebay.co.uk/itm/RF-Coaxial-Attenuator-10W-30W-50W-1dB-40dB-N-Type-Male-to-Female-3-0GHZ-50-Ohm/282736491856
Many thanks
(Traduction)
Salut
Quel atténuateur avez-vous utilisé et où l’avez-vous acheté ?
J’en ai vu quelques-uns sur Ebay mais je ne sais pas ce qui est le mieux.
https://www.ebay.co.uk/itm/1pce-Attenuator-N-male-to-female-50W-50-Watts-DC-3-0GHZ-50ohm-COAXIAL-6dBi-50dBi/223068717582
et
https://www.ebay.co.uk/itm/RF-Coaxial-Attenuator-10W-30W-50W-1dB-40dB-N-Type-Male-to-Female-3-0GHZ-50-Ohm/282736491856
Merci beaucoup
The objective of the attenuator is to limit the energy at the input of your measuring instrument. Often, spectrum analyzers require that the level should be limited to 20dBm. Beyond that your equipment will suffer irreversible damage. This represents 100 mW. Let’s take the example of a transmitter delivering 25W. This represents a level of 44 dBm. You will need an attenuator of at least 24 dBm and capable of dissipating 24.9W. Of course, for MMDVM it is not necessary to perform measurements at 25W, they can be performed by connecting an antenna to the analyzer.
A colleague of mine bought the round model (30dB and 100W I think). I am equipped with a 30dB 30W attenuator. This is the model, available here: Attenuator 30dBm 30W 50 ohms
In addition, you were asking me for my opinion on this spectrum analyzer : OWON XSA1015-TG Spectrum Analyzer 9kHz -1.5GHz
I don’t know this brand. I use Rigol and can also recommend the Siglent brand. I didn’t take the time to look at everything in detail, but it could be a good entry-level equipment that for an amateur will surely fulfill his role.
Hoping to have been able to help you in your choices.
(Traduction)
L’objectif de l’atténuateur est de limité l’énergie en entrée de votre appareil de mesure. Souvent, les analyseurs de spectre demandent que le niveau soit limité à 20dBm. Au delà votre équipement subira des dégâts irréversibles. Cela représente 100 mW. Prenons l’exemple d’un émetteur délivrant 25W. Cela représente un niveau de 44 dBm. Il vous faudra un atténuateur d’au moins 24 dBm et capable de dissiper 24,9W. Bien-sûr, pour MMDVM il n’est pas nécessaire de réaliser des mesures à 25W, elles peuvent d’ailleurs être réalisé en raccordant une antenne à l’analyseur.
Un collègue à moi à acheter le model rond (30dB et 100W je crois). Je suis équipé d’un atténuateur 30dB 30W. Il s’agit de ce modèle, disponible ici : Attenuator 30dBm 30W 50 ohms.
Par ailleurs, vous me demandiez mon avis sur cet analyseur de spectre : OWON XSA1015-TG Analyseur de spectre 9kHz -1.5GHz
Je ne connais pas cette marque. J’utilise Rigol et peut conseiller également la marque Siglent. Je n’ai pas pris le temps de tout regarder en détail, mais cela pourrait être un bon équipement d’entrée de gamme qui pour un amateur remplira surement tout à fait son rôle.
Espérant avoir pu vous aider dans vos choix.
The 30dB 30W attenuator arrived today.
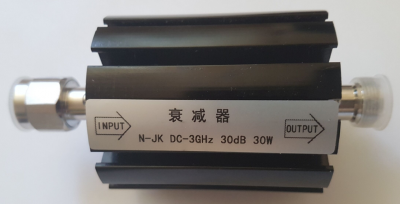
Is the sticker the wrong way round?
Many thanks
Norman
(Traduction)
L’atténuateur 30dB 30W est arrivé aujourd’hui.
L’autocollant est-il à l’envers ?
Merci beaucoup
Normand
There is no particular direction when using an attenuator. You can ignore the label.
Connected to the input of an analyzer equipped with a female N plug, the side labelled INPUT should be plugged in instead.
Regards, Christian
Il n’y pas de sens particulier dans l’utilisation d’un atténuateur. Vous pouvez ne pas en tenir compte de l’étiquette.
Raccordé à l’entrée d’un analyseur équipé d’une fiche N femelle, on branchera plutôt le coté étiqueté INPUT.
Cordialement, Christian
Bonjours, nous avons suivit votre tuto, mais au moment de lancer la commande “
sudo /opt/MMDVMCal/MMDVMCal /dev/ttyACM0”nous avons la réponse suivante :
Version: 1 "MMDVM 20170501 TCXO (D-Star/DMR/System Fusion/P25/RSSI/CW Id) (Build: 22:17:02 Jun 30 2017)"Invalid response
0000: E0 04 02 00
avez vous une idée du soucis ?
(Translation)
Hello, we followed your tutorial, but when running the command “
sudo /opt/MMDVMCal/MMDVMCal /dev/ttyACM0”We have the following answer:
Version: 1 "MMDVM 20170501 TCXO (D-Star/DMR/System Fusion/P25/RSSI/CW Id) (Build: 22:17:02 Jun 30 2017)"Invalid response
0000: E0 04 02 00
Do you have an idea of the worry?
Bonjour,
Cela indique à priori qu’il n’y a pas de communication entre MMDVMHost et votre platine de filtrage MMDVM.
Le port USB est-il bien raccordé; Voyez vous le port USB ? Executez cette commande qui doit lister ttyACM0 lorsque la liaison est branchée.
ls /dev/ttyAC*(Translation)
Hello,
It lay indicates that there is no communication between MMDVMHost and your MMDVM filtering modem.
Is the USB port connected properly? Do you see the USB port? Execute this command, which should list ttyACM0 when the connection is linked.
ls /dev/ttyAC*Hi Dave,
First of all “Many thanks” for sharing your experiences and your knowledge with others!
I checked the stability of my TCXO and got a reading or 431 (at the beginning) – every 10 values there is a decrease of “1”. So within 2 minutes my reading is below 390! The decrease is very stable and continuous.
I am using the original MMDVM from Bruce, Canada with 12 Mc TCXO.
All modes work – D-Star produces BERs of 0,00% while DMR still sounds a bit “floating”. Voices sound a bit swimming – not really stable. The TX output BER is most-likely in the range of 2% (externally measured with a DV4mini) – I am using a FTM-100D (as TX) but also tried a FT-7900 (with same results).
Looks like there is still a kind of a problem – the DSO-815TG alignment could fix this either.
Any idea is much apprecitaed!
Thanks, 73,
Andy – DL6EAT
(Traduction)
Salut Dave,
Tout d’abord “Merci beaucoup” de partager vos expériences et vos connaissances avec les autres!
J’ai vérifié la stabilité de mon TCXO et j’ai obtenu une valeur de 431 (au début) – toutes les 10 valeurs il y a une diminution de “1”. Donc en 2 minutes ma lecture est en dessous de 390! La baisse est très stable et continue.
J’utilise le MMDVM original de Bruce, Canada avec 12 Mc TCXO.
Tous les modes fonctionnent – D-Star produit des TEB de 0,00% alors que DMR sonne encore un peu “flottant”. Les voix sonnent un peu nageantes – pas vraiment stables. Le TEB de sortie TX BER est le plus probable dans la plage de 2% (mesuré à l’extérieur avec un DV4mini) – J’utilise un FTM-100D (comme TX) mais j’ai aussi essayé un FT-7900 (avec les mêmes résultats).
On dirait qu’il y a encore une sorte de problème – l’alignement du DSO-815TG n’a pas résolu ce problème non plus.
Toute piste serait appréciée
Merci, 73,
Andy – DL6EAT
Hello Andy,
Name is Chris, but never mind.
It seems in relation with the TCXO, have a look on the TCXO output levels, that must evoluate between near 0-3.3V
May help you also:
https://www.f5uii.net/en/compilation-installation-configuration-mmdvm-stm32f4xx/#comment-13080
Tell me if you find a solution
73
Chris
(Traduction)
Hello Andy,
Je me prénomme Christian, mais c’est pas grave.
Cela semble venir du TCXO, vérifiez les niveaux de sortie du TCXO, qui doit évoluer entre 0-3.3V
Peut vous aider :
https://www.f5uii.net/compilation-installation-configuration-mmdvm-stm32f4xx/#comment-13080
Dites moi si vous trouvez une solution
73 Chris
Hi.
When I’m going to calibrate, with the command:
pi@raspberrypi:/ $ sudo /opt/MMDVMCal/MMDVMCal /dev/ttyACM0I get the error:
No response from the modemI have checked, that the port that uses the raspberry is the ttyAMC0.
By activating the log, I see how the modem is configured.
-------------------------------I: 2017-10-14 22:12:30.584 Modem Parameters
I: 2017-10-14 22:12:30.584 Port: /dev/ttyACM0
I: 2017-10-14 22:12:30.584 RX Invert: no
I: 2017-10-14 22:12:30.584 TX Invert: no
I: 2017-10-14 22:12:30.584 PTT Invert: no
I: 2017-10-14 22:12:30.584 TX Delay: 100ms
I: 2017-10-14 22:12:30.584 RX Offset: 0Hz-
I: 2017-10-14 22:12:30.584 TX Offset: 0Hz
I: 2017-10-14 22:12:30.584 DMR Delay: 0 (0.0ms)
I: 2017-10-14 22:12:30.584 RX Level: 50.0%
I: 2017-10-14 22:12:30.584 CW Id TX Level: 50.0%
I: 2017-10-14 22:12:30.584 D-Star TX Level: 50.0%
I: 2017-10-14 22:12:30.584 DMR TX Level: 50.0%
I: 2017-10-14 22:12:30.584 YSF TX Level: 50.0%
I: 2017-10-14 22:12:30.584 P25 TX Level: 50.0%
I: 2017-10-14 22:12:30.585 RX Frequency: 431000000Hz (431000000Hz)
I: 2017-10-14 22:12:30.585 TX Frequency: 431000000Hz (431000000Hz)
M: 2017-10-14 22:12:30.585 Opening the MMDVM
I: 2017-10-14 22:12:32.598 MMDVM protocol version: 1, description: MMDVM 20170501 TCXO (D-Star/DMR/System Fusion/P
25/RSSI/CW Id) (Build: 00:05:22 Aug 7 2017)
-------------------------------------------------------------------
But the error appears: “No reply from the modem for some time, resetting it”
M: 2017-10-14 22:12:32.990 MMDVMHost-20170719 is runningE: 2017-10-14 22:12:44.659 No reply from the modem for some time, resetting it
M: 2017-10-14 22:12:44.660 Closing the MMDVM
M: 2017-10-14 22:12:46.660 Opening the MMDVM
I: 2017-10-14 22:12:48.681 MMDVM protocol version: 1, description: MMDVM 20170501 TCXO (D-Star/DMR/System Fusion/P
25/RSSI/CW Id) (Build: 00:05:22 Aug 7 2017)
Any idea to solve it?
Greetings. Manuel
(Traduction)
Salut.
Quand je lance le logiciel de calibration, avec la commande:
pi@raspberrypi: / $ sudo /opt/MMDVMCal/MMDVMCal /dev/ttyACM0J’ai l’erreur:
Pas de réponse du modem
J’ai vérifié, que le port qui utilise le raspberry pi est le ttyAMC0.
En activant le journal, je vois comment le modem est configuré.
-------------------------------I: 2017-10-14 22:12:30.584 Modem Parameters
I: 2017-10-14 22:12:30.584 Port: /dev/ttyACM0
I: 2017-10-14 22:12:30.584 RX Invert: no
I: 2017-10-14 22:12:30.584 TX Invert: no
I: 2017-10-14 22:12:30.584 PTT Invert: no
I: 2017-10-14 22:12:30.584 TX Delay: 100ms
I: 2017-10-14 22:12:30.584 RX Offset: 0Hz-
I: 2017-10-14 22:12:30.584 TX Offset: 0Hz
I: 2017-10-14 22:12:30.584 DMR Delay: 0 (0.0ms)
I: 2017-10-14 22:12:30.584 RX Level: 50.0%
I: 2017-10-14 22:12:30.584 CW Id TX Level: 50.0%
I: 2017-10-14 22:12:30.584 D-Star TX Level: 50.0%
I: 2017-10-14 22:12:30.584 DMR TX Level: 50.0%
I: 2017-10-14 22:12:30.584 YSF TX Level: 50.0%
I: 2017-10-14 22:12:30.584 P25 TX Level: 50.0%
I: 2017-10-14 22:12:30.585 RX Frequency: 431000000Hz (431000000Hz)
I: 2017-10-14 22:12:30.585 TX Frequency: 431000000Hz (431000000Hz)
M: 2017-10-14 22:12:30.585 Opening the MMDVM
I: 2017-10-14 22:12:32.598 MMDVM protocol version: 1, description: MMDVM 20170501 TCXO (D-Star/DMR/System Fusion/P
25/RSSI/CW Id) (Build: 00:05:22 Aug 7 2017)
-------------------------------------------------------------------
Mais l’erreur apparaît:”Pas de réponse du modem pendant un certain temps, réinitialisation”
M: 2017-10-14 22:12:32.990 MMDVMHost-20170719 is runningE: 2017-10-14 22:12:44.659 No reply from the modem for some time, resetting it
M: 2017-10-14 22:12:44.660 Closing the MMDVM
M: 2017-10-14 22:12:46.660 Opening the MMDVM
I: 2017-10-14 22:12:48.681 MMDVM protocol version: 1, description: MMDVM 20170501 TCXO (D-Star/DMR/System Fusion/P
25/RSSI/CW Id) (Build: 00:05:22 Aug 7 2017)
Une idée pour résoudre ce soucis ?
Salutations. Manuel
Manuel
This could be your TCXO that does not generate the reference signal. Check with the oscilloscope that your TCXO is functional and not mounted upside down, and that the output is not grounded.
Manuel,
(Traduction)
Cela pourrait être votre TCXO qui ne génère pas le signal de référence. Vérifier à l’oscilloscope que votre TCXO est bien fonctionnel et non monté à l’envers, et que la sortie ne soit pas mise à la masse.
Hi.
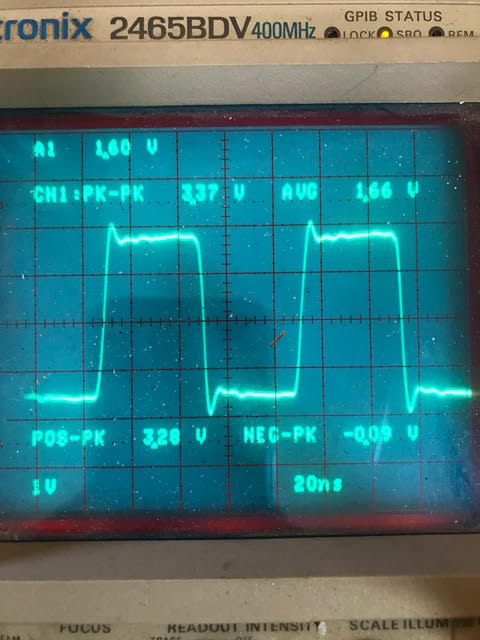
I checked the signal with an oscilloscope.
The measurement is correct.
Frequency: 12.02 MHz.
Values PK-PK 3.37V
Any idea to solve it?
Greetings. Manuel
(Traduction)
Salut.
J’ai vérifié le signal avec un oscilloscope.
La mesure semble correcte.
Fréquence: 12,02 MHz.
Valeurs PK-PK 3,37V
Une idée pour le résoudre?
Salutations. Manuel
Manuel,
That seems correct [0V to 3,3V]. Is this signal the same after C22 ?
I suppose you have checked that your active USB port is that
/dev/ttyACM0. When connected, the port is appearing in the list with this command :ls /dev/tty*73
(Traduction)
Cela semble correct [0 à 3,3V]. Le signal est-il correct après C22 ?
Je suppose que vous avez vérifié que votre port USB actif est bien /dev/ttyACM0, Une fois conencté, le port apparit dans la liste avec la commande :
ls /dev/tty*73
How does one go about editing the host file to enable RSSI output in DMR mode?
I am running A Zumspot board with Raspberry Pi Zero.
(Traduction)
Comment édite-ton le fichier host pour activer la sortie RSSI en mode DMR?
Je tourne avec une carte Zumspot et un Raspberry Pi Zero.
Hello Max,
Your question is also in relation with my other post concerning HotSpot https://www.f5uii.net/en/hotspot-homebrew-zumspot-mmdvm-pistar-tune/
I do not have tested the RSSI on a zumspot, and neither on this Hotspot with ADF7021.
But you may test this advises.
In the Config.h, you have to enable this parameter before compiling MMDVM:
// Send RSSI value:#define SEND_RSSI_DATA
Then your Rasperry PI, you have to inform MMDVMHost with a
RSSI.datfile contenting the conversion of Raw data to dBm levels (linear relationship between the input (raw) RSSI and the RSSI reported to the network), for example :# Raw RSSI dBm997 -100
1020 -95
1200 -80
I am not sure that this second stage is required, because I read here https://github.com/juribeparada/MMDVM_HS/blob/master/BUILD.md
Let me know if you succeded in this goal.
73 Christian
(Traduction)
Max,
Votre question est également en relation avec un autre article qui concerne le HotSpot https://www.f5uii.net/hotspot-homebrew-zumspot-mmdvm-pistar-tune/
Je n’est pas testé le RSSI sur un Zumspot, ni sur un Hotspot avec l’AFD7021.
Mais vous pouvez peut-être tester avec ces pistes.
Dans le fichier Config.h, vous pouvez activer le paramètre avant compilation de MMDVM:
// Send RSSI value:#define SEND_RSSI_DATA
Ensuite, sur le rRaspberry Pi, vous devrez informer MMDVMHost avec le fichier
RSSI.datqui contient les conversion entre niveaux brutes et les niveaux dBm, par exemple :# Raw RSSI dBm997 -100
1020 -95
1200 -80
Je ne suis pas sûr de cette deuxième étape, car j’ai lu ici here https://github.com/juribeparada/MMDVM_HS/blob/master/BUILD.md
Faite moi savoir si cela fonctionne.
73 Christian
can anyone give me some advice I have a mmdvm repeater i am having problems with the DMR side when i habndshake the repeater with a TYT MD380 it opens 1st time when i use Hyrera or Motorola radios it wont handshake.
i have set the dev. on the Tx radio.
i am using taits 8000 in the repeater with a zum board and the pi-star image
hopefully some has had the same problems
(Traduction)
Est-ce que quelqu’un peut me donner des conseils j’ai un répéteur mmdvm j’ai des problèmes avec le côté DMR quand je communique le répéteur avec un TYT MD380 il s’ouvre 1ère fois quand j’utilise Hyrera ou Motorola radios il n’a pas d’échange.
J’ai mis le dev. sur la radio Tx.
J’utilise taits 8000 dans le répéteur avec un zum board et l’image pi-star.
avec un peu de chance, certains ont eu les mêmes problèmes.
Hi yes the cc is correct and also the programming of the radios.
(Traduction)
Hello, oui le CC est correcte et également les programmes des radios.
Have you checked to Colorcode is the good one, same as repeater.
(Traduction)
Avez vous vérifié que le ColorCode est le bon, le même que celui du relais.
Bonjour
D’abord merci pour tout le travail fait sur ce site.
J’ai configuré et installé un arduino due avec une carte mmdvm type zum.
j’ai ensuite installé le logiciel sur raspberry pi3 et j’ai désactivé le bluetooth.
J’ai configuré comme un hotspot et lorsque je lance le logiciel j’ai le message d’erreur suivant :
Received a NAK to the SET_CONFIG command from the modemSi quelqu’un a une idée ???
73’s Jean-Louis F5NXG
(Translation)
Hello
First of all thank you for all the work done on this site.
I configured and installed an arduino due with a mmdvm zum board.
I then installed the software on raspberry pi3 and I deactivated the bluetooth.
I configured as a hotspot and when I launch the software I get the following error message:
Received a NAK to the SET_CONFIG command from the modemIf anyone has an idea???
73’s Jean-Louis F5NXG
Jean-Louis,
Cela doit indiqué qu’il n’y a pas de communication entre le RPI3 le modem MMDVM. Je ne sais pas avec quel port la carte ZUM communique (USB ou paire série). Vérifier que le port de communication est bien configuré (USB =
/dev/ttyACM0, paire série =/dev/ttyAMA0)73 F5UII
(Translation)
Jean-Louis,
This may indicate that there is no communication between the RPI3 and the MMDVM modem. I don’t know which port the ZUM card communicates with (USB or serial pair). Check that the communication port is well configured (USB =
/dev/ttyACM0, serial pair =/dev/ttyAMA0)73 F5UII
Hi, just wanted to say hello and thank you for this posting. The article is very helpful and explained very well.
Cheers,
Juan
(Traduction)
Bonjour, je voulais juste vous dire bonjour et vous remercier pour cette publication. L’article est très utile et très bien expliqué.
Merci,
Juan
Hi.Could you help me install P25?
Vlad
(Traduction)
Bonjour. Pouvez-vous m’aider à installer le P25 ?
Vlad
Thank you for an excellent write u- on documenting the process. Once I get the Diviation where do I put that at? On the TX level or DMRTX level? Say for instance I come up with 22. Do I set the Tx level 22 and leave the DMRTX level at 50? Or do I set TX Level at 100 and DMRTX level at 22?
(Traduction)
Merci pour cet excellent article sur la documentation du processus. Une fois que j’ai obtenu la déviation, où dois-je la placer ? Au niveau TX ou DMRTX ? Disons par exemple que j’obtiens 22. Est-ce que je règle le niveau Tx à 22 et je laisse le niveau DMRTX à 50 ? Ou est-ce que je règle le niveau TX à 100 et le niveau DMRTX à 22 ?
Thank you,
You can either specify, the same level for all modes by filling in TXLevel and putting the TXLevel ‘Mode’ levels in comments, or bring in special level settings depending on the mode. I assume that TXLevel ‘Mode’ overrides the global TXLevel setting. This has to be confirmed. You can probably get away with setting the value on both variables…
(Traduction)
Merci,
Vous pouvez spécifier, soit un niveau identique à tous les modes en renseignant TXLevel et en mettant les niveaux TXLevel’Mode’ en commentaires, soit amener des réglages de niveaux spéficiques en fonction du mode. Je suppose que TXLevel’Mode’ supplente le paramètre global TXLevel. Cela est à vérifier. On s’en sort sans doute en mettant la valeur sur les deux variables…
All
So what if you can not null the center frequency which if I understand correctly is the carrier frequency of your chosen operating frequency. I can only get it down about 10dbm below the others.
Thanks
(Traduction)
Bonjour à tous
Je ne peux pas annuler la fréquence centrale qui, si j’ai bien compris, est la fréquence porteuse de la fréquence de fonctionnement choisie. Je n’arrive à la faire descendre qu’à environ 10dbm en dessous des autres.
Merci