Première méthode manuelle de pilotage
First of all the selection of the method is made by the way of the input or not of the IP address of your encoder in the Controller page of PlutoDVB. For our manual method, you must have the IP field empty (or with the value undefined). Don’t forget to click on the Apply Settings button.

Prior to using it in manual mode, we will install a computer tool that will allow us to communicate in the right language with the encoder’s API server and pass our audioen missing parameter to it. Moreover, this will allow us to adjust all the parameters of the video encoder directly. Don’t worry, everything is explained step by step.
Encoder control by REST client software
- Download and install the software Advanced client REST
- Click on SKIP in the welcome window.
- Download the configuration file prepared for you : arc-data-export-H265.txt
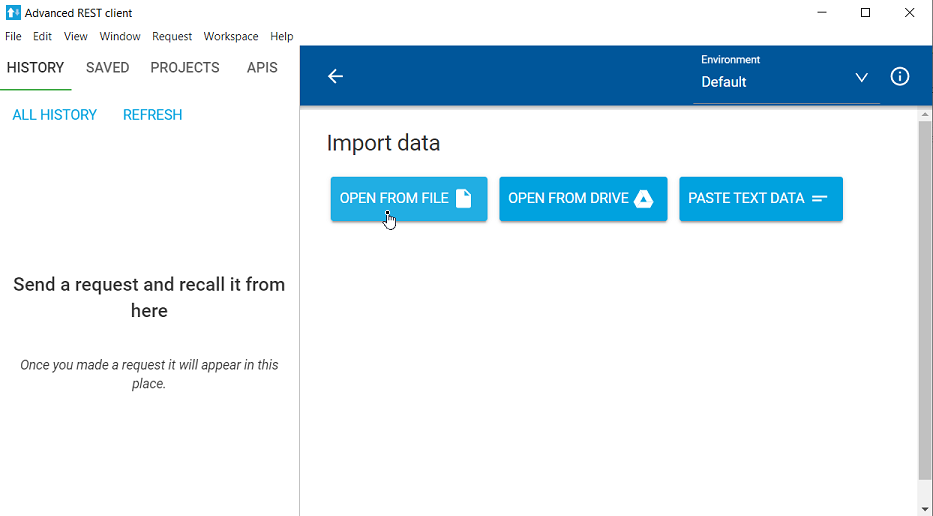
- Choose Import Data from the File menu
- Clic on OPEN FROM FILE
- Select the downloaded “txt” file. To confirm the import of the “H265-Encoder” project of the 3 requests (audio, video and multicast), click the IMPORT DATA button.
- You will find the 3 requests in the PROJECTS tab under H265-Encoder by F5UII. By clicking on each line of the left column, a tab is displayed on the right with the names of the 3 AUDIO VIDEO MULTICAST queries. We are going to use the BODY tab which contains all the parameters that we are going to send to the encoder.
Below (identical to the capture), here is the content of the query that allows us to send directly. You will find the audioen parameter that we were missing (<audioen>1</audioen>)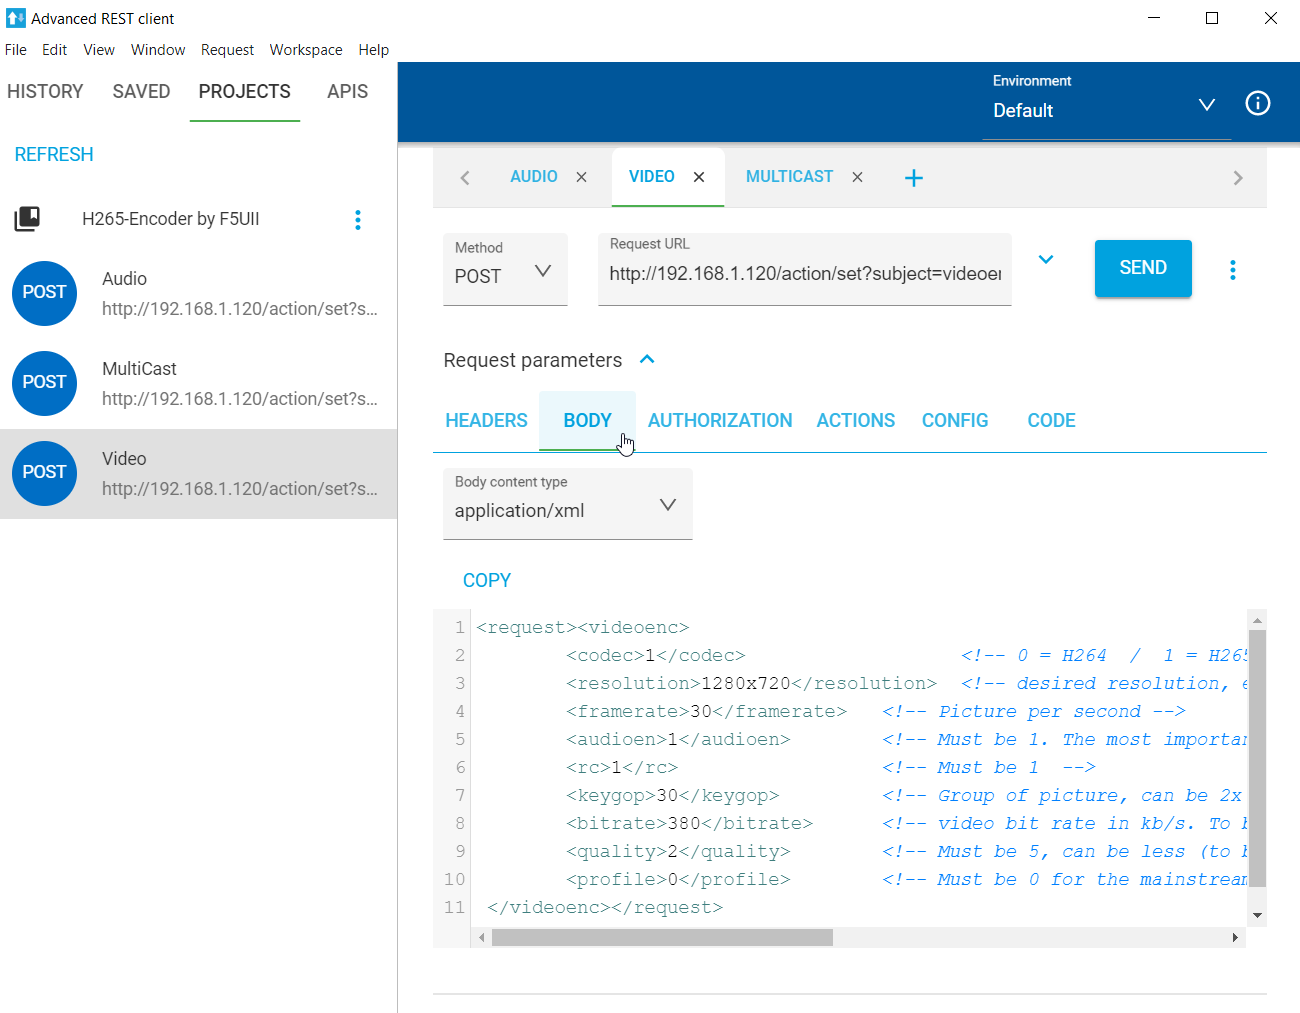
You can modify the values of the different parameters positioned between the keywords <keyword>, and without ever changing the content of the keywords.
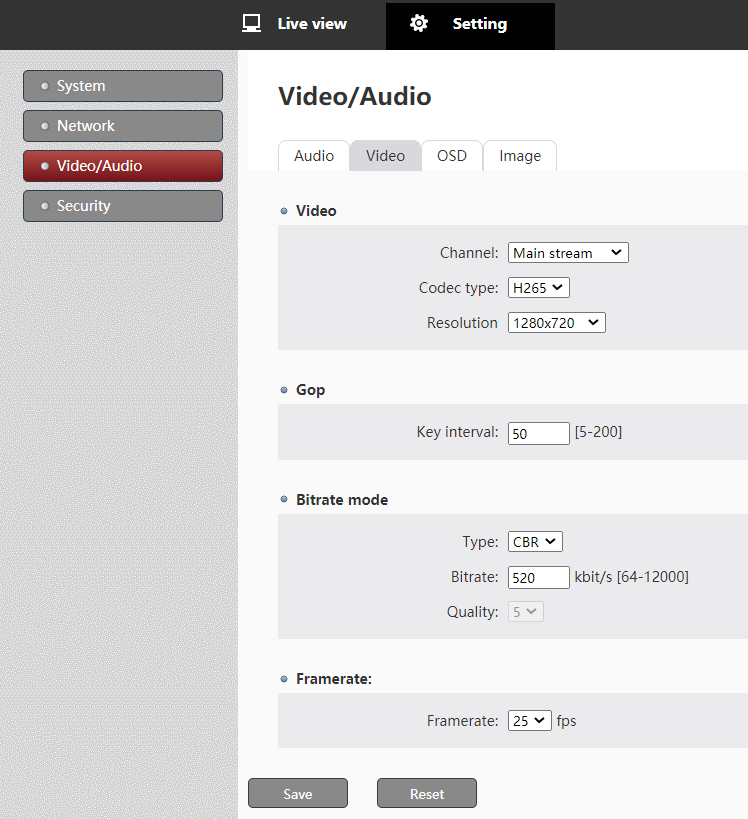
Here are the settings that correspond to those on your encoder’s configuration page found on its Settings / VideoAudio page and on the Video tab.
<request><videoenc> <codec>1</codec> <!-- 0 = H264 / 1 = H265 --> <resolution>1280x720</resolution> <!-- desired resolution, even if not in the list of standard resolutions proposed by the encoder. --> <framerate>25</framerate> <!-- Picture per second --> <audioen>1</audioen> <!-- Muste be 1. The most important for have sound streaming --> <rc>1</rc> <!-- Must be 1 --> <keygop>50</keygop> <!-- Group of picture, can be 2x framerate--> <bitrate>380</bitrate> <!-- video bit rate in kb/s. To be adjusted according to the capacity of your DATV broadcast --> <quality>5</quality> <!-- Must be 5, can be less (to be tested...) --> <profile>0</profile> <!-- Must be 0 for the mainstream --> </videoenc></request> - Verify that the IP address of the encoder that starts the command line (Request URL) is that of the encoder box. The address of our configuration is the default encoder address of the encoder box which is 192.168.1.120. Click on SEND. The request is sent to the box. If the box has received your parameters, a green “200 OK” is displayed at the bottom of the Advanced REST client. It is thanks to this little line <audio>1</audio> that the audio will be available in your stream and then broadcast by PlutoDVB.
Please note that your encoder keeps this setting in memory, even after powering up again. You will then be able to use the automatic method directly (see below). Of course, and on the contrary, if you use the encoder reset function (accessible through the Setting / System menu, Maintain tab – factory reset button), this is no longer the case.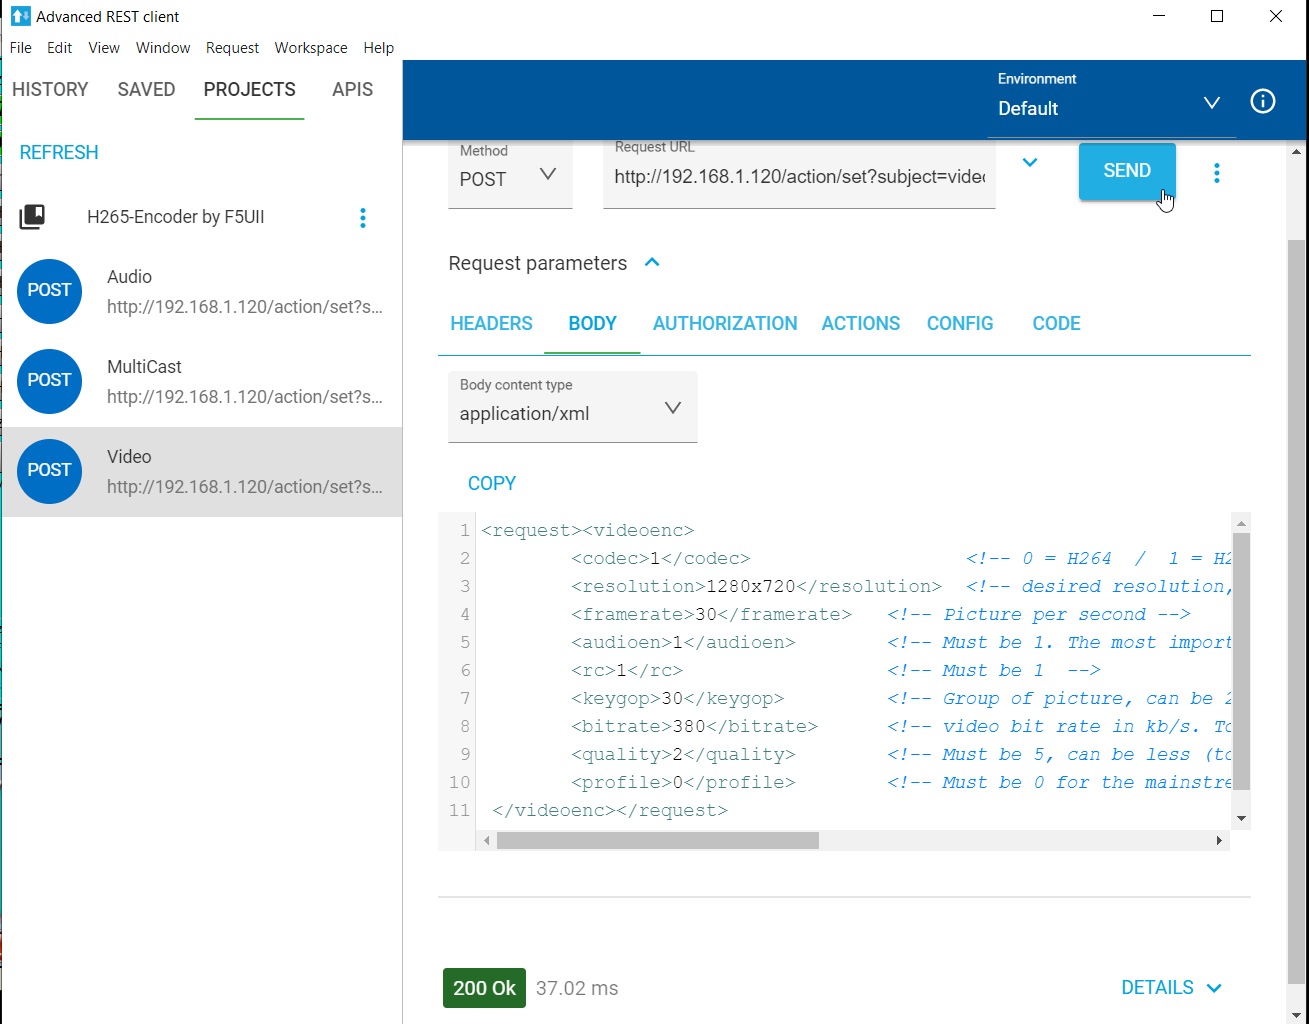
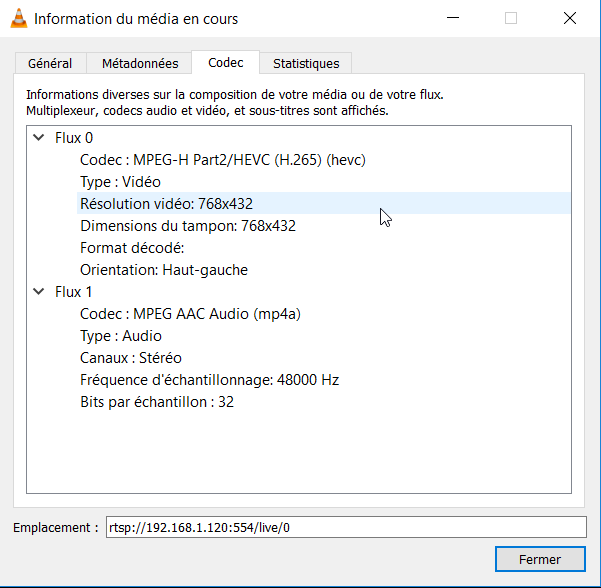
- You can check directly on the encoder page that your settings are the ones you just passed. Don’t worry if the definition area shows an empty field. This is normal if you ask for a definition that is not in the list of definitions offered by the interactive decoder page. The resolution is still taken into consideration. You can easily check this by connecting VLC to the RTSP stream. To do so, launch VLC (VideoLan). Open the network stream (Media Menu Open network stream or CTRL-N) of what the box is able to encode. The channel to connect is the Main stream which is numbered zero, by typing rtsp://192.168.1.120:554/live/0 in VLC. To display the definition, and check the codec used, do CTRL-J
- The audio request also allows you to configure the characteristics of your audio track. Again, after clicking SEND, you can see on the Settings / VideoAudio page, Audio tab of the encoder that your settings have been taken into account.
<request><audioenc> <channel>1</channel> <!-- 0 for mono 1 for stereo --> <bitrate>32000</bitrate> <!-- audio bitrate : 32000 48000 64000 128000 --> <codec>2</codec> <!-- Codec 0=G711U, 1=G711A, 2=AAC (good choice) --> <samples>48000</samples> <!-- Bitrate 32000 44100 48000 (good choice) --> <input>0</input> <!-- 0 for HDMI input 1 for Line in --> </audioenc></request> - The multicast request simply opens the mainstream streaming channel to the IP address of your Pluto. Customize your request by placing between the addr tags the IP address of your Pluto.
<request><multicast>

<mcast>
   <active>1</active>        <!-- 1 for enabled the stream -->
   <port>8282</port>         <!-- PlutoDVB request here 8282 -->
   <addr>192.168.1.8</addr>  <!-- PlutoSDR ip address here -->
</mcast>

<mcast>
   <active>0</active>    <!-- 0 for disabled this default stream -->
   <port>10001</port>
   <addr>224.1.2.3</addr>
</mcast>

<mcast>
   <active>0</active>	 <!-- 0 for disabled this default stream -->
   <port>10002</port>
   <addr>224.1.2.3</addr>
</mcast>
</multicast></request>
- We are ready to launch OBS Studio, the software you took in hand with the previous article ( Transmit digital television signals over Qatar Oscar 100 satellite )
Transmit your images with OBS Studio and the PlutoDVB Controller
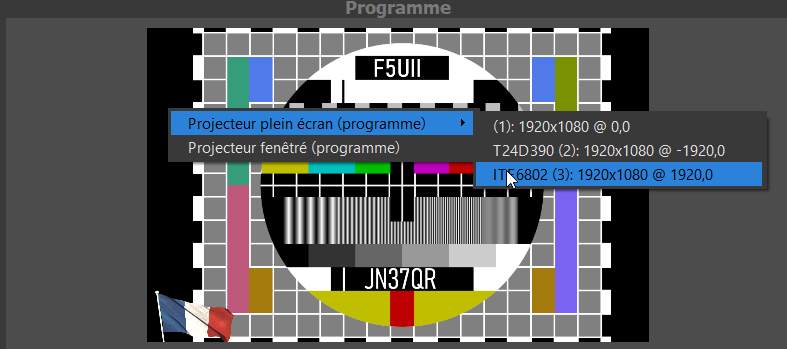
- When OBS Studio is started, the encoder being of course connected in HDMI on the same computer, right click on the Program screen, and choose the ITE6802 screen that corresponds to the encoder. This way your OBS Studio image is displayed at the HDMI input of your encoder. In VLC which is connected as an RTSP stream to the encoder, you should actually see the program image displayed there.
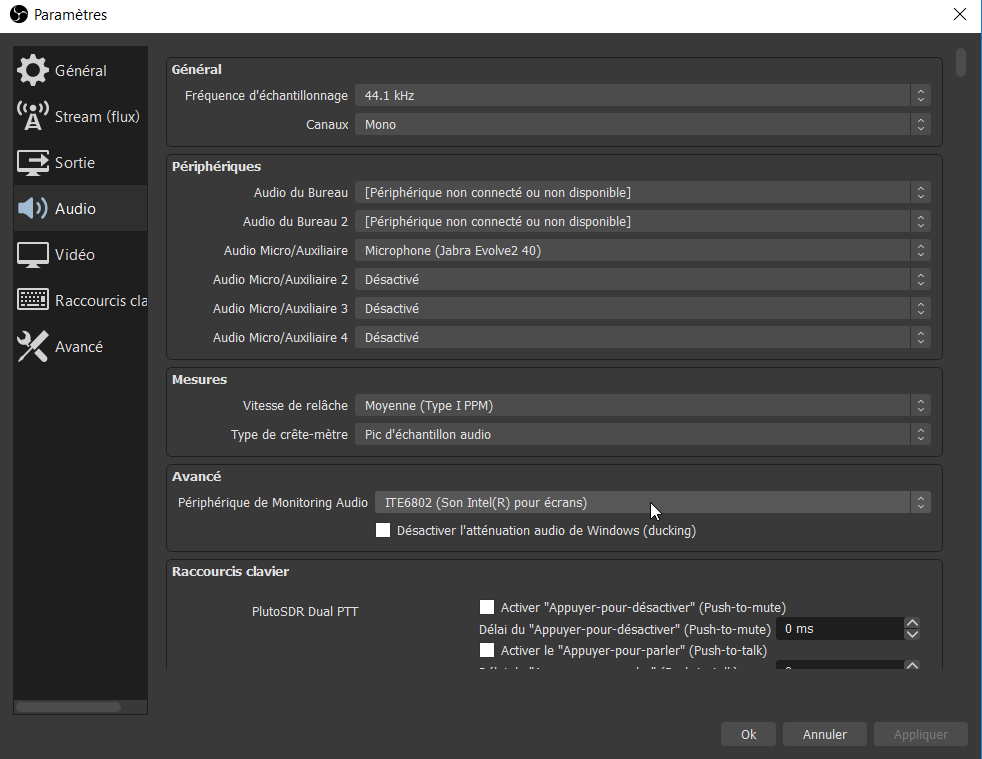
- Now for the sound, to make sure that the output sound arrives to the HDMI sound input, open the OBS Studio Settings panel, select the Audio tab. In the Audio Monitoring device (Advanced), select the ITE6802 output corresponding to the encoder. Validate the modification with OK.
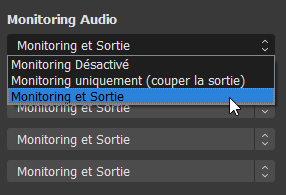
- On the audio channels of your different scenes, you need to activate the Monitoring output: Click on the audio channel setting wheel in the mixer, and choose Advanced Audio Properties.
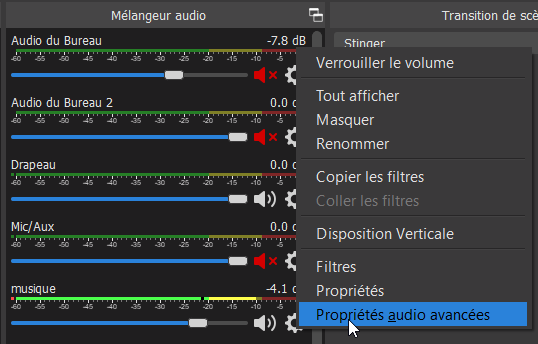
- Validate Monitoring and Output on audio channels.
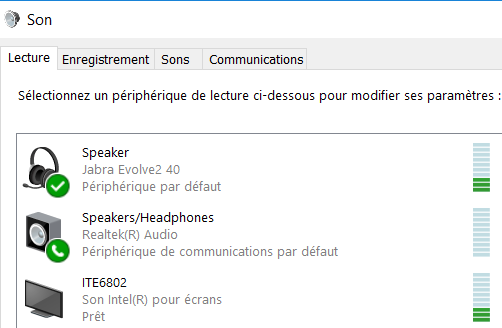
- To check that the sound is sent to the input of your encoder, open the Windows Sound panel to check the dynamic bar graph. (To launch this Sound panel, type Sound in the Windows search bar, or right-click on the taskbar speaker)

- The image and the sound are thus diffused, we can carry out the settings of the PlutoDVB Controller.
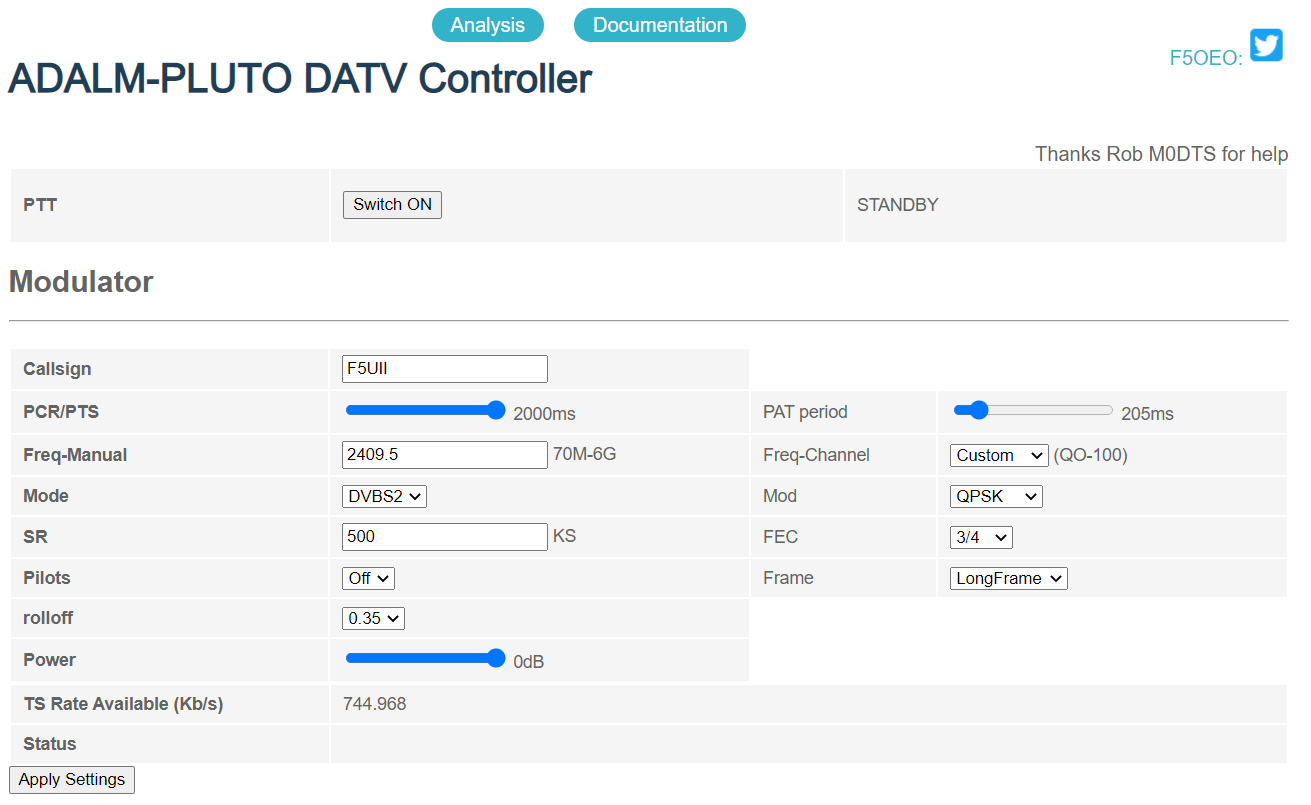
- Open the configuration page of your PlutoDVB, with your browser in which you will have entered its IP address. Open the Controller page.

-
In the Modulator section, enter your callsign and the usual characteristics of your DATV transmission: Frequency, Mode, Symbal Rate, FEC.
- On the encoder setting panel (Setting, Audio/Video, Video tab) determine the CBR rate that will suit your previously set transmission.
- Go back to PlutoDVB and now apply your settings using the Apply Settings button in the Modulator part.
- Check with the Analysis page that the flow rate is appropriate. If you have any doubts on this point, and it is important for a good transmission, I invite you to reread or review this part of the explanation given on this page. At the bottom of the Controller page, use the Save to flash button, to find all your settings the next time you restart the Adalm Pluto.
- The frequency is still free, so you can switch to transmit by pressing the PTT Switch ON button at the top of the page. The same button will be used to stop the transmission.
- During the broadcast, without interrupting the emission, you can change image settings such as resolution and CBR rate. You can make these changes from the encoder settings page, or with the REST client software. During these operations, watch your bitrate on the PlutoDVB Analysis page.
Merci pour ce guide.
Concernant la mise à jour des fichiers système par la clé USB, il faut un hub dit “OTG”, dans mon cas j’utilise un HAMA Hub USB 2 OTG (ou un hub standard + un câble OTG). Il semble également que le disque USB se monte pas automatiquement forcément sous /media/sda… Sur mon Pluto, il apparaît sous /media/sda1.
Voir nos discussions à ce sujet ici : https://forum.batc.org.uk/viewtopic.php?f=15&t=6626
73 qro de michel, hb9dug
(Translation)
Thank you for this guide.
Concerning the update of the system files by the USB key, you need a hub called “OTG”, in my case I use a HAMA Hub USB 2 OTG (or a standard hub + an OTG cable). It also seems that the USB disk doesn’t automatically mount itself under /media/sda… On my Pluto, it appears under /media/sda1.
See our discussions on this subject here: https://forum.batc.org.uk/viewtopic.php?f=15&t=6626
73 qro de michel, hb9dug
Merci Michel pour votre contribution intéressante,
73 Christian
(Translation)
Thank you Michel for your interesting contribution,
73 Christian
Greetings from New Zealand.
I notice that you have done some work with this inexpensive h264 encoder.
I have been trying to find out if it can encode 1080i50 as well as 1080p50
Would this be something you could test? It seems to be very difficult to find.
Best Regards,
Stuart.
(Traduction)
Salutations de la Nouvelle-Zélande.
Je remarque que vous avez fait un peu de travail avec ce codeur h264 peu coûteux.
J’ai essayé de savoir s’il pouvait encoder aussi bien le 1080i50 que le 1080p50
Serait-ce quelque chose que vous pourriez tester ? Il semble très difficile à trouver.
Bonne chance,
Stuart.
Stuart,
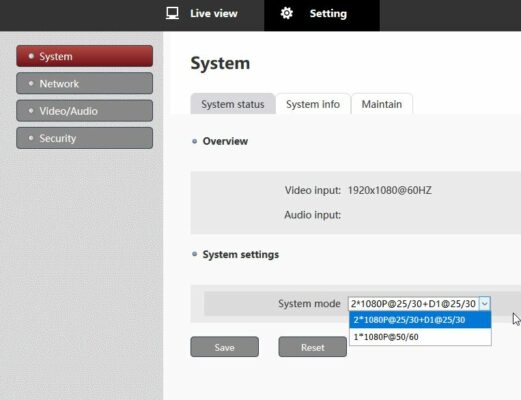
Here is a capture where we see that the output is indicated 1080p. Concerning the input I have no way to test the variant. I use a notebook, and I have no other source available. Sorry for the poor help.
Chris
(Traduction)
Stuart,
Voici une capture où l’on voit que la sortie est indiquée 1080p. Concernant l’entrée je n’ai pas moyen de tester la variante. J’utilise un notebook, et je n’ai pas d’autre source disponible. Désolé pour le peu d’aide.
Chris
Bonsoir.
Merci pour ce guide.
(Translation)
Good evening.
Thank you for this guide.
Hi all,
have got recently an encoder box ON-DMI-16E and there is on the video setup screen the option audio on / off and it works …
73 de Walter
OE2CAL
(Traduction)
Bonjour à tous,
J’ai récemment installé un encodeur ON-DMI-16E et il y a sur l’écran de configuration vidéo l’option audio on / off et ça marche …
73 de Walter
OE2CAL
Walter,
Yes it works since then thanks to the corrections made on the latest PlutoDVB alpha version firmware : https://www.f5uii.net/en/patch-plutodvb/
But it didn’t work with the brave versions mentioned in the article.
This would be a new article on my blog, especially with the new features brought by these recent alpha versions.
Good tests. 73
(Traduction)
Walter,
Oui cela fonctionne depuis avec les corrections apportés sur les derniers firmware PlutoDVB version alpha : https://www.f5uii.net/en/patch-plutodvb/
Mais cela ne fonctionnait pas avec les versions brave cité dans l’article.
Cela mériterait un nouvel article sur mon blog, notamment avec les nouvelles fonctions apportés par ces récentes versions alpha.
Bons tests. 73
Hi Christian,
Thankyou for the EXCELLENT! Perseverance firmware now using 0303
Is there a simple explanation on how to update the encoder with “patch.tgz 2021-02-14 16:42 4.1M”
Or is this not necessary when using Perseverance firmware?
So many new features like to try them all with my limited Knowledge.
Regards
Martin
G8KOE
Martin,
from a console this should be done by running /root/h265box/autotelnet.sh But I don’t know exactly on which version of the encoder this can be implemented…
Question may to be post on PlutoDVB group for a more detailed informations.
73
Hi Christian,
Followed your advice and now have the patch installed.
Just trying to understand using the encoder with patch.
Thanks again for your help.
73’s
Martin
Hi, I have on-dmi-16e encoder. Last night when I try to update my device( software ) just die( i think there was a problem whit my router and the update just stop) I looking for the diagram of the device or the data sheet of the EEPROM ( can’t find it anywhere). Regards Pawel
(Traduction)
Bonjour, j’ai un encodeur on-dmi-16e. La nuit dernière, lorsque j’ai essayé de mettre à jour mon appareil (logiciel), il s’est éteint (je pense qu’il y a eu un problème avec mon routeur et que la mise à jour s’est arrêtée). Je cherche le diagramme de l’appareil ou la fiche technique de l’EEPROM (je ne la trouve nulle part). Cordialement Pawel
I can’t help you. I have never come across these resources
(Traduction)
Je ne saurai pas vous aider. Je n’ai jamais croisé ces ressources