
La définition de l'image et compression
Now that we have some matter to broadcast, let’s see the settings expected by the Adalm Pluto and PlutoDVB. It integrates an RTMP server (Real-Time Messaging Protocol) which will receive the video stream sent by OBS Studio. It is mainly this server and the very simple way to broadcast the stream to the PlutoDVB that makes all its interest. The easy implementation of Evariste F5OEO’s firmware lies in the simplicity of a “line of parameters” sent from OBS to the Adalm Pluto. Let us see that in detail.
Video stream generation
- In the OBS settings (File/Settings), we will indicate the destination of PlutoSDR: In the Stream tab, choose the “Custom…” service.
- In the field “Stream key”, in the second line, indicate your callsign with 2 commas. In the first line Server, the RTMP server integrated in the Adalm Pluto will be indicated, as well as all the characteristics of the DATV transmission. Be careful not to forget one of the separating commas. Here is an example.
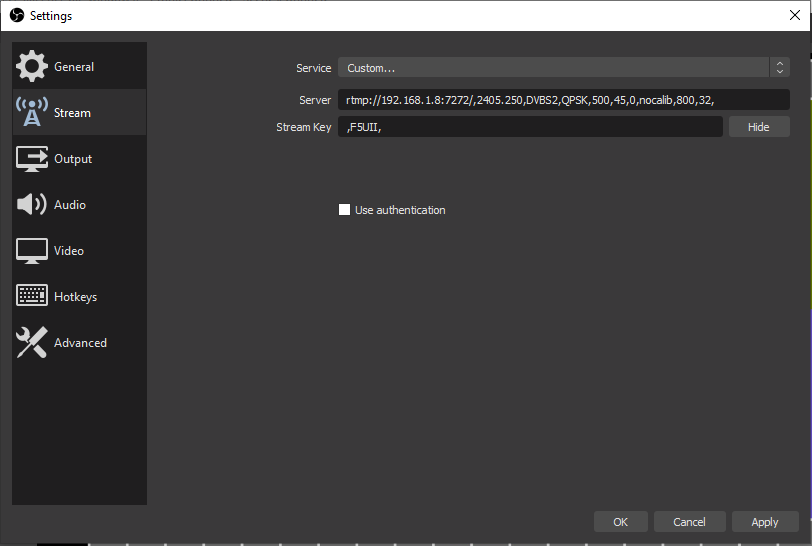
- Now let’s detail the parameters that constitute the line.
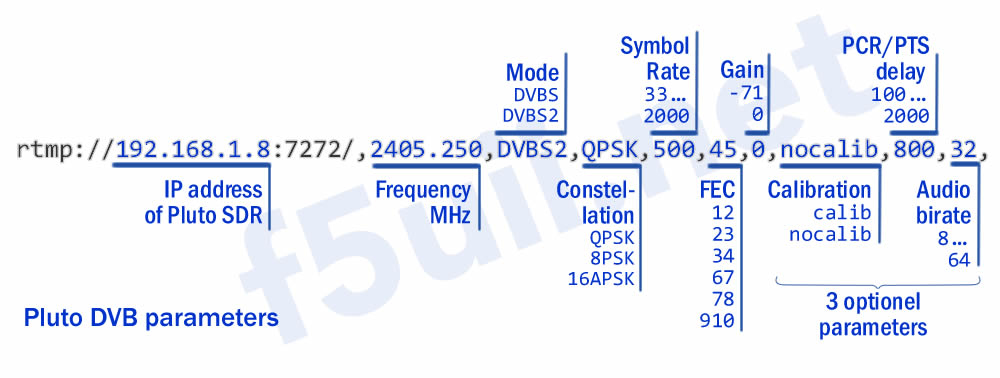
- The IP address is that of your Pluto. Connected in USB it is 192.168.2.1. If your Pluto is connected to the network, this is of course the IP address of your PlutoSDR on the network. Port 7272 is the default value to be used to transmit the video stream.
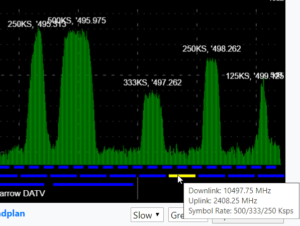
- The transmission frequency must be chosen in correlation with the bandwidth map of the Qatar Oscar 100 satellite’s wideband transponder and depends on the spectrum occupation and the Symbol Rate width you will be using. On the webSDR of the BATC eshail.batc.org.uk/wb a free channel is chosen and priority is given to the free narrowband portion. Refer to the rules specified in the chapter ‘QO-100 wideband operating guidelines and bandplan‘.
Select a free frequency
- The mode (usually DVB-S2).
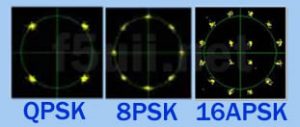
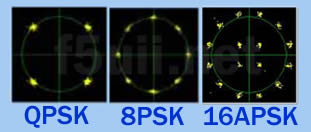
- The phase modulation constellation. For DVBS mode, only the QPSK constellation is possible.
- The SR is the symbol rate of the transmission. The SR is the main variable that determines the frequency bandwidth of your signal. Pluto DVB accepts from 33 to 2000 kS.
- FEC stands for Forward Correction Error. The FEC is a data ratio between the useful data (image, sound) and the data added to the transmission, which are used to a certain extent and according to the criteria of plausibility, to correct errors during decoding, errors caused by the hazards of the transmission. At the time of transmission, data are introduced which enable the receiver to reconstitute the useful information which would have been lost. The FEC can thus take values such as 14 for 1/4, 13=1/3, 25=2/5, 12=1/2, 35=3/5, 23=2/3, 34=3/4, 45=4/5, 56=5/6, 89=8/9, 910=9/10. This is the number of useful bits for the number of transmitted bits, for example: 3/5 corresponds to 3 useful bits for 5 transmitted bits, i.e. 2 used for correction.
- Gain is expressed in dBm, the maximum transmit signal is reached by setting the value to 0.
- The emission calibration (a maximum amplitude peak) can be generated with the calib value. (first of the optional parameters – not tested by me)
- The PCR/PTS delay can be increased if the encoding suffers from a lack of bitrate. We will come back to this in more detail. (optional parameter)
- The audio streaming rate can be limited by PlutoDVB (optional parameter). OBS Studio can only broadcast a minimum of 64 kbit/s of audio. It can therefore be interesting to switch to 32kbit/s and to make the video or correction stream benefit from this increased rate.

TS stream to PlutoDVB – Video bitrate
We will now tell OBS Studio the data rate we will send to PlutoDVB (the TS, Transport Stream), the definition of the transmitted image, and the compression encoding of the video stream.
Video bit rate
We will fill the TS (Video Transport Channel – Transport Stream) at a “Fixed Sample Rate” (CBR Constant Bit Rate). The CBR is calculated and depends on the mode (DVB_S, DVB_S2), the chosen constellation (QPSK, 8PSK…), the chosen symbol rate (which itself with the rolloff coefficient, defines the RF bandwidth occupied by your signal).
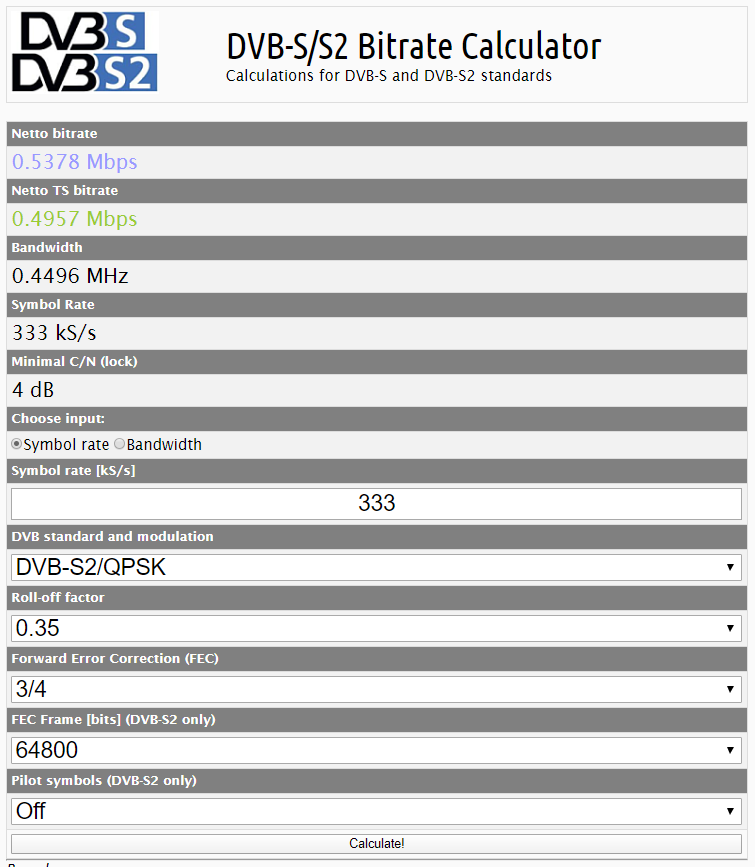
Calculators are available for calculating the flow rate. I quote here two online flow rate calculators.
Calculation on Satbroadcasts.com
- On Roks-tv.com
- On Satbroadcasts.com
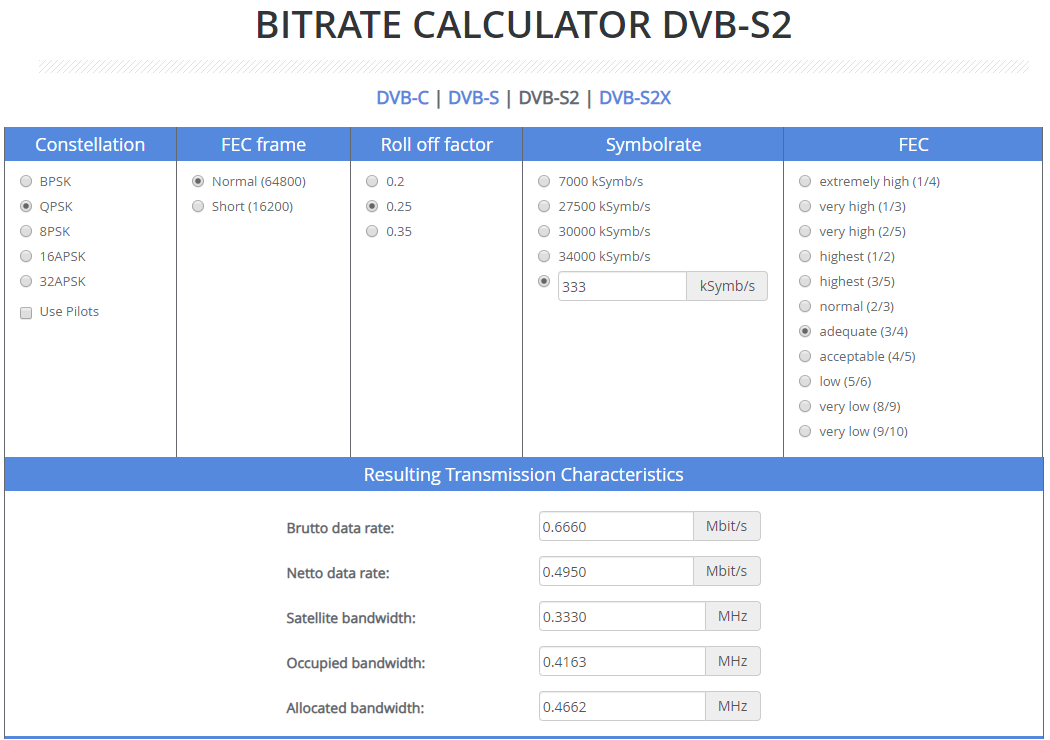
Calculation on roks-tv.com
For a “classic” DVB-S2 /QPSK transmission, in these tools, choose the constellation (QPSK), indicate that it is DVB-S2, and enter your choice of SymbolRate “width” (333 for example), and choose the FEC. This gives you the Netto TS bitrate value (Netto TS bitrate, or Netto data rate).
This total net bit rate value includes video, audio and also some other DVB “control” data (PMT – Program Map Table, PAT – Program Association Table, SDT – Service Description Table). Of course the largest data is of course the video itself.
To determine the video bit rate (VBR), we take between 60 and 70% of the net bit rate. The most important first step is that the bit rate is not too high. In the following table, you will find in the CBR column, the video bitrate values that I use myself (with the PTR/PTS delay buffer of 800, the default value used by PlutoDVB, and with forcing the audio bitrate to 32 kbps last parameter of the Stream line).
The table gives you the bit rates for a DVB-S2 signal in QPSK. The following pages of the table show the upper SRs.
FEC SymbolRate (kS/s) Brut data rate Netto data rate OBS CBR (kbps) Mini MER RX
extremely high (1/4) 125 250 61 -2.35
very high (1/3) 125 250 81 -1.24
very high (2/5) 125 250 98 -0.3
highest (1/2) 125 250 123 1
highest (3/5) 125 250 148 2.23
normal (2/3) 125 250 166 3.1
adequate (3/4) 125 250 185 4.03
acceptable (4/5) 125 250 198 72 4.68
low (5/6) 125 250 206 78 5.18
very low (8/9) 125 250 221 90 6.2
very low (9/10) 125 250 223 95 6.42
extremely high (1/4) 250 500 122 -2.35
very high (1/3) 250 500 162 -1.24
very high (2/5) 250 500 197 -0.3
highest (1/2) 250 500 247 1
highest (3/5) 250 500 297 2.23
normal (2/3) 250 500 332 3.1
adequate (3/4) 250 500 371 4.03
acceptable (4/5) 250 500 396 4.68
low (5/6) 250 500 412 280 5.18
very low (8/9) 250 500 442 6.2
very low (9/10) 250 500 447 6.42
extremely high (1/4) 333 666 163 -2.35
very high (1/3) 333 666 216 -1.24
very high (2/5) 333 666 262 -0.3
highest (1/2) 333 666 329 210 1
highest (3/5) 333 666 395 270 2.23
normal (2/3) 333 666 442 320 3.1
adequate (3/4) 333 666 495 380 4.03
acceptable (4/5) 333 666 528 410 4.68
low (5/6) 333 666 548 430 5.18
very low (8/9) 333 666 588 465 6.2
very low (9/10) 333 666 595 470 6.42
extremely high (1/4) 500 1000 245 -2.35
very high (1/3) 500 1000 324 210 -1.24
very high (2/5) 500 1000 394 270 -0.3
highest (1/2) 500 1000 494 370 1
highest (3/5) 500 1000 594 475 2.23
normal (2/3) 500 1000 664 540 3.1
adequate (3/4) 500 1000 743 620 4.03
acceptable (4/5) 500 1000 793 665 4.68
low (5/6) 500 1000 824 700 5.18
very low (8/9) 500 1000 884 760 6.2
very low (9/10) 500 1000 894 6.42
extremely high (1/4) 1000 2000 490 370 -2.35
very high (1/3) 1000 2000 649 530 -1.24
very high (2/5) 1000 2000 789 650 -0.3
highest (1/2) 1000 2000 988 830 1
highest (3/5) 1000 2000 1188 1030 2.23
normal (2/3) 1000 2000 1328 1140 3.1
adequate (3/4) 1000 2000 1487 1310 4.03
acceptable (4/5) 1000 2000 1587 4.68
low (5/6) 1000 2000 1648 5.18
very low (8/9) 1000 2000 1768 6.2
very low (9/10) 1000 2000 1788 6.42
 Let’s take the example of this signal: We will transmit a DVBS2 signal in QPSK and at 333 KS (kilo-symbols). We will start with a high correction rate 1/2 (i.e. 50% correction data). The CBR value is 220 kbps.
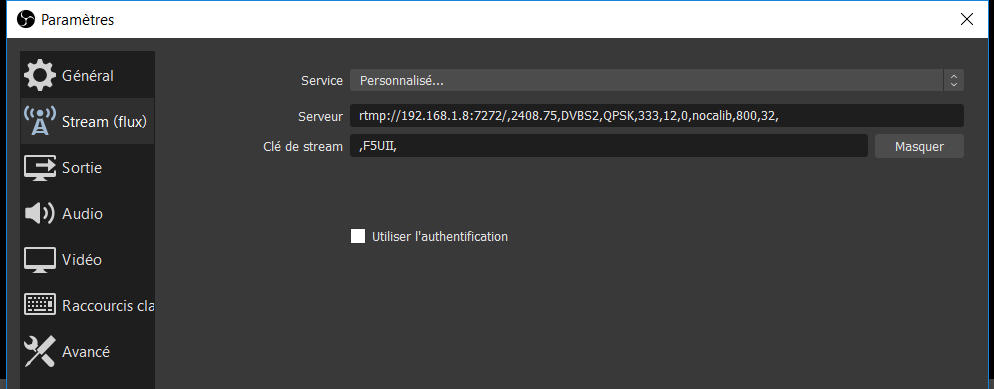
Let’s report this CBR value in OBS Studio :
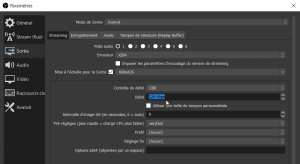
- Open the Settings panel (from the File menu, or directly from the command button, at the bottom right of the screen)
- Select the second line “Stream”
- Choose Service “Custom…”Enter the stream command line in the Stream tab to transmit to the satellite.
-
rtmp://192.168.1.8:7272/,2408.25,DVBS2,QPSK,333,12,0,nocalib,800,32,
and the stream key with your callsign enclosed in commas
,F5UII,
- Select the third line “Output”.
- We switch to the output mode to Avanced.
- Select the Streaming tab. We will enter the CBR rate
- Validate these settings by clicking on OK in the Settings window.
- We can switch to the transmit by clicking on the Start streaming command button. To make your first tests, I advise you not to transmit to QO100. After a few seconds, the transmission signal is effective. Note that the same button allows you to stop the transmission.
- If the Adalm Pluto is receiving the stream, in the bottom right corner of the OBS Studio window the green light appears.

Christian,
Congratulations, this is one of the Blog articles I’ve read about how to setup a DATV station for QO-100.
Thanks for sharing with the community.
73’s
Alex EA4BFK
(Traduction)
Christian,
Félicitations, c’est l’un des articles de blog que j’ai lu sur la façon d’installer une station DATV pour le QO-100.
Merci pour avoir partagé avec la communauté.
73’s
Alex EA4BFK
Merci Christian Superbe tuto !! A bientôt sur QO-100
73 de ON1RC
Chris
(Translation)
Thank you Christian Superb tuto ! See you soon on QO-100
73 from ON1RC
Chris
Bonjour Christian
Mais quel superbe outil de travail, moi qui suis totalement néophyte dans le mode DATVet dans l’utilisation du logiciel OBS.
Me voici équipé pour comprendre le fonctionnement et pouvoir parfaire mon installation.
Félicitations pour la qualité de tes tutos qui sans nul doute vont être un fabuleux tremplin à beaucoup pour créer sa station.
73 cordialement salutations et au plaisir de te retrouver sur le satellite Q0-100. F3CJ
(Translation)
Hello Christian
But what a great tool, I’m a total neophyte in the DATVet mode in the use of OBS software.
Here I am equipped to understand how it works and to be able to perfect my installation.
Congratulations for the quality of your tutorials which will undoubtedly be a fabulous springboard for many to create their station.
73 cordially greetings and I look forward to seeing you on the Q0-100 satellite. F3CJ
Merci beaucoup Christian.
Des informations très précises et détaillées.
Superbe.
73 de Aitor F4VTB EB2AT
(Translation)
Thank you very much, Christian.
Very precise and detailed information.
Superb.
73 of Aitor F4VTB EB2AT
Thanks for the wonderful guide. Very comprehensive. Thanks again for sharing your experiences. With gratitude 73 de Ros i4wrm
(Traduction)
Merci pour le merveilleux guide. Très complet. Merci encore de partager vos expériences. Avec reconnaissance 73 de Ros i4wrm
Bonsoir Christian F5UII,
Merci pour votre tuto, très instructif. J’ai échangé avec Pascal F4BRF et Nicolas FR4LI au sujet de la modification à base de 2 x 4N35 (montage vu sur le net pour l’ADALM PLUTO).L’idée, une commutation TX/RX pour la partie amplificateur SG-LAB depuis le PLUTO.
J’aimerai avoir votre avis avisé sur le sujet svp. En vous remerciant par avance.
Au plaisir de vous lire Christian F5UII.
73 de Axel FR5GS
(Translation)
Good evening Christian F5UII,
Thank you for your tutorial, very informative. I discussed with Pascal F4BRF and Nicolas FR4LI about the modification based on 2 x 4N35 (assembly seen on the net for the ADALM PLUTO) The idea, a TX/RX switching for the SG-LAB amplifier part from the PLUTO.
I would like to have your opinion on the subject please. Thank you in advance.
Looking forward to reading you Christian F5UII.
73 from Axel FR5GS
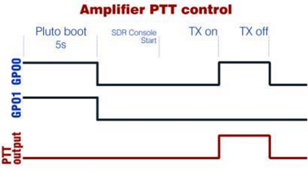
Oui, le logiciel SDR Console et également le firmware PlutoDVB d’Evariste F5OEO pilotent les sorties GPO0 et GPO1 lorsque l’on passe en émission. On utilise les 2 sorties car toutes les deux passent en émission à la mise sous tension du Pluto pendant environ 5 secondes.
On trouve deux schémas permettant la commutation PTT, l’un à base d’optocoupleurs, l’autre à base de transistor et relais reed. J’ai choisi de mettre en œuvre la seconde technique, avec double circuit de commutation, permettant d’alimenter distinctement 2 sorties indépendantes. Une commande groupée sera certainement prochainement proposée. Tous les détails sur cette page.
Il existe une autre solution, mais que je ne conseille pas au vu du risque engagé sur le Pluto. Il s’agit de celle qui consiste à détecter l’activité du bit0 du bus 12 bits du convertisseur numérique /analogique. Pour la curiosité, je vous laisse découvrir cette mise en œuvre de DH1NFJ sur ce site internet (langue allemande).
(Translation)

Yes, the SDR Console software and also the PlutoDVB firmware of Evariste F5OEO drive the GPO0 and GPO1 outputs when you switch to transmission. Both outputs are used because they both switch to transmission when the Pluto is switched on for about 5 seconds.
We find two schematics for PTT switching, one based on optocouplers, the other based on transistor and reed relay. I chose to implement the second technique, with a double switching circuit, allowing to supply separately independent 2 outputs. A grouped order will certainly be proposed soon. All details on this page.
There is another solution, but which I do not advise in view of the risk involved on the Pluto. It is the one which consists in detecting the activity of bit0 of the 12 bits bus of the digital/analog converter. For curiosity, I let you discover this implementation of DH1NFJ on this website (German language).
Bonsoir Christian,
Merci pour toutes ces informations. Inscription faite de mon côté pour la prochaine commande groupée (PTT Pluto). 73 de Axel FR5GS
(Translation)
Good evening, Christian,
Thank you for all this information. Registration made on my side for the next group order (PTT Pluto). 73 from Axel FR5GS
Christian,
Congratulations, for great work.
Thanks for sharing with the community.
Jose EA3HMJ
(Translation)
Christian,
Félicitations, pour votre excellent travail.
Merci d’avoir partagé avec la communauté.
Jose EA3HMJ
Bonjour Christian,
Merci pour vos articles qui nous permettre d’avancer sur la construction de notre deuxième station DATV à l’Ile de la Réunion. Nous sommes actuellement actif sur QO100 en bande étroite.
La station DATV est en cours de construction en suivant à la lettre votre tuto.
Nous recherchons un système à base d’Arduino capable de mettre off le PA du SG Lab lors d’un SWR élevé et qui serait capable de faire les mesures de puissance OUT/IN. Ceci en utilisant les points de mesures en tension prévu à cet effet. Avez vous une idée si un Om c’est déjà penché sur la question.
Par avance merci,
Nicolas Dhiver
FR4LI
(Translation)
Hello, Christian,
Thank you for your articles which will allow us to progress on the construction of our second DATV station in Reunion Island. We are currently active on QO100 in narrowband.
The DATV station is under construction following your tuto to the letter.
We are looking for an Arduino based system able to turn off the SG Lab PA at high SWR and which would be able to make OUT/IN power measurements. This by using the voltage measurement points provided for this purpose. Do you have an idea if an Om has already looked into the matter.
Thank you in advance,
Nicolas Dhiver
FR4LI
This is a great guide, helped me a lot. Merci!
Ed PY2RN
(Traduction)
C’est un excellent guide, qui m’a beaucoup aidé. Merci !
Ed PY2RN
Bonjour Christian,
La petite carte PTT à base de transistor et relais reed, est-ce-qu’ elle marche également avec le firmware standard de Analog Devices dans le Pluto, ou uniquement avec le firmware F5OEO?
My best 73
Rudy
(Translation)
Hello, Christian,
The small PTT card based on transistor and reed relay, does it also work with Analog Devices standard firmware in Pluto, or only with F5OEO firmware?
My best 73
Rudy
Bonjour Rudy,
La carte exploite le changement d’état de la voie GP0, et GP1 qui, lui, bloque le passage à l’émission lorsque le Pluto démarre (GP1 actif en même temps que GP0 au démarrage). Elle est compatible avec les logiciels qui font commande le GP0 au passage en émission du pluto. C’est le cas en effet PlutoDVB d’Evarise F5OEO et SDRConsole de Simon G4ELI. Peut être d’autres le propose… ou le proposeront.
D’après ce qui est indiqué sur le wiki de l’Analog Device, on doit pouvoir ajouter cette instruction (entre autres lignes) pour ajouter la commande automatique de la voie GP0.
iio_attr -a -D ad9361-phy adi,gpo0-slave-tx-enable 1Bons essais. N’hésitez pas à partager vos conclusions ici.
73 Christian
(Translation)
Hello, Rudy,
The board exploits the state change of channel GP0, and GP1 which locks the switch to transmit when the Pluto starts (GP1 active at the same time as GP0 at start up). It is compatible with the software that controls GP0 when the Pluto is transmitting. This is indeed the case of PlutoDVB from Evarise F5OEO and SDRConsole from Simon G4ELI. Maybe others propose it… or will propose it.
According to the wiki of the Analog Device, it should be possible to add this instruction (among other lines) to add automatic GP0 channel control.
iio_attr -a -D ad9361-phy adi,gpo0-slave-tx-enable 1Good try. Feel free to share your findings here.
73 Christian
Wonderfull site and good OM thanks for all your time
GRTZ the Alain ON7ATV
(Traduction)
Site merveilleux et bon OM merci pour tout le temps passé
GRTZ le Alain ON7ATV
Hi guys,
thanks for the great tutorial. i have some questions please: software update done, when i enter the IP of my Pluto then i get to the welcome page as described, but the essential tabs : CONTROLLER, ANALYSIS, DONATE are missing, instead there are another one. Do these tools still exist? and where? What mistake am I making?
Sincerely Peter OE5PLN
(Traduction)
Salut les gars,
Merci pour ce super tutoriel. J’ai quelques questions s’il vous plaît : la mise à jour du logiciel est faite, quand j’entre l’IP de mon Pluto alors j’arrive à la page de bienvenue comme décrit, mais les onglets essentiels : CONTROLLER, ANALYSIS, DONATE sont manquants, à la place il y en a un autre. Ces outils existent-ils encore ? et où ? Quelle erreur est-ce que je fais ?
Salutations Peter OE5PLN
Which version 0303 : From the landing page, click on “Let’sgo to PlutoDVB”, then you reach the PlutoDVB with menu :
Have fun, 73
(Traduction)
Quelle version 0303 : Depuis la page de démarrage, cliquer sur “Let’sgo to PlutoDVB”, pour atteindre PlutoDVB et son menu :
Bon amusement, 73
I have now installed a new firmware , beta for the brave, now it shows me the right page.
73 de Peter oe5pln
(Traduction)
J’ai maintenant installé un nouveau firmware, beta pour les courageux, maintenant il me montre la bonne page.
73 de Peter oe5pln
This is not the way the story goes, but if it suits you.
The main firmwares can be found on this page https://www.f5uii.net/en/patch-plutodvb/
73 de Chris
(Traduction)
Ce n’est pas le sens de l’histoire, mais si cela vous convient.
Les principaux firmwares se trouvent sur cette page https://www.f5uii.net/en/patch-plutodvb/
73 de Chris
Bonjour Christian,
Dis moi j’ai un soucis qui me chagrine, car c’est risqué pour le PA.
J’utilise le firm 0303 + patch pour le Pluto RevD, et lorsque je lance l’interface web, le Pluto part en emission par défaut. J’ai vu qu’il y avait un switch dans le setup, mais ca ne change pas grand chose me semble t il.
Voilà j’aurai voulu ton avis.
Mes amities franck f1ssf
(Translation)
Hello Christian,
Tell me I have a problem that bothers me, because it is risky for the PA.
I use the firm 0303 + patch for the Pluto RevD, and when I launch the web interface, the Pluto goes into emission by default. I saw that there was a switch in the setup, but it doesn’t seem to change much.
Here I would have liked your opinion.
My friends franck f1ssf
En mode DATV : en stream UDP, c’est le bouton Switch/PTT (F10) de la page Controller, qui fait passer l’émission en route. en stream RTMP, l’émission est automatiquement assuré lors de l’arrivé du flux.
En mode passant : l’émission est piloté par SDR Console qui change le niveau émission (-40dBm = PTT off) piloté habituellement par SDR Console. détails code source
Le bouton “Transmission permitted at start-up” doit fonctionner pour le mode DATV.
(Translation)
In DATV mode in UDP stream, it is the Switch/PTT button (F10) of the Controller page, which switches the transmission on. In RTMP stream, the transmission is automatically assured when the stream arrives.
In passtrought mode, the transmission is controlled by SDR Console which changes the transmission level (-40dBm = PTT off) usually controlled by SDR Console. code source details
The “Transmission permitted at start-up” button must operate for the DATV mode.
Salut Christian,
J’avais pommé le message. Oui je suis bien en UDP stream, et pourtant des que j’accede a l’interface je passe en TX. Alors il est peut être possible, comme j’ai un boitier H265 qui stream en RTMP en permanence, que ce soit cela. Merci pour les precision, je vérifierai ce weekend.
Et c’est quoi exactement le switch PPT at the startup ?
73 Franck F1SSF
(Translation)
Hi Christian
It’s not conclusive, I cut all the input streams.
I’m not sure if it’s a good idea to use the same software as the one I’m using now. Thanks for the code, but I didn’t catch it all to be honest. 73 franck f1ssf/42
Salut Christian
C’est pas concluant, j’ai coupé tous les flux en input.
Malgres cela il passe en TX sans que je demande aléatoirement. Merci pour le code, mais j’ai pas tout capté pour etre franc. 73 franck f1ssf/42
(Translation)
Hi Christian
It’s not conclusive, I cut all the input streams.
I’m not sure if it’s a good idea to use the same software as the one I’m using now. Thanks for the code, but I didn’t catch it all to be honest. 73 franck f1ssf/42
Hello i have last version firm pluto , and win is 8.1 the soft OBS can not be connected PLUTO, OBS usb connect continuous message connection, disconnection, please one solution
(Traduction)
Bonjour, j’ai la dernière version de pluto, et win 8.1 le soft OBS ne peut pas être connecté à PLUTO, OBS usb connect message continu connexion, déconnexion, s’il vous plaît une solution.
Yiannis,
You may be streaming in RTMP. Try checking/testing with the flow control is CBR and a lowered flow value.(Parameters / Output / streaming tab)
(Traduction)
Yiannis,
vous streamer peut être en RTMP. Essayer de vérifier/tester avec le controle de débit est CBR et une valeur abaissée de débit. (Paramètres / Sortie / Onglet Streaming)
Hi Christian,
I’m writing an iMac application to control & monitor a remote DATV / QO-100 ground station over my LAN. It’s all but finished, except that I’d don’t know how send configuration commands to the Pluto F5OEO firmware.
Ultimately, I’d like to also have Pluto return the internal temperatures – which I think can be done via a bash script over SSH. So, perhaps SSH could write to a Pluto file that the F5OEO firmware would pickup.
Any help you can provide will be very much appreciated. All I have on GitHub so far is a screenshot – https://github.com/ea7kir/SatController
Sorry to bother you, but you may be my only hope.
Michael EA7KIR
(Traduction)
Bonjour Christian,
Je suis en train d’écrire une application iMac pour contrôler et surveiller une station terrestre DATV / QO-100 à distance via mon réseau local. C’est presque terminé, sauf que je ne sais pas comment envoyer des commandes de configuration au firmware Pluto F5OEO.
En fin de compte, j’aimerais aussi que Pluto renvoie les températures internes – ce qui, je pense, peut être fait via un script bash sur SSH. Donc, peut-être que SSH pourrait écrire dans un fichier Pluto que le firmware F5OEO ramasserait.
Toute aide que vous pouvez fournir sera très appréciée. Tout ce que j’ai sur GitHub jusqu’à présent est une capture d’écran – https://github.com/ea7kir/SatController.
Désolé de vous déranger, mais vous êtes peut-être mon seul espoir.
Michael EA7KIR
Michel,
Here for you : GitHub PlutoDVB
(Traduction)
Michel,
Voilà pour vous : GitHub PlutoDVB
Bonjour
Avec la révision B de Adalm Phuto est il possible de passer du firmware 0201 à 0303 ?
Merci pour votre réponse
73 Philippe
F5AOD
(Translation)
Hello
With the revision B of Adalm Phuto is it possible to go from firmware 0201 to 0303?
Thanks for your answer
73 Philippe
F5AOD
Aucun problème, puisque développer justement sur celle ci.
(Translation)
No problem, since it is precisely on this one that we develop.
Bonjour, je suis entrain de faire une station d’emission datv avec ADALM Pluto pouvez vous me dire si la config que vous preconisé est toujours la meme et qu’il est possible de suivre ce tuto meme si le pluto est en rev C ou D et utiliser le fw 0.31 merci de votre reponse et super tuto merci d’avance
(Translation)
Hello, I am making a datv broadcast station with ADALM Pluto can you tell me if the configuration that you recommend is still the same and that it is possible to follow this tuto even if the pluto is in rev C or D and use the fw 0.31 thank you for your answer and great tuto thank you in advance
Vous n’avez plus besoin de mettre à jour le firmware Analog puisque celui ci vient avec le firmware personnalisé.
Je vous conseille de vous rendre sur cette page des logiciels PlutoDVB ou vous choisirez
– la version PlutoDVB perseverance firmware 0303 auquel vous ajouterez le patch dans un second temps “PlutoDVB Patch Detection Hardware Revision firmware perseverance 0303.zip”
– ou l’ancienne version “PlutoDVB firmware 0201” auquel vous ajouterez le patch dans un second temps “PlutoDVB Patch Detection Hardware Revision firmware 0201.zip ”
73 et à bientôt sur le WB transpondeur QO-100
(Translation)
You don’t need to update the Analog firmware anymore since it comes with the custom firmware.
I advise you to go on this PlutoDVB download page where you will choose
– the PlutoDVB perseverance firmware 0303 version to which you will add the patch in a second time “PlutoDVB Patch Detection Hardware Revision firmware perseverance 0303.zip
– or the old version “PlutoDVB firmware 0201” to which you will add the patch in a second time “PlutoDVB Patch Detection Hardware Revision firmware 0201.zip ”
73 and see you soon on the WB transponder QO-100
Hi Christian,
last days, I tried different versions of DATV FW for the Adalm Pluto.
I found out that max output power of the Pluto is different with different FW versions. For example with FW 0303 perseverance max otput of the Pluto is about 0,22mW (500kSymb/sec) and with FW2711 I got about 0,62mW.
Is there any power limitation in the FW? I always had the power scroll bar at maximum.
Do you or any otherone have any idea about that?
By the way, is 0303 the latest version?
Vy73 de Achim, DL3RY
Yes there are some power variation in relation of the firmware. The 0303 is our lastest version
73 Christian F5UII
Bonjour
j’ai une tete Lnb Tête LNB Othernet Bullseye et un Adam Pluto et un Bias-t que faut-il de plus dans la liaison
Lnb Adam pluto pour pouvoir passer en emission datv
merci 73’s de F5pzq Kris
(Translation)
Hello
I have a Lnb Tête LNB Othernet Bullseye and an Adam Pluto and a Bias-t. What more do I need in the link?
Lnb Adam pluto to be able to pass in emission datv
thank you 73’s from F5pzq Kris
Le LNB sert à la réception. Pour réaliser la réception des images, il vous faut utiliser un tuner tel le minitiouner ou décoder un flux SDR par exemple avec SDRAngel.
Pour l’émission la chaine est en parallèle de la réception, tel que décrit dans mes articles.
(Translation)
The LNB is used for reception. To receive images, you need to use a tuner such as the minitiouner, or decode an SDR stream using SDRAngel, for example.
For transmission, the chain runs in parallel with reception, as described in my articles.
Bonjour Christian
D’abord merci pour votre site une mine d or
malheureusement je n’ai pas trouvé réponse a mon problème
Mon pluto n’ai pas reconnu en usb imposible de charger le drivers 201
j’ai chargé les fichiers dfu sans problème
mais toujours pas reconnu sur l’exploreur
peut on charger le drivers 201 par le reseau avec Winspc et ou ?
merci d’avance pour votre aide
73
Michel F6FGD
(Translation)
Hello Christian
First of all, thank you for your site, a gold mine.
Unfortunately I have not found an answer to my problem
My pluto was not recognized in usb impossible to load the drivers 201
I loaded the dfu files without any problem
but still not recognized on the explorer
can you load the 201 drivers via the network with Winspc and where?
thank you in advance for your help
73
Michel F6FGD
Michel,
Merci pour vos mots d’encouragements
Je vous invite à télécharger et installer les derniers drivers USB fournir par le constructeur Analog tel que présenté sur cette page https://wiki.analog.com/university/tools/pluto/drivers/windows pour espérer permettre à ce que le Pluto apparaisse comme un lecteur sous Ce PC Windows.
Espérant que cela puisse répondre à vos attentes. 73 Christian
(Translation)
Michel,
Thank you for your words of encouragement.
I invite you to download and install the latest USB drivers provided by the manufacturer Analog as presented on this page https://wiki.analog.com/university/tools/pluto/drivers/windows to hope to allow the Pluto to appear as a player under Windows PC.
I hope this will meet your expectations. 73 Christian
Bonjour
Merci pour la réponse
mais l’avais déjà téléchargé mais sans résultat
un om ma prêté sont pluto et ça fonctionne donc c’est bien mon pluto qui est en panne
je cherche comment charger le 201 par le réseau si c’est possible ??
merci
73 Michel F6FGD
(Translation)
Hello
Thanks for the reply
but I had already downloaded it with no result
an om lent me his pluto and it works so it’s really my pluto that’s broken down
I’m looking for a way to load the 201 via the network if that’s possible?
Thank you
73 Michel F6FGD
Sur le firmware d’origine, il y a pas à ma connaissance de chargement de firmware possible via réseau.
Vu l’impossibilité d’accès en USB au Pluto, jJe suggère une remise à zéro du DFU. Voir https://www.hb9afo.ch/articles/pluto/default.htm (“Régénération du firmware en mode DFU”)
Bons essais, 73
(Translation)
As far as I know, the original firmware does not allow firmware to be loaded via the network.
Given the impossibility of accessing the Pluto via USB, I suggest resetting the DFU. See https://www.hb9afo.ch/articles/pluto/default.htm (“Firmware regeneration in DFU mode”)
Nice try, 73
Hi I am using a H265/H264 hardware encoder with a Pluto to make a 1080HD 2Ms/s repeater output, however I also want to put up a 2nd signal using the hardware encoder but at a very low symbol rate but the hardware encoder has the same audio rate for both its streams. So I would like the second Pluto to re-encode the audio from 128k down to 32k – I am guessing there is almost certainly a .sh file I can hard code this in the Pluto? Or I can pass the command string as used for OBS from the stream output options in the encoder.
Can you guide me to which file please.
Paul G6MNJ
(Traduction)
Bonjour, j’utilise un encodeur matériel H265/H264 avec un Pluto pour faire une sortie répétiteur 1080HD 2Ms/s, cependant je veux aussi mettre un 2ème signal en utilisant l’encodeur matériel mais à un taux de symbole très bas mais l’encodeur matériel a le même taux audio pour ses deux flux. J’aimerais donc que le second Pluto réencode l’audio de 128k à 32k. Je suppose qu’il existe certainement un fichier .sh permettant de coder en dur cette opération dans le Pluto ? Ou bien je peux passer la chaîne de commande utilisée pour OBS à partir des options de sortie du flux dans l’encodeur.
Pouvez-vous me guider vers ce fichier, s’il vous plaît ?
Paul G6MNJ
Amigo parabens pels explicaçoes !Eu utilizo um Dx Patrol e um Radio Kenwood Ts450 em 10m para transmitir no QO-100 então não seria possivel transmitir DATV correto ?
(English)
Amigo, congratulations on the explanations! I use a Dx Patrol and a Kenwood TS450 on 10m to transmit on QO-100, so it wouldn’t be possible to transmit DATV, right?
(En Français)
Amigo, félicitations pour les explications ! J’utilise un Dx Patrol et un Kenwood TS450 en 10m pour transmettre sur le QO-100, donc il ne serait pas possible de transmettre du DATV, n’est-ce pas ?”
(English)
You got it all. This transmission chain is not capable of handling wide signals modulated in DVBS2.
(Français)
Vous avez tout compris. Cette chaine d’émission n’est pas capable de faire transité des signaux larges modulé en DVBS2.
Bonjour,
Pourrais-tu m’indiquer la commande à mettre dans Obs pour sortir une porteuse sans modulation navec le Pluto ? Merci.
F3YX
(Translation)
Hello,
Could you tell me what command to enter in Obs to output an unmodulated carrier using Pluto? Thanks.
F3YX
Avec la version la plus récente https://github.com/F5OEO/pluto-ori-ps qui est pilotable par MQTT. Les modes disponibles sont indiqués ici : https://github.com/F5OEO/pluto-ori-ps/wiki#stream-mode
Il existe un mot de test qui est génère une mire et un signal audio de test
(Translation)
With the latest version https://github.com/F5OEO/pluto-ori-ps, which can be controlled via MQTT. The available modes are listed here: https://github.com/F5OEO/pluto-ori-ps/wiki#stream-mode
There is a test word that generates a test pattern and a test audio signal